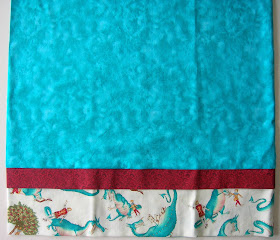
I have had a fun time making Fancy Pillowcases this last week. I thought I'd share with you how to do it. In my post about the Fancy Pillowcases, I mentioned that I'm picky about the bed linens matching. Well, truth be told, I'm pretty picky about pretty much everything. So, without further ado:
Fancy Pillowcase Instructions: Picky Version
Downloadable, printable version of this tutorial
Here's what you'll need:
⅞ yard main fabric
⅓ yard hem fabric
¼ yard accent fabric
Matching thread
Iron
Rotary Cutter
Cutting Mat
Rulers
Chocolate
Wash, dry and press all fabrics. {Yes, really. But eat the chocolate while the fabric is in the spin cycle. It makes the waiting much more pleasant. [And if you like to get really picky, may I recommend you serge the raw edges of your fabrics before washing.] Washing and drying shrinks the fabric before you make it into something beautiful. If it shrinks after it is made into something beautiful, sometimes it isn't so beautiful anymore. Pressing helps with a nicer finished project.}
Square up your fabrics. Sometimes the manufacturing process pulls fabric off-grain as it is rolled onto the bolts. Washing, drying and pressing helps to pull your fabric to the straight-of-grain {I usually starch too, but we want the pillowcase to be soft and ready-to-use, so I'd suggest skipping that step for this particular project}. After you have pressed the fabric fold it in half lengthwise, bringing the selvage edges together {like it was on the bolt}. If the fabric puckers at the fold in the center, it means that the fabric was not cut on-grain. Slide the selvages opposite of each other, but keep them parallel with each other until the pucker at the fold disappears and the fabric hangs straight. If the fabric was cut off-grain, the raw edges will not line up with each other anymore and one layer of fabric will be longer than the other both ends. Cut perpendicular to the fold and selvage edges, and this will put the fabric back on grain.
Cut the main fabric to 27½" x width of fabric
Cut the hem fabric to 10½" x width of fabric
Cut the accent fabric to 3½" x width of fabric
{Yes, really. I had you buy extra fabric just for the purposes of shrinkage and squaring up -- which means something completely different to Lydia and Kate than it does in this context. But that's a rant for another day. This means a nicer pillowcase when you're all finished.}
Place the fabrics on top of each other with the folded edges even. Cut away the selvage of all three fabrics {about ½" in from the outside edge} at the width of the narrowest fabric. {No, you don't have to measure. Just make sure your folded edges are lined up. Really. I know, I said I was picky, but I'm only picky about the really important things.}
With right sides together and using a ¼” seam, sew across the width of the fabric along the top edge of the pillowcase. Start at the raw edge and sew to the fold. Sew down the length of the fabric along the raw edges from the top to the bottom. Sew two separate, intersecting seams. This helps to make a nicer corner when the pillowcase is turned.
Finish the raw edges of the inside of the pillowcase. You can either serge {recommended} or zig-zag stitch around the edges.
With right sides together and using a ¼” seam, sew the length {the edges that used to be selvage} of the hem fabric together to form a circle that is 10½" tall. Repeat with the accent fabric, finishing with a circle that is 3½" tall. You will have two separate pieces of fabric. In the picture, it kinda looks like they are somehow sewn together. Press the seams open.
Turn the pillowcase right-side out, Press the seams flat. Fold the hem fabric in half along the width of the fabric, bringing the raw edges together so that you have a tube of fabric that is 5¼" tall. Repeat for the accent fabric, finishing with a tube that is 1¾" tall. Place the hem fabric tube inside of the accent fabric tube, matching the seams. Mark into quarters with pins. Mark the bottom edge of the pillowcase in quarters. Matching the side seam of the pillowcase with the seam in the hem and accent fabrics, pin the right side of the pillowcase with the accent in between the hem fabric and the pillowcase using the quarter-mark pins to line the pieces up evenly. Sew the accent and hem to the bottom of the pillowcase using a ¼" seam.
Finish the raw edge where you attached the hem and accent to the pillowcase by serging or zig-zag stitch.
Turn the hem down to reveal your Fancy Pillowcase. Press the finished pillowcase {yes, really. Don't you see where it was folded, and wouldn't it have looked much nicer in the picture if it were pressed flat?}.
The finished pillowcase should be 32" long, which is plenty long enough for a standard size pillow.
If you follow these instructions and they don't make sense or you end up at a dead end, tech support is available 24-hours*. Use the e-mail button in my side bar and help will be only a moment away.
*Tech support is available 24-hours a day inasmuch as you can e-mail me pretty much whenever you want. 3:00 am? No problem. Type away. I'll get back to you when I get up around noon.


You're a hoot Elizabeth. Nice instructions!
ReplyDeleteYou are hilarious! I am dying.
ReplyDelete