People who say they sleep like a baby usually don't have one. -Leo J. Burke
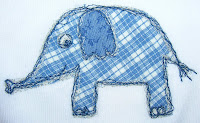
I'm torn between posting three more finishes for March and keeping a secret. I'm hoping I can get away with both. Two of these little Onesies with appliqué fronts are baby gifts for a couple of sweet friends who I hope don't read my blog until after they get their goodies in the mail. The third (which was really the first) is my 'practice' Onesie and it is currently an orphan.
I was trying to imitate (the sincerest form of flattery) the technique Little Miss Shabby used on the appliqué birds on her Cathedral Windows pillow (photo courtesy of Corey -- thank you!). She mentioned 'free motion foot' and 'drop the feed dogs.' Free motion foot. I've got one of those -- I've even practiced with it. Drop the feed dogs. I know how to do that. New technique. Piece of cake. After all, I've been sewing since I was eight. I didn't realize there's a learning curve involved. I did plan ahead a little and had some water-soluble stabilizer that I put behind the fabrics and I put a hoop around it to keep the stitches from distorting the knit fabric of the Onesie. Remembering from my class that free-motion was easier at a higher speed, I set my pedal-free machine at a pretty fast speed, positioned my needle and pressed the start button. About half-way around the elephant I realized that it was no good. I pulled out the seam-ripper and painstakingly removed all of the stitches. Then I put it away for the night. The next morning, I tried again, remembering further that when we practiced free-motion on stencils at my class, it was easier to follow the lines if I went slower. This time was better, but my lines of stitching still weren't getting that pretty 'wavy' quality like LMShabby's, nor was the design 'popping' like hers. I went around and around and around the elephant, hoping that my grey thread would eventually pop. But it didn't.
Frustrated, I went to my thinking spot (the shower) and came to the conclusion that I'd been around the elephant too many times and the thread wasn't dark enough. In the interest of testing out my theory and not wasting any more Onesies, I went around this little elephant again, three times in a darker thread. It seemed better. I decided that this 'experiment' could go to Goodwill. I'm sure they could get a quarter for it. After all, the sleeves are hemmed on the Onesie.
Then I gave this adorable Chicken a try. The pattern is called Chicken & Stars and was free at FatCat Patterns. Sindy has a whole section of appliqué chicken patterns there. I decided on black thread and went for 'less is more' in stitching (something I have not yet achieved in my blog posts), going around the design three times. I traced it out beforehand with my finger to decide which direction I would go and also to avoid starting and stopping as much as possible. I also followed the 'rule' from Mary Ann, the teacher at my free-motion class and did not turn the design (practice for when I have a whole quilt in there and can't turn it) but moved it up and down, back and forth, left and right as I followed the edges. I was very pleased with the way this design came out. It has a much more 'messy on purpose' look to it. It is a little closer to Little Miss Shabby's adorable birds.
Then I gave the elephant another try, forgetting that I had not flipped the pattern the first time because I wanted the elephant to face left. Oh well. This way you know I didn't just photoshop a third elephant Onesie in so I could count another finish for the month. Elephant No. 2 came out much cuter than his older brother (isn't it that way with kids sometimes too? Oops, did I say that out loud?).
Chicken & Stars and Elephant No. 2 will be in the mail tomorrow, on their way to exotic destinations. I got to post about this over on Sew&Tell Fridays and chalk up three more OPAM finishes for me in March!
Pages
▼
Wednesday, March 31, 2010
Tuesday, March 30, 2010
The Short Second Life of Bree Tanner
Announced today on Stephenie Meyer's web-site, a new book will be coming out on June 5, 2010. The book is titled The Short Second Life of Bree Tanner: An Eclipse Novella. From Stephenie's web-site:
This story was something that I worked on off and on for a while, just for fun, in between the times I was writing or editing other Twilight novels. Later, when the concept for The Twilight Saga: The Official Guide came up, I thought that might be a good place for Bree. Her story is a nice complement to Eclipse; it explains a lot of the things that Bella never knew. So I dusted it off and finished it up for placement in the Guide.The book is available for pre-order from Amazon for a GREAT price, with $1.00 of each purchase going to the American Red Cross. It will also be available for free (yes, really!) at BreeTanner.com from June 7 to July 5, 2010.
Then I got the news: my "short story" was nearly 200 pages long when typeset. It was too long to fit into the Guide—without ending up with a tome as heavy as the Oxford English Dictionary. My publisher approached me with the idea of releasing the Bree story on its own. One of the major benefits of this plan was that it would be out before the movie, so people would get to know Bree before they saw her in the film. That made sense to me, and we decided to go ahead with it.
Monday, March 29, 2010
Bloomin'
I love spring anywhere, but if I could choose I would always greet it in a garden. -Ruth Stout
Saturday, I spent some time outside working on the spring clean-up that never appears closer to finished than before. These are some of the pretty things coming up all over. The daffodils are in full bloom. I had to laugh a bit because no matter how hard a gardener might try, nature really is in charge. This garden sits next to the sidewalk at the northern most point of our yard. I like to keep it full of color for passers-by to enjoy. But since daffodils face the sun and the sun is to the south of this bed at this time of year, they are facing the wrong way for pedestrians to admire.
This white daffodil is so pretty in contrast with the hyacinths in the foreground. I'm also happy to see the peony starting to shoot up in between the two.
These gorgeous, coral colored Toronto Tulips are the first of the season. They are in the border that runs along the back of my house, which faces south. It is so fun to see the pretty color start to pop up all over the yard.
This is the garden that you see when walking up to my front door. At this time of year it sits mostly in shade, so the flowers aren't as far along here as they are in other parts of the yard. As the season progresses most of the garden will sit in sun, with only the very back in shade. It has been a trick to figure out how to 'engineer' this garden, but it is one of my favorites. I call it the 'Birdbath Garden' because of the pretty stone birdbath that sits in it.
Saturday, March 27, 2010
Will the real me please stand up?
If you do not tell the truth about yourself you cannot tell it about other people. -Virginia Woolf
Yesterday I read an interesting post by Lane at That man Quilts? He asked his readers to consider the question, am I showing the real me in my blog? He'd read the musings of Mrs. P at Quilting In My Pyjamas. She was wondering if blog personas are all they appear to be. Sarcastic Quilter echoed these thoughts on her blog. Her interpretation of Mrs. P's original post included this question, are you really you in blogland? Do you let only a part of you out or all of you or do you sanitize it to make it more politically correct or "likeable"?
After I read the posts by Lane and Sarcastic Quilter, I started thinking about who I am in my blog. Today I went to Mrs. P's post, the one that started it all and read what she had to say. Her opener is, Not sure where I'm going with this post. It's been rattling round inside my head for a week. I'm pretty sure I'm going to offend someone, somewhere (probably with my comment about religion down the page -paragraph 5 in case you want to skip straight there). When I got to paragraph five, I got a chuckle about what she had to say about religion.
Mrs. P was looking for bloggers with common interests. So she had been profile browsing which didn't help much so she started to browse blogs. She was looking for a place to fit in. Don't we all do that? Acceptance and love are fundamental human needs. Even in the virtual world this is true, because behind the pixels beings of flesh and blood reside. And those people want readers. They want to matter.
Cutting to the heart of the question, is my blog persona the real me? I'm not sure if 'yes' is the honest answer, but I think it comes closest to the truth. For the most part you get my public face. Let me put it like this. Some days I stay in my jammies past noon. Those are the days that I hope nobody knocks on my door. If someone does happen to came to the door, I reluctantly answer. But I wouldn't go out into the world without having showered, dressed, and put on some make-up. I try to put my best foot forward. That is the 'me' you see in my blog. I like to dress up my posts with pictures and quotes to illustrate the point I'm trying to make. I use my 'fancy vocabulary' here, more than I would in real life and attempt humor more than I do when conversing directly with other humans. I have center stage here. I can show my creative things without feeling like a show-off. I can brag about myself without feeling prideful. It is a 'safe' place for me to put myself out there because I never see the vast number of people who aren't interested in or don't like my work or me.
This blog started out as a place for sharing my creative endeavors. Now, it is more a place for sharing me. I post what I am interested in. I don't 'sanitize' (cussing on or off my blog just isn't me), or try to be politically correct (I post about my religion quite frequently, hoping that it is in a sharing-part-of-who-I-am kind of way and not in an in-your-face-shove-it-down-your-throat kind of way). My blog readers are not the biggest part in the equation. If they happen to like what I write, then that is great! I don't write to gain and please a readership. Yet, at the same time I LOVE that I have followers. I love that these people chose me.
Who is the real me? It is true that I have days that I stay in my pajamas until noon. Do I get frustrated and irritated by my kids and husband. Yes. Am I trying to hide this part of me? I don't think so. Even though my family sees my 'jammie' days, I still give them the best me I can. Family members deserve at least every courtesy we extend to perfect strangers. Of course, I'm definitely a work in progress, especially in that regard. But I think that you get the real me as much as my family or my friends get the real me.
The Host Paperback Book Giveaway
I knew it would begin with the end, and the end would look like death to these eyes. I had been warned.
Not these eyes. My eyes. Mine. This was me now.
The language I found myself using was odd, but it made sense. Choppy, boxy, blind, and linear. Impossibly crippled in comparison to many I'd used, yet still it managed to find fluidity and expression. Sometimes beauty. My language now. My native tongue.
With the truest instinct of my kind, I'd bound myself securely into the body's center of thought, twined myself inescapably into its every breath and reflex until it was no longer a separate entity. It was me.
Not the body, my body. -Wanderer, The Host, page 9
I'm a Stephenie Meyer fan. Not just a Twilight fan, but a Stephenie Meyer fan. I love her writing style. Her books are nice and thick and full of juicy details. I have a hard time putting them down. The Host is no exception. She take impossible elements and creates a believable world, a place you could almost swear you'd been to. I'll be first in line to buy her next publication, because the places she creates are places I like to visit.
The Host is coming out in paperback on April 13th. If you've never read it, here's your chance to get a copy for free. Eve's Fan Garden is giving away 10 copies of the book, so head over there and check it out.
Personally, I like hardback books. They stand up to the wear and tear of reading and re-reading much better than a paperback. I had a copy of The Host in paperback (really, I did! They were only available through the school market at book fairs in the spring of 2008) but I traded one of my best girlfriends for a new copy in hardback. But I entered this giveaway because the paperback includes a new, never-before-published “Bonus Chapter.” Personally, I'm hoping for a sequel, but even just another chapter of Stephenie's amazing writing is a bonus for me.
To enter the giveaway, fill out the form at the bottom of their post. You can also leave a comment, but that doesn't count as an entry. Good luck!
Friday, March 26, 2010
Following
I'm obsessed with fabulous projects. I'm certain of it. And I browse blogs. Mostly quilting blogs. Don't you think that is a dangerous combination? I'm beginning to think so.
*Note, follow the links I'm providing. They'll take you to exactly what I'm talking about and illustrate my point. Trust me. You have to see this.
Two weeks ago exactly, I came upon the most scrumptious pillow over at Twin Fibers. Jessica had just received it from her Pillow Talk Swap partner and I was amazed at how creative, colorful and cheerful this pillow is. So, I hopped on over to Little Miss Shabby to see how Corey had done it (photo courtesy of Corey -- thank you!). It looked like a faux curved piecing technique I had done in a quilt, but couldn't figure out how these particular blocks went together. Little Miss Shabby used a tutorial over at Hyenia in Petticoats to do what is called Cathedral Windows. I absolutely loved the technique (quilt as you go, everything gets finished, self-contained, all-in-one) and decided that this would be a great project to get to sometime to use up all the scraps. This is good, right? Two new blogs to follow, new projects to look forward to AND an idea for what to do with those accumulating scraps. 'Sometime,' I thought, 'I'll make a lap quilt using this technique.' It's all good.
Here's were the trouble starts. A few days later on my daily blog rounds, I came across another Cathedral windows pillow on Quilt Dad. John had just received his Pillow Talk Swap pillow and his uses Kona Cotton in Coal and Flora & Fauna by Michael Miller. The result is absolutely stunning (photo courtesy of Heather -- thank you!). So, I hopped on over to A La Mode Fabric (another fun blog to follow!) to see how Heather has done her Cathedral Windows. She followed the same tutorial as Little Miss Shabby, only she tweaked it a bit. She wrote out her own tutorial, giving her experience with the pattern and roughly what you need to do to enlarge or reduce the blocks. Her tutorial is divided into part one and part two, if you want to check it out. The nebulous, sometime-in-the-future-use-up-the-scraps project in my head started to take a shape.
Cut to last week and I'm at JoAnn's Fabrics. I don't even remember why I was there. It was something important I'm sure. Fate intervened and wiped everything about that trip from my memory except the amazing treasure I found among the bolts of fabric there. Kona Cotton Solids . . . and they even had it in Coal. I stopped and petted the bolts (you all do it too, you know you do) and admired the colors. Especially the Coal.
The minute I walked in the door from my shopping trip, I uncovered the latest JoAnn's add from under some sewing to look for coupons. Sure enough, I had a 50% off coupon good for this weekend. So, earlier today, I headed to JoAnn's, coupon in hand. I pulled out the bolt of Coal and started measuring width and figuring out how much fabric I would need for a lap quilt (roughly 45" x 54"), based on a few things that Heather had mentioned in her tutorial. As I calculated what I'd need right there at the fabric counter, I came up with a total of 19 yards. Even at 50% off, that is a chunk of change all in one piece of fabric. I knew there wasn't possibly that much on the bolt and I lost my nerve. I put the fabric back. I have to pause to say here, that I did get a few other pretty fabrics for pillowcases and aprons while I was there. But sadly I left the Kona Cotton in Coal, which was the whole purpose of my shopping trip, behind.
I came home and looked morosely at the pretty pictures of the amazing Cathedral windows pillows again. I knew that was the closest I was going to get to something that amazing. I followed the link that John provided for the Flora & Fauna fabrics that Heather used in his Kona Cotton in Coal Cathedral Windows Pillow (say that fast three times, lol). When I discovered that the coordinates come in not only Turquoise and Mustard, but Raspberry and Stone, I decided that even if I really did need 19 yards, I was going to get my Kona Cotton. After all, I had a coupon for 50% off.
I needed to go back to JoAnn's anyway, because as I looked over my receipt from earlier, one of my items didn't get the coupon added to it, and I love my coupons. I decided that before I left, I'd better double-check my figures for the Cathedral blocks, just to make sure. I pulled out some scratch paper and made a model of the largest block size that the width of the fabric would accommodate without waste. As it turns out, the calculations I was using for the block size, based on what I thought I remembered reading in Heather's tutorial were for the windows size, not the foundation block size. I only need 9 yards (taking into account shrinkage, I'm a die-hard pre-washer) to make a lap quilt that will come out at 44" x 57". I was in the car in within minutes of this discovery. They had 8 yards on the bolt (after a moment of panic when I couldn't find it again!) and happily took my 50% off coupon. I got my Kona Cotton in Coal for $2.99 a yard. If only I could get off that easy with the Flora & Fauna in Raspberry and Stone.
For those of you without a coupon and who now have a serious case of fabric envy, Kona Cotton Solids will be on sale at 40% off next week at JoAnn's fabrics. I wonder which color I need next?
Sale at JoAnn's
Have I mentioned that I LOVE to get a great deal? What makes it even better is when I can share those great deals with a friend. And I've got a good one for you today! JoAnn's is having a great sale this weekend and on top of their great sale prices (Keepsake Calicos are 50% off!), they sent me a coupon for an additional 20% off my total purchase! Then they gave me another 20% off coupon to share with a friend! I couldn't think of anyone I'd rather share with than YOU! Click on the link below to print out your coupon and then have fun shopping!
Twilight Quilters Coven Anniversary Giveaway
I wanted to let you in on a fun little giveaway over at the Twilight Quilters Coven. This is what they had to say:
We searched our threads in the forums at TwilightMOMS and determined that March 31, 2009 is the day that we officially organized ourselves into a quilting group. To celebrate, the members of the Twilight Quilters Coven are participating in a swap. Each member is sharing a little gift with the others consisting of her favorite quilting tool, TQC memorabilia, or fabric. We thought it would be fun to host a little giveaway as part of our celebration. Since we put this together on-the-fly, there might be a thing or two more that we add but for now, we are going to show you what we are 100% sure that we are including.
Our giveaway includes a 4" x 8" OmniGrid ruler, perfect for trimming all those Twilighty paper piecing patterns as you go. And a few of our favorite sparkly fabrics, because vampires sparkle and we quilt about vampires. Fabrics include a fat quarter each of white with iridescent sparkles (a favorite for Vampire skin), Hollyberry Fairy Frost (red with gold sparkles), Platinum Fairy Frost (silver with silver sparkles) and Diamond Fairy Frost (not shown, but for sure included, black with silver sparkles).
First, the rules.
1. Any comment/entry that contains the words, 'real vampires don't sparkle,' or any variation thereof will be immediately deleted. This is not up for debate because vampires aren't real.
2. Please, please, please edit your profile (Google, Twitter, Yahoo, AIM, Netlog or OpenID) to include your e-mail. We need a way to contact you if you're the winner. If you would prefer to keep your profile void of your e-mail or are using the anonymous commenter option, then leave your first name and e-mail in your comment in the following format: address (at) domainname (dot) com. If we can't contact you, you can't win. Therefore, any comment/entry that does not have contact information will be deleted.
3. Giveaway is open until March 31, 2010, the date of our anniversary.
4. Winner will be drawn on April 1st {no joke}. We'll probably draw by hand, but in the event that we're absolutely inundated with entries, we'll use a random number generator to select the winner.
5. A giveaway entry consists of a comment on this post.
6. Each entrant is allowed only one comment/entry per category (listed below), for a total of four entries. Multiple entries in the same category will be deleted.
7. Negative, profane and/or inappropriate comments will be deleted. This is left to the sole discretion of the TQC Administrator.
8. TQC Admin and Authors are not eligible for this giveaway.
Now, let's get to the nitty gritty. How do you enter?
1. Answer any of the following questions:
You only get ONE entry for the question category, so just answer in ONE comment post. You can answer all three questions if you want, but you only get ONE post to do it in. Multiple entries in this category will be deleted.
- What is your favorite quilting tool? OR
- What is your favorite TQC quilt block? OR
- Who is your favorite Sparkly Vampire?
2. Follow our blog. The easy link for following is at the very bottom of our blog. If you have a Google, Twitter, Yahoo, AIM, Netlog or OpenID, you can use an existing ID to follow our blog. Then leave a comment saying that you follow us (current followers, that includes you!).
3. Grab our button and put it on your blog. The code for the button is in the right hand column. The small button is 150 pixels wide and the large button is 220 pixels wide. Then leave a comment saying that our button is on your blog.
4. Blog about our giveaway. You have our permission to copy the giveaway goodies photograph and/or this post in its entirety. However, please do not copy other photographs or posts from our blog without permission from us (please feel free to link directly to any of our posts, though). Then leave a comment saying that you blogged about us.
Good luck!
Head on over to the Twilight Quilters Coven blog and enter to win!
Wednesday, March 24, 2010
Frolic on Sale!
I love to find a great deal. And this one is too good to keep to myself. Natalia over at Piece N Quilt has got Frolic on sale through March 30, including that delicious jelly roll! She's also got the charm pack and panel and lots of coordinates, so stop by and snap up some of these fabulous fabrics at a great price!
Monday, March 22, 2010
Frolic
The only place where housework comes before needlework is in the dictionary. -Mary Kurtz
Today is supposed to be laundry day. But laundry can't really compete with a squishy in the mail. Since I knew what was in my package, I forced myself to sort and move a load along. And then I tended to the important task of opening my squishy. I got my first jelly roll. And I had to pose it and my other pretties for a picture. You should feel this fabric. It is amazing!
I mentioned that this is my first jelly roll. I've never been interested in jelly rolls. What do you do with a pack of strips that you can't pre-wash and may or may not be cut straight on the grain? But I got caught in the perfect storm. I happened upon instructions for a baby quilt using a jelly roll by Natalia over at Piece N Quilt. I was very intrigued by it. It finally made a jelly roll make sense! Then I got a peek of Frolic by Moda. The rest is history.
I want my Frolic quilt to be a snuggle-up-under-and-read (or watch TV) kind of quilt (rather than for a baby) so I may make it just a bit bigger than the instructions call for. The jelly roll and the solid green will make the quilt top. There is enough green for binding as well, but I'll have to see how the top looks when I get that far, because the striped fabric is a strong contender for binding at this point. The brown with flowers is the back. I think I got an extra ½ yard of that. I also got ½ yard each of the dots, stripes and swirls because I want to do a couple of other projects with this fabulous line. I'm going to make a scripture cover for myself like the ones I made for my kids, only mine will be pieced from the jelly roll. And I want to make an Abbey Bag.
I'm really itching to unroll this baby and get working. I'm a die hard pre-washer, but since it is a bad idea to wash a pre-cut, and these fabrics are all from the same line and they feel so fabulous, I'm going to let it go on this one. That means these fabrics could possibly go straight from the mailbox to my sewing table, no wait time. Instant gratification. Alas, it is past time to make dinner. Trust me, I'd rather be stitchin' than in the kitchen!
So, now that I've dipped my toe in the jelly roll pond, I'm curious about what I've been missing. Tell me about your favorite jelly roll projects. Include a link in your comments if you've got it posted somewhere. I'd love to see!
The DIY Dish Janome Giveaway
I like to browse blogs. There are a lot of interesting, creative and just plain neat people out there. I recently ran across The DIY Dish while blog browsing. Hosted by twins Kris & Kim (or is it Kim & Kris?), this is just a really fun place with lots of fabulous projects and products!
In conjunction with their new series of episodes, The DIY Dish and Janome are giving away two machines! A Memory Craft 350E embroidery machine and a Decor Computer 4030 sewing machine.
There are lots of ways to win! Look over the rules and then hop on over to their blog and enter to win. Entries are accepted through March 30.
Sunday, March 21, 2010
Sunday Scripture: Enter Into His Gates
Saturday, March 20, 2010
Sun, New Moon & Quilting
Today is the Vernal Equinox. From Wikipedia, An equinox occurs twice a year, when the tilt of the Earth's axis is inclined neither away from nor towards the sun, the sun being vertically above a point on the Equator. What that really means is that the long nights and short days are over -- it is officially spring! Hooray! And spring is beautiful in my neck of the woods. I hope to find a bit of time to putter around in the gardens today.
Today is just full of special things. Today, New Moon is available on DVD. Were you one of the enthusiastic, vampire-clad fans celebrating at the pre-launch parties? I don't have quite enough nerve to do that, although I do have a pair of golden contacts (thanks, Iris) that are fun to wear. Or did you just brave the crowds, head ducked, to get your copy at midnight last night? I'm not quite that brave either. I'm going today, hoping that the crowds have thinned and there's still a copy left for me. Different stores are offering different features. When Twilight came out, I HAD to have two different copies of the DVD because of the special features. This time I'm only getting one copy. The special features on the Wal-Mart DVD interest me most this time -- exclusive scenes from Eclipse. Need I say more?
Today is also National Quilting Day. The National Quilting Association has put together a quilt pattern (download here) for groups, guilds or individuals to work on in honor of our troops. They suggest you gather up your scraps, put this quilt together and donate it to a VA hospital, a military base if one is near you or the family of a neighbor or community church member serving in the military. This is a very worthy cause, indeed, but only one suggestion of how to spend National Quilting Day. I'm off to get my copy of New Moon DVD, perhaps drop in at my favorite LQS, Corn Wagon Quilt Co. and see what is happening there, and then settle in with some sewing and my newly acquired DVD and all its special features. Then if there's any time left in the day, I'm going to dig a little in the dirt.
Happy Spring! Happy New Moon Day! Happy Quilt Day!
Friday, March 19, 2010
My Twilight Quilt: Fire & Ice
The wind shook the tent again, and I shook with it.
The temperature was dropping. I could feel it through the down bag, through my jacket. I was fully dressed, my hiking boots still laced into place. It didn't make any difference. How could it be so cold? How could it keep getting colder? It had to bottom out sometime, didn't it?
Edward sat as far from me as possible in the cramped space, afraid to even breathe on me when I was already so cold. It was too dark to see his face, but his voice was wild with worry, indecision, and frustration.
I heard the sound of the zipper around the tent door pulling swiftly down.
Jacob slid through the smallest opening he could manage, while the arctic air flowed in around him, a few flecks of snow falling to the floor of the tent. I shivered so hard it was a convulsion.
Edward's hand was suddenly hard on his shoulder, restraining, snow white against the dark skin. Jacob's jaw clenched, his nostrils flaring, his body recoiling from the cold touch. The long muscles in his arms flexed automatically.
"Scoot over, Bella," he said, zipping the sleeping bag open farther.
I stared at him in outrage. No wonder Edward was reacting this way.
He crammed his body into the nonexistent space, forcing the zipper up behind himself.
And then I couldn't object -- I didn't want to anymore. He was so warm. His arms constricted around me, holding me snugly against his bare chest. The heat was irresistible, like air after being underwater for too long. He cringed when I pressed my icy fingers eagerly against his skin. -Bella Swan, Eclipse, pages 487-494
As I was refining my layout for this quilt, I found a block called Light and Dark at The Quilter's Cache. I really wanted to incorporate it in my quilt. Iris says it makes her think of Midnight Sun. It made me think of the chapter in Eclipse called Fire and Ice. The block is 12" and originally I'd planned to make two 6" sections of it, one with 'fire' as the dominant color and one with 'ice' as he dominant color. But as my layout evolved, I realized I needed to make room for other blocks and so I gave this block one 6" square and reduced the pattern by 50% to make it fit.
I like the representation; each of the 'ice' dominant sections has a bit of fire in them and vice-versa. Edward, who is obviously the 'ice' in this block also has a bit of fire in him. He's not exclusively ice, although he is as cold. And Jacob, who runs at a toasty 108.9, is not all fire. That is what makes it so hard for Bella to choose between them.
When putting this block together I wanted the fabric to be just right. I used Platinum Fairy Frost for 'ice.' It has a silver background with silver glitter. I love the way it shines. The 'fire' is a hand-dyed fabric that Iris sent me. It has a lovely, earthy texture and tone, with variation in the color that made me think of fire. I hope I got it right.
And now, my favorite part. I know you just saw the layout, but here it is again, with one more block filled in.
I Have A Notion Giveaway
I Have A Notion is celebrating their 1-year anniversary.
Kelly is hosting an amazing giveaway! It is thirty days of giveaways to be precise! From March 15 through April 15, her vendors are giving away some really amazing things. One new giveaway will be added each day and all prizes will be drawn on April 16th. Pop on over and see!
Pinwheel Sampler Quilt Along: block four
Here are my blocks for part four of the pinwheel quilt-along. This block was really fun and simple to create. You can find the instructions at p.s. i quilt: pinwheel sampler quilt along: block four. I decided that instead of using half-square triangles I would use flying geese. I used Patti Anderson's instructions for No Waste Flying Geese. Her instructions make four geese; perfect for this block. Here is my first fabric combination, although it isn't really a combination since it is just one fabric. Jerri Lynn sent me this fabulous Robert Kaufman FQ for my birthday. This block had it's name written all over it. I love how it turned out.
Here is my second block. This one turned out very sweet too.
Half-way done!
Thursday, March 18, 2010
My Twilight Quilt: Police Chief Swan
Charlie is Police Chief Swan to the good people of Forks. -Bella Swan, Twilight, page 5
As my quilt layout evolved, I ended up with a few odd-shaped spaces to fill. Most of my quilt blocks are 6" x 6", but the 4" wide, extra-tall tree that occupies the height of two rows, left the four other rows with 4" x 6" blocks needed to complete them. Two of those 4" x 6" spaces were attached to the 6" x 6" blocks next to them and two were left at 4" x 6". As I was trying to decide how best to fill them, I thought that a police badge for Charlie might be a good representation for him. I asked Cat, my go-to-gal for paper pieced patterns, if she could help me. I didn't give her much to go on; just that I wanted a 4" x 6" block with a Forks Police badge. As usual, she really came through. She used these two images to create one amazing Police Chief Swan quilt block.
You can see that the block most closely resembles the patch on the right. I am probably going to do a little hand embroidery and add the '19' and '45' on either side of the center emblem and then do 'City of Forks' and 'WA' on the bottom. Sometime soon, I need to take my machine in for servicing, and if I go with the shop that sold it to me, it will be out for at least three weeks, so I'm saving up all my handwork for then.
I used Fairy Frost for this block -- I just had to. Silver for the badge. The fabric is two-toned underneath the monochrome 'frost.' I cut away all of the darker areas and used the lighter, brighter background areas for the badge. I wanted it to be bright and shiny. Then I raided my 'stash' for the fabrics for the center emblem. All of the fabrics used in this block have been used (or will be in the future) in my other Twilight Quilt blocks. I like that kind of continuity throughout a quilt. The trees are all made from the same eight or nine fabrics (I can't remember exactly at the moment, but I'll go count if you want). And I framed the badge with my trusty black Civil War Reproduction fabric (used throughout the quilt and as the outer border, background and cross your fingers I have enough for the binding too).
Cat did a great job at capturing the details on the badge. This pattern went together very nicely. Cat's work is pure genius, as usual. She modified this pattern and has included it as the advanced block this month in her Twilight Mystery BOM Quilt. I've seen a preview of her layouts and am using most of her advanced blocks in my own quilt layout, so I won't be following those exactly. I am following along with the beginner blocks, though, and am going to make a little wall-hanging with them. I haven't done my beginner block for this month yet, but I'll keep you posted.
Here's the layout with Chief Swan added in. I love to watch it fill in. It keeps me motivated.
Monday, March 15, 2010
More Signs of Spring
One of the most delightful things about a garden is the anticipation it provides. -W.E. Johns, The Passing Show
Technically, it is still winter, as the slushy rain and snow we got the day before yesterday proves. But some days, the weather is so inviting it is impossible to stay inside. Today was one of those days. Look at the amazing color on that hyacinth! There is so much life coming up already! In this one little snap shot, there are two bunches of tulips, a daylily, Lamb's Ear, Mums, Jacob's Ladder, Matchstick (I think that's what that grassy-looking stuff is called), and my most favorite Tête-À-Tête Daffodils, a miniature of the narcissus, growing only 6" to 8" tall.
This adorable little daffodil ranks in the top 10 most sold daffodils. And it is no wonder. Tête-À-Tête is an early bloomer, coming up just after the crocuses, heralding in spring in cheery style. This is the biggest bunch in my garden so far. These are planted in the border that runs along the back of my house, and so this bed faces south. There are more of these little beauties in my front gardens, but they'll come up a bit later because they're in shadier spots. I can't wait!
Spring flowers are my favorite. I love to watch the earth change slowly from sleepy and gray to bursting with life and color. I start looking forward to the next spring's show almost the minute the last bulb fades. Last fall, I opted for spring clean-up. I was up to my ears in New Moon Quilt and there wasn't enough time to get everything done. Now that spring is here, I'm afraid that I'm going to miss the show I've been looking forward to for nearly a year because the bulbs are coming in faster than I can clean out the debris from last fall. This year's show promises to be spectacular. This little preview, a tiny daffodil nestled in with a poppy looks to me like just a bit of heaven, right here on earth.
Sunday, March 14, 2010
Sunday Sermons: Have I Done Any Good?
We become so caught up in the busyness of our lives. Were we to step backward, however, and take a good look at what we're doing, we many find that we've immersed ourselves in the thick of thin things. -Thomas S. Monson
Saturday, March 13, 2010
Baptism Brunch
LadyBug is eight and she choose to be baptized. The ordinance took place one week ago today. We arrived about 25 minutes before the meeting was to begin for pictures and a little orientation on what was going to happen that day. Here is LadyBug with my youngest brother, who baptized her. He turned 16 just a couple of months before Grasshopper turned eight and baptized him. He's 18 now and will be heading out for a mission in the early fall. LadyBug was excited to have him baptize her.
Amy has a cousin on Mr. Bug's side who turned eight just two weeks before she did and so together, the girls and their parents decided that it would be fun if we did the baptisms together because they were both scheduled for the same time on the same day. I think it was nice to do it that way because then everyone from Mr. Bug's family could attend two events at once and minimize travel a bit. I think it was fun for the girls too, to share such a special day.
We had 68 family members and friends attend and 57 of them stayed for brunch afterwards. We had a wonderful time visiting with everyone and enjoying good food. My mom, two of my sisters and my brother's wife brought bunches of muffins, including LadyBug's favorites (scroll to the bottom) and I took care of the brunch casseroles and fruit. I wanted to share the recipes for the casseroles we enjoyed. I found these on the internet a couple of years ago and served them at Grasshopper's baptism as well.
Ham & Broccoli Breakfast Casserole
8 slices white or wheat bread, cut into cubes
1 lb. shredded cheddar cheese
2 medium heads fresh broccoli, cut to bite size pieces
1 lb. cubed ham
4 eggs
2 cups milk
¼ teaspoon dry mustard
1 can cream of mushroom soup
• Cover the bottom of a greased 9" x 13" baking dish with the bread cubes. Sprinkle shredded cheese over the bread.
• Place broccoli in a vented, microwave-safe covered dish. Add about ¼ cup of hot water and steam in the microwave for 5 minutes on medium power. Broccoli should be bright green and still a bit crisp. Drain the broccoli and arrange on top of the cheese. Add the ham.
• In a medium mixing bowl, combine eggs, milk and mustard; lightly beat. Pour over mixture in the pan. Store in the refrigerator overnight. Spread the soup over top of the casserole in the morning.
• Heat the oven to 350˚. Bake covered for 30 minutes. Remove the foil and bake 30 minutes more. Check to make sure the eggs are set; bake an additional 10 to 15 minutes if necessary.
Bishop's Brunch Casserole
8 slices bread, cut into cubes
2 lbs. sausage, cooked and drained
2 cups milk
4 eggs, slightly beaten
1 small can mushrooms, drained
¼ cup finely chopped onion
3 cups grated cheddar cheese
1 teaspoon dry mustard
1 teaspoon Worcestershire sauce
1 can cream of mushroom soup
⅓ cup milk
Paprika
• Cover the bottom of a greased 9" x 13" baking dish with bread cubes.
• In a large mixing bowl, combine sausage, milk, eggs, mushrooms, onion, cheese, mustard and Worcestershire. Pour the mixture over the bread.
• Cover and refrigerate overnight.
• Before baking, mix the mushroom soup and milk together. Spread over the top of the casserole and sprinkle with paprika.
• Heat oven to 325˚. Bake, uncovered, for 1½ hours, checking that the eggs are set before serving.
Susan's Breakfast Casserole
6 slices of bread, cut into cubes
18 to 24 oz. bacon, cooked, drained and crumbled
3 cups shredded cheddar cheese
9 eggs, beaten
3 cups milk
1½ teaspoons dry mustard
• Cover the bottom of a greased 9" x 13" pan with bread cubes.
• Sprinkle bacon over the bread pieces. Sprinkle cheddar cheese over the bacon.
• In a medium mixing bowl, combine eggs, milk and mustard. Pour over casserole. Refrigerate overnight.
• Heat oven to 350˚. Bake covered for 30 minutes. Uncover and bake for an additional 15 to 30 minutes, until eggs are set.
French Toast Casserole
1 cup brown sugar
1 teaspoon cinnamon
½ cup butter, melted
3 apples, peeled, cored and sliced
1 lb. French baguette loaf, cut into 1" slices
6 eggs, lightly beaten
1½ cups milk
1 tablespoon vanilla
1 teaspoon cinnamon
• Grease a 9" x 13" baking dish. In a medium mixing bowl, combine brown sugar and 1 teaspoon cinnamon; mix in melted butter. Add apples and toss to coat. Place in the bottom of the baking dish. Arrange the bread slices in an even layer over the apples.
• Whisk together eggs, milk, vanilla and 1 teaspoon cinnamon. Pour evenly over bread slices, making sure each slice is soaked. Cover baking dish with foil and refrigerate overnight.
• Heat oven to 375˚. Bake casserole, covered for 40 minutes; remove the foil and bake for 10 minutes more. Let stand 5 minutes before serving.
Buttermilk Syrup
¾ cup sugar
½ cup butter
1 cup buttermilk
1 teaspoon baking soda
1 teaspoon vanilla
• In a medium saucepan, combine sugar, butter and buttermilk. Bring to a boil.
• Remove from heat and add baking soda and vanilla (baking soda will foam).
• Serve warm over your favorite breakfast foods. Store in the refrigerator.
Friday, March 12, 2010
Pinwheel Sampler Quilt Along: block three
Rachel posted the instructions for block three last Saturday, but it was a busy day for us (more details on that soon). I started, and finished my blocks early this week, but one of them looked too much like one of my combinations for block one. So, I decided that I was going to unpick it and switch the colors. I did, and I like it much better.
Here's my first block. LadyBug helped me decide on the colors. I love how it turned out. It kind of reminds me of neapolitan ice cream. Neapolitan isn't one of my favorites -- the chocolate and strawberry clash too much. But in the case of my quilt, it is a good thing.
And this is the second block, the one I had to unpick. As I was carefully pulling out each stitch, I remembered a tutorial for unpicking over at Park City Girl. I tried it, and lo and behold, it worked! And it took half the time! I wonder why no on ever taught me this before?
You can find the instructions for this block here: p.s. i quilt: pinwheel sampler quilt along: block three. Five more designs (10 blocks total) to go!
Thursday, March 11, 2010
Tuesday, March 9, 2010
Scripture Cases
LadyBug got her first set of scriptures this weekend. They were a gift from her grandma (my mom) after her baptism. She was pretty excited about it. As a matter of fact, it was her Primary class's turn to help with opening exercises on Sunday and she signed up ahead of time to read the scripture, knowing that she was getting new scriptures. We found the reference, marked it with a red pencil, bookmarked it, and she read it over and over to make sure she had it just right.
Recently I ran across instructions for making a quilted cover in a blog I follow. So, I decided to make one for LadyBug's new scriptures. I noticed that Grasshopper's scripture case had a rip in it, so I decided to make one for him as well. My original plan was to run to JoAnn's on Saturday afternoon and let the kids pick out their own fabrics. But I remembered a couple of pieces of fabric in my stash that I thought might work well; red for LadyBug, who happens to adore the color, and blue for Grasshopper, who thinks that if it isn't blue, it isn't a color worth noticing. I pulled the fabrics out and the kids were enthusiastic. Fortunately, I also had coordinating fabrics in my stash, as well as a small piece of batting and plenty of interfacing, which saved me a trip to the fabric shop. I cut the fabrics, got the interfacing pressed on everywhere and began quilting.
This was fun for me because I'd just taken a beginning machine quilting class a couple of weeks ago and was excited to try out my new skills. I thought I'd better keep it simple for a beginning project, so I just did straight-line quilting with my walking foot. I considered adding a little flower embellishment to LadyBug's cover in the large empty squares in the pattern, but after a little practice I decided that my free-motion skills need a little more honing. She's not a flowery kind of girl, anyway. Here is the back-side of the cover so you can see the detail.
Here is hers, all finished. The cover fabric is a South Seas Import. I have it in two other colors. Unfortunately, the selvage cuts off in just the wrong spot and it doesn't have the name on it.
Here is the front inside, with a little pocket just the right size for marking pencils. The fabric for the inside, including the lining is a Moda Marble, in red.
I wanted the quilting in Grasshopper's cover to be a little different, so I did a sort of crosshatch pattern. I'm thinking now that it might have been a little better had I turned it on an angle like LadyBug's. This fabric is Bali Rain by Blank Textiles (I think).
Here is the little inside pocket. I liked the contrast of using the cover fabric. I had a little more of this blue than I did the red in LadyBug's, or I would have done hers like this too. The fabric for the lining and inside came from JoAnn's.
Amy at Amy's Creative Side wrote up the instructions for these covers and you can find them here: Tutorial — Quilted Bible Cover. The instructions are easy to follow and include a section for customizing the size to your needs. Since my covers are smaller than hers, I thought I'd include the measurements I used. I calculated these using the conversion section in Amy's tutorial. This is for the medium size LDS Quadruple Combination (7⅜" x 5⅜" x 2⅜").
Exterior fabric:
Cover: 10" x 16" (to be quilted and then trimmed to 8⅞" x 15")
Handles: 2 - 4" x 14"
Tie: 1½" x 18"
Interior fabric:
Jacket Cover Pocket: 2 - 8⅞" x 8"
Pencil Pocket: 2 - 5½" x 3½"
Lining fabric (or interior fabric):
8⅞" x 15"
Batting:
11" x 17"
Interfacing:
Lining: 8⅞" x 15"
Handles: 2 - 4" x 14"
I also added interfacing to the jacket cover pockets and the pencil pocket. After you have pressed the jacket cover pocket in half, add interfacing to one side, from the center to the outer edge. This measures 8⅞" tall x 4" wide (you'll need two pieces, one for each side). The interfacing for the pencil pocket is 5½" x 3½".
These 'scripture cases' (as my kids call them) make two fun finishes for March! Hooray!