Friday, July 16, 2010

Operation Pop-up Window Pirate: Update

A while back, I posted about Blogger's comment options and my personal preference for the Pop-Up Window. I launched a campaign to convert all of blog-kind to Pop-Up Window Pirates, because I like to browse blogs and leave a little comment for the blog owner. The Pop-Up Window is by far the fastest of the three comment options that Blogger offers. Since then, I've been paying attention when I comment and I'm pretty sure there are more Pop-Up Windows than the other two options by quite a margin. Who knew I had such influence in the Blog-isphere?

Thank you to all who have joined the
Pop-Up Window Pirate Crew!

{or already were a Pop-Up Window Pirate and I'm totally taking credit for it now.}

I now follow 72 blogs {five have been added to the list just today!} Ya'll make some cool stuff and say funny things and have adorable children/families/pets. I love to see what you get up to. I also like to comment at each blog at least once a week. Because let's face it, bloggers love comments. I'd like to think I'm practicing the Golden Rule.

I'm posting about this again because I really am grateful to everyone who changed their settings just for me. I also wanted to post for those who may be new here or missed this the first time around. I'd love it if the Pop-Up Window Pirate Crew Members would continue to spread the word. I even made a little bloggy button for you.

Operation Pop-Up Pirate

I've also written up some step-by-step instructions for changing your comment settings. They were specially designed with all types of learners in mind {for those who follow verbal instructions best, read them out loud to yourself} and they will help you to quickly and easily become a Pop-up Window Pirate.

• From your Dashboard, click on the Settings option.

• Under the settings tab, click on the fourth option: Comments.

• In the third heading labeled Comment Form Placement, select Pop Up Window.

• Save your changes {scroll to the bottom of the page} and you're done. You're now officially a Pop-Up Window Pirate. Welcome to the crew, matey.

Yours Humbly,
Elizabeth, King of the Pirates

Thursday, July 15, 2010

Frolic Finishes

It has been forever since I got my Frolic jelly roll in the mail and it has been calling to me non-stop since it arrived. It has also been forever since I've been wanting to make myself an Abbey Bag. I bought fabric for it like last September and it has been sitting cut out since then. I made one for Iris clear back in January and always meant to get to one for myself, but just never made the time. So, while I've been procrastinating strategically planning the machine quilting for the snowball quilt I'm making for my sister for her wedding {which is in 16 days. I'm starting to panic a little} I decided that I was going to use my beautiful Frolic fabrics for an Abbey Bag instead of what I already had cut out. I totally it.

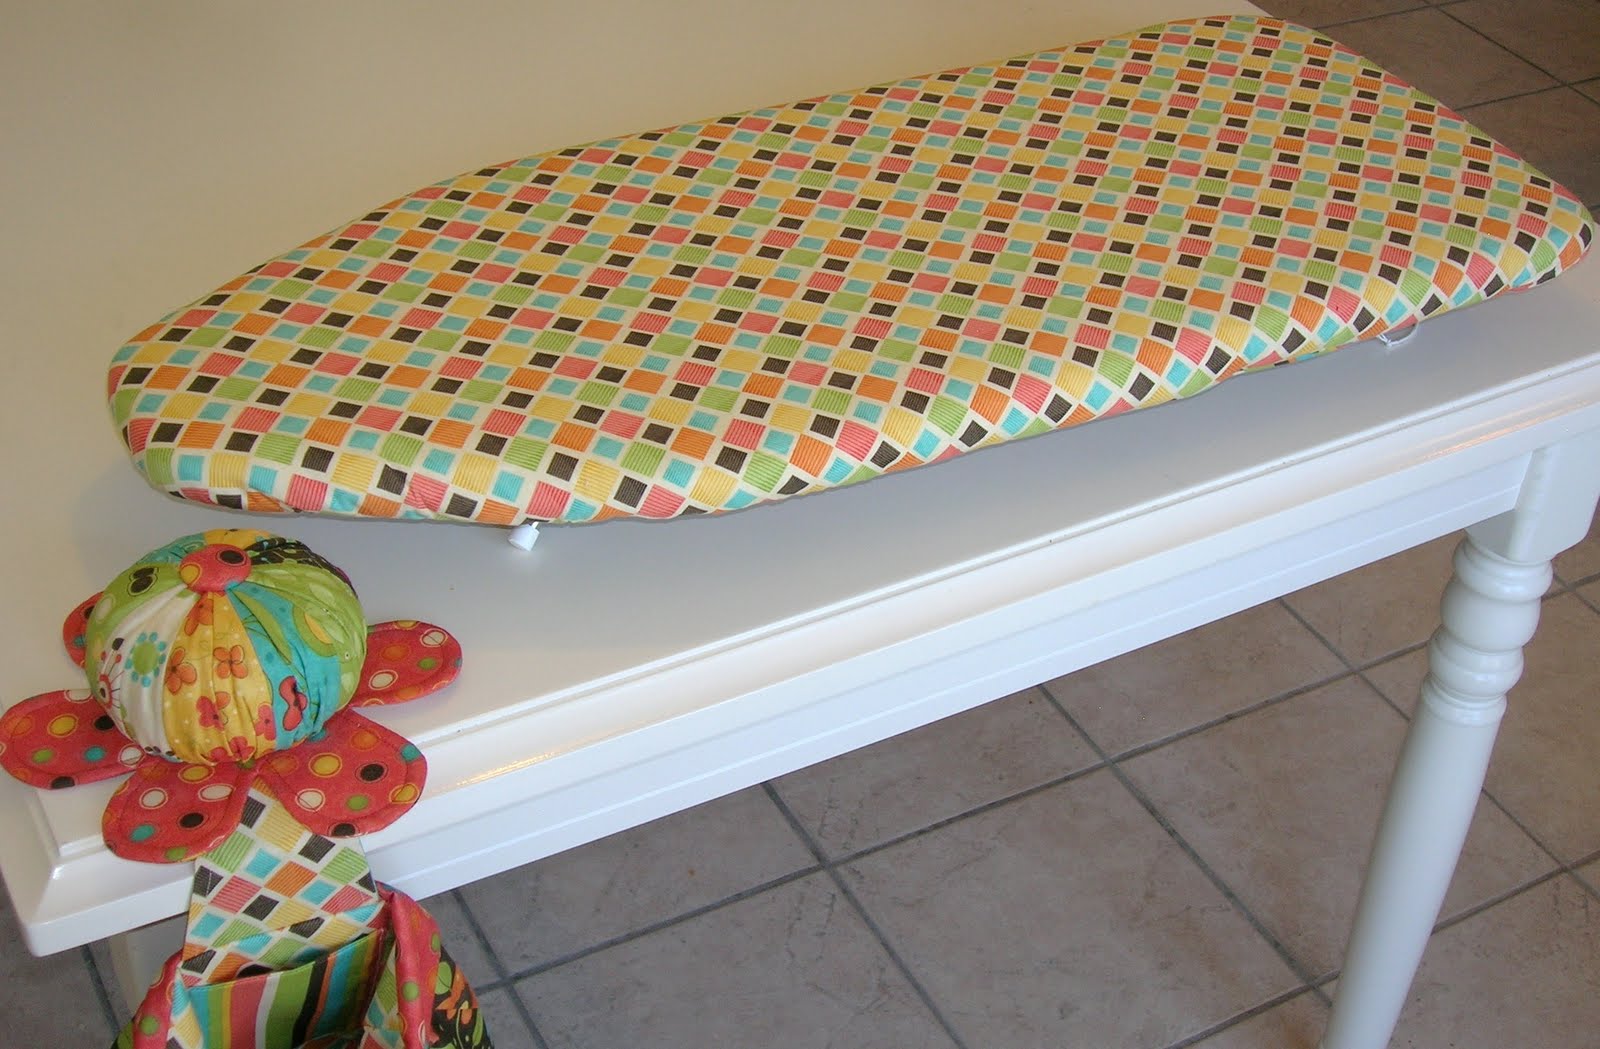
I have also been wanting to make an ironing board cover for a while now. But I haven't been able to find that pretty apples and pears fabric in the stores when I go in lately {I know, I know. I could order on-line. I just gave you the link. But I hate to pay shipping, so I'm holding out for it to come back in stock at the store}. So I started thinking how awesome it would be to have a cover for my little tabletop ironing board in Frolic to match my new Abbey Bag.

It totally needed it. The only problem is, I can't decide which side I want to use first.

For the reversible ironing board cover, I used a combination of two tutorials, one from Stop Staring and Start Sewing {I like her philosophy} and the other from Amy's Creative Side, along with a few tweaks of my own. In order to make the cover washable and prevent it from shrinking, I washed and dried all the fabrics before starting. I also soaked the batting {Warm and Natural} in hot water and then squished the water out of it first by hand {being careful not to wring it} and then I rolled it in a towel to get as much water out of it as I could before I put it in the dryer. I worried that I'd end up with a dryer full of lint, but the batting came out just fine. Amy said she used two layers of batting in her cover, but that just didn't seem fluffy enough for me, so I went with three. I use this board a lot, so I think it will be worth it. When I do my big ironing board {if I can ever find some more of that apples and pears fabric}, I'll only do two layers of batting.

For my pattern, I pulled the old cover off and used that to cut out the new cover. I also pulled the tie cord that was in the old cover out and saved it to use in the new cover. My binding is 1¼" wide, single fold. I sewed it on and then laid the cord inside the binding and sewed it closed, saving myself a bit of trouble threading the cord through the binding. I think the binding is the cutest part of the cover, but nobody gets to see it.

Hooray! Two more finishes for July! I've linked up at a couple of fun blogs.


While I had my jelly roll out, I put together this quilt top using a super easy tutorial for jelly rolls at Piece 'n Quilt. Natalia also has a shop and she's got Frolic in stock. As a matter of fact, I got some of my yardage from her. Thanks Natalia! The top still needs some giant rick-rack between the pieced part and the solid fabric, but I won't put it on until I quilt it. I think I'll go with chocolate brown. Or, perhaps a cream colored. I'll have to see what I like when I get to the store.

I was really on a roll {pun totally intended} and I put together the outside of a tote bag. I used the tutorial that Rachel over at p.s. i quilt put together for a little friendship bag. Since I was working with a jelly roll instead of a honey bun, I increased the size of my pieces by double so my bag won't be short and fat.

I also put together a patchwork for a scripture cover for myself, like the ones I made for the Little Bugs.

I even have some left over strips that I will piece together some way or another with the left-over bits of yardage. I'm thinking perhaps four-patches placed in nine-patches with yardage. I'm not sure yet.

In any case, I'm so excited to have a couple of cute Frolic things finished and a few more cute Frolic things to look forward to!

Wednesday, July 14, 2010

Missão Brasil Fortaleza: A Day in the Life

6:30 am: wake up
1 hour personal study (including scriptures, gospel principles and language)
1 hour companion study
Breakfast, shower, etc.
9:30 am: teaching
12:00 pm: lunch
1:00 pm: teaching
5:00 pm: dinner
6:00 pm: teaching
9:30 pm: arrive back home, time for writing in your journal, have a snack, prepare for bed
10:30 pm: go to bed

Last week I posted about my mission. It turned out to be a rather lengthy post, but I didn't say nearly everything I wanted to say. How can you sum up 18 months in 2700 words? Even when you factor in 1000 words a picture {there were 16, just so you don't have to go back to count and yes, I did the math: 18,700 words}, I still haven't said much on the subject.

The schedule I listed out above is roughly the same schedule every missionary in the entire world follows. There are variations to this, such as Sunday mornings, when you attend church from 9:00 to noon (or sometimes from 11:00 to 2:00 or even sometimes from 1:00 to 4:00 in the afternoon). Once a week you are encouraged to help out with a service project somewhere in the commmunity. And one morning a week you have a meeting with your zone {a mission is divided up into zones, the zones are divided up into districts and the districts are divided up into areas}. The schedule and rules are adaptable to each mission. At 4˚ south of the equator, an addendum was added to the 9:30 - 10:30 pm time frame at the end of the day and that was that you were to take another shower. It was a mission rule, not that I needed telling twice. And because the sun rises every day of the year at 6:00 am and sets every day of the year at 6:00 pm in Fortaleza, we were to arrange our schedules to that we had as many appointments as possible in the evening so that we weren't left knocking on doors after dark {it's not fun in the daytime either, but it's not fun and also not a super safe idea at night}.

The main purpose of a mission is to share the gospel of Jesus Christ. All other distractions are eliminated and you focus solely on learning and teaching about our Savior. There are lots of rules to follow, like no swimming and no TV and no dancing. It is difficult. It is a pretty rigorous schedule {Mr. Bug and I used to joke that it was my secret Wonder Woman training in the Amazon. That was before I had kids and totally lost my super powers}. But you grow and learn and become a better person.

In between all the teaching, you still have everyday kinds of things that you need to take care of, so one day a week {called Preparation Day, or P-Day} you have from 9:30 am to 6:00 pm to do laundry, write letters home {it's a rule; you have to write your family every week but it only makes sense. If you write them, they'll write you and getting letters on you mission is a good thing.}, get groceries, go to the bank {you and/or your family pay your own way, but it is parceled out from home bi-weekly}, etc. Since laundry was all done by hand {see illustration at right}, I would sometimes wash that day's clothes after I showered at night so that I didn't have so much to do on P-Day. See? The schedule is totally adaptable.

Not too long after I arrived in Brazil, my mission president arranged for a little day trip on P-Day for everyone. We went to the beach, which is a pretty strange place to go for a group of people who aren't allowed to swim. The first thing the mission president said to us when we got off the bus was that if we set so much as a big toe in the water, he'd send us straight home. It was enough to keep us all dry. We had a picnic and explored and climbed on the dunes. The mission president arranged us into the initials of our mission and took photos for us.
Leading up to this trip, I kept hearing that the beach we were headed to, Morro Branco {White Hill}, had areias coloridas. Being a little wet behind the ears {translation: completely inept. Oh, and I wasn't really wet behind the ears -- remember no swimming} with the language, I had to look this up in my handy dandy English/ Portuguese dictionary. It means colored sands. I was intrigued. I verified with my companion, Sister Soares, that I had indeed understood correctly -- the sands at the beach we were going to were colored. I envisioned pink and blue and green and yellow; a rainbow at the beach. I'm still scratching my head over that one, because all the sand was, well, sand colored :confused:.

Looking back, I spent an unusual amount of time at the beach for someone who couldn't go in swimming. My zone went to Praia do Futuro {Beach of the Future} about four months later.

I even went on a little river tour with my district in Aracati. The boat we rode on is in the background. While we were stopped at the mid-point of the trip, my companion {who, I must say, followed all the rules} had the idea to wade out to this little fishing boat and take a snap shot. It was near the shore and the water only came up to mid-shin. I took a picture of her with her camera and then we switched and she took a picture of me with my camera {I wish I'd have thought to take a picture of her with my camera too}. There's nothing like breaking the rules, taking a picture and then posting it all over the internet. It's been sixteen years. I wonder if there's a statute of limitations on something like this or if I can expect to be struck by lightning any time now?

This is another zone trip, this time to Cofeco Beach {no translation for Cofeco} six months after Praia do Futuro. Notice that all of the footprints in the sand are parallel to the water. A few come pretty close to the water, but none go in.

Our entire mission even went to the beach at Christmas (between the river trip and Cofeco beach). Volleyball anyone?

This boardwalk goes out over the ocean and continues out for quite a ways. This landmark is called Ponta Metalica {Metalic Point} or sometimes shortened to Pontão {The Point, but the 'ão' at the end indicates size. For example, the root word is ponta (point). Adding 'inha,' pontinha, makes the point little and adding ão makes the point big. You can do that with almost any word in Portuguese}. As beautiful as it was, it really didn't seem like Christmas.

Besides visiting the beach on Christmas, we stopped for ice cream and the mission president took us to another landmark in the city, a mausoleum. This is a postcard I bought of it.

This is me with the mission president's daughter, Lúcia Maria, under the mausoleum. Recognize her dress?

The president gathered us and his daughter took a picture of all of us together. He and his wife are in the bottom left corner on the front row. These are all the missionaries who were serving in our entire mission at the time. See if you can find me {click on the picture to enlarge}. It is kind of like Where's Waldo? I'm even wearing red and white stripes.

Tuesday, July 13, 2010

Snowball Night: Week 7

Every man, through fear, mugs his aspirations a dozen times a day.
-Brendan Francis


I don't have much progress to report on my first Snowball Quilt.

Here is the back of the quilt with all those teeny tiny corners I saved and sewed together into scrappy baby snowball blocks. It turned out pretty fun, but for a while there I was worried that it wasn't going to work out. They didn't actually look like snowballs until they were all sewn in.

I've got it mostly pinned for quilting. Just over half-way through I ran out of curved basting pins, so I sorted through my regular safety pins and pulled out all the ones that were the same size as the basing pins. That got me a little over half of what I needed, so then I pulled the next size down out and they worked without much trouble. But I still have a corner and one side of the border that need pinned and I'm not to keen on the idea of using the itty bitty pins that are left to finish the job. I'm hearing shouts of, just go buy more pins! Normally I would, but there are budget constraints so I'm hoping to make this work with what I have. I think that this corner is stable enough that if I start working on the opposite side I can use the pins that come out of that side to finish pinning.

I wanted to have it quilted and bound by now. The last word I heard was that my sister's wedding shower was today, but when I talked to my mom to confirm, she told me it wasn't until next week, so I let my lack of pins and cowardice take the reigns on this project. I have planned for this quilt {free motion} stippling, but I've only practiced it a little bit and it is pretty craptastic. I know I'll get better with practice, but I hate for a quilt that is a gift to be my practice piece. I've been picturing making lovely rounded stipples in my head all week long, hoping that visualization will get me there, but the only thing for it is to just do it.

Monday, July 12, 2010

Wedding Rings and Wedding Dresses

In a time when nothing is more certain than change, the commitment of two people to one another has become difficult and rare. Yet, by its scarcity, the beauty and value of this exchange have only been enhanced. -Robert Sexton

Remember the double wedding ring quilt memento I made from left-over wedding dress fabric combined with the super fabulous Metro Blue line? The wedding was a couple of weeks ago and now that I've seen the dress, the white lace with ivory colored satin makes much more sense. The lady who made the bride's dress also made a vest for the groom which, I think, makes the quilt memento all the more special {I think I can say that without sounding too boastful, because the whole idea of making something of the leftover fabric wasn't mine. The way the whole project came together with the woman who made the dress suggesting that I do something like that and then getting the idea for the double wedding ring block was inspired, in the true sense of the word, I think. I take no credit -- I just put it together and get to show it off a bit.}.

I thought you might like to see the beautiful bride and her groom on their special day. You can see how pretty that lace looks over the top of the satin. The dress is beautiful. I love the chocolate sash on it and the groom, in his matching vest and chocolate suit, is very handsome.

Here's a wider shot with the bride's parents and you can see most of the dress. I love the contrast between the bodice and the skirt, and look how pretty her bouquet is.

Here is one final picture of them cutting their cake. Don't you just love weddings?