Men love their country, not because it is great, but because it is their own. –Seneca
By Way of Introduction
One post about the comings and goings lately wasn't enough for this week to cover all the random bits of this and that floating around in my head that I feel I just have to share. So welcome to the Tuesday Edition of VSM.
Partay in the USA
Mr. Bug's work schedule is upside down and he has become a mostly nocturnal animal, which is something he has to maintain even on his days off. It is an adjustment. But sometimes it works to our advantage.
Yesterday morning we put on our party shirts and headed for the movie theater. We got there for the first showing of the day for Cars 2 {loved it, by the way}. Being the early bird is pretty awesome. We arrived 10 minutes before the movie started on a holiday, did not have to wait in line for tickets or popcorn, paid a lower admission price {although not by much; those silly 3-D glasses really jack the price up} and we had our pick of seats in the theater. There were only a few other families there, so we didn't have to put up with fussing kids or talking or the backs of our seats being kicked. By the time the movie was over, crowds were starting to form in the lobby and the ticket line looked like a pretty good wait. We laughed and headed to our favorite pizza place. Ahead of the game, we were seated right away in the nearly empty restaurant, were served quickly and enjoyed a leisurely meal without all the noise of the holiday crowd.
When we got home, I made my Bugs pose for a photo op in their party shirts. Someone looks goofy in all of the pictures, so in the spirit of liberty and justice for all, you get to see them all looking goofy. I love my goofy little bunch.
Sparkle Toes
Because it was a holiday, and sparkly and red is the thing this time of year, I treated myself to a pedicure {read: I soaked my feet in the tub before I did all the scrubbing and buffing and pedicuring and I put on more than one coat of polish, which necessitated those funky toe separator things}. I did DIY Glitter Toes. Is it horrible that I can't stop staring at my feet? My toes are SO sparkly! I love it! I put on three coats of red polish, so I'd have a really nice base of red and while the third coat was still wet, I coated my toes with red glitter. Then I put on three coats of clear, and I think I'll probably add a fourth tomorrow. I'm hoping that I can get a good week's worth of wear out of them before they start to chip, because touch-ups will be tricky. Oh, and don't you love my new{ish} flip flops? I've almost given up all my other shoes in favor of these. It's the next best thing to going barefoot.
Monday Music Spot, Tuesday Style: Reflections on Rain
I've posted about all the Mondays it has rained this spring. It is summer now and the rain has mostly stopped. At least, the all-day-pouring-buckets-stay-inside-and-curl-up-with-a-good-book kind of rain. I kind of miss it. Last night there was a tiny little shower. It lasted only 10 or 15 minutes and was only a sprinkle of rain — certainly nothing to dampen {ha, ha! I kill myself with the puns} anyone's celebration. All of that rain in May and June has made for a very different July. For the first time in years signs haven't been posted limiting the areas in which you can let off fireworks because it is really dry and the fire danger is high. And for the first time ever, aerial fireworks are legal in Utah.
I had to work over the weekend {Saturday and Monday; accounting heeds no holidays}. I fit it in around my family activities. I was coming home from work at just after 9:00 pm last night in the little rain shower and as I reached the summit of a little hill on the way into town, I could see fireworks going off all over the place. When I got home, the Little Bugs and I went outside and it was like being inside a giant snow globe of fireworks — a fireworks globe, if you will. It was an absolute free-for-all. Everywhere you turned, the most beautiful fireworks were going off. We hardly knew where to look there were so many.
And tonight it is raining. That most awesome open-the-windows-listen-to-it-beat-on-the-roof-snuggle-under-the-covers-sing-you-to-sleep kind of rain. While I was at work this weekend, I spent some quality time with Josh Groban {among others} and I think this is just about perfect.
Tuesday, July 5, 2011
Monday, July 4, 2011
Various and Sundry Monday: Fourth of July Edition
Love your country. Your country is the land where your parents sleep, where is spoken that language in which the chosen of your heart, blushing, whispered the first word of love; it is the home that God has given you that by striving to perfect yourselves therein you may prepare to ascend to him. –Giuseppe Mazzini
Monday Music Spot: America the Beautiful
Parades and barbecues. Fireworks and time spent with family. But the Fourth of July celebration goes deeper than that. It is wrought of a love and loyalty for the land in which we live. I would say that I'm proud to be an American, except that's not really the right word. Blessed? Certainly. Humbled? Indeed. Grateful? Definitely.
Red, White & Blue Sampler
Once upon a time, about seven or eight years ago, I started a quilt. My mom had done a block-of-the month sampler at her LQS and I borrowed the four patterns from her. I only did a little bit of work on it; I gathered fabrics {which is one of my favorite parts of making a quilt} but was dissatisfied because I couldn't find the same fabrics that the quilt shop had provided with the patterns. I only finished two blocks. Then the project sat in the closet for a few years, until I had a renewed interest in quilting. Two or three years ago, I pulled the quilt out and decided to add some more blocks to the original four. I searched the internet for patriotic patterns and found The Quilter's Cache to be a really great resource. As I auditioned blocks for my quilt, I refined the ideas in my head to come up with a layout for it. I narrowed the patterns down and got to work.
As it stands, I have 10 blocks finished and need to do three more 12" blocks {all paper pieced}, one 5" block and one 5" x 9" block, plus twenty-seven 1" paper-pieced five-point stars for the setting squares in the sashing. I left the outer border on my diagram empty because I want to do flying geese on the border, but the quilt finishes at 53" x 40" so the geese don't divide evenly into the 53" sides. I've figured out how I'm going to do it though, and I think that the border will be awesome.
Although I really love this quilt, I think it stalled for a couple of reasons. First, paper piecing is so tedious. I love the results, but am not overly fond of the process. And second, it needed a little rest period. I needed to hash over the details of it in my head and figure out the best way to finish it. However, I've got a renewed interest in it and hope to make some progress on it soon.
The List
I am distracted by anything shiny and new, as evidenced by the eight year-old Ph.D I just showed you. At the beginning of the year, I set a pretty lofty goal of finishing seven quilts during the next six months. While I did finish seven quilts between January 1 and June 30, they weren't precisely the seven quilts I set out to do. Goals and priorities changed and some of the quilts got bumped down the list and new quilts took their place.
• Grandpa's Candy Dish: Done
• Gracie's Pinwheels: Done
• Cozy Posies: Done
• Magic quilt: Done
• Tweet Tweet: Done
• Service Rendered: Done
• Rainbow Sherbet: Double Dipping: Done
It is really nice feeling to have those quilts finished and checked off my list. There are a few projects that will carry over to my new list for the next six months. I'm not exactly sure how to prioritize this list. There are several quilts I'm itching to get done. And then there are the projects that need to get done. I'm going to focus as much as I can on Ph.D's, but I do have a couple of things I want to do for Christmas. Starting early will be the only way to arrive at Christmas without going completely crazy. I've ordered the list roughly in the priority that I want to work on things, but I'm going to have to see how things go.
• Pinwheel Sampler: current project
• Boo to You!: blocks are nearly all completed; I work on it when I need a project-to-go and want to finish it in time to hang for Halloween this year. I haven't decided if I'm going to quilt this one myself or take it to the shop where I got the pattern and have the pattern designer herself quilt it. This will dictate somewhat how soon I need to get the top finished.
• Project Polka-Dot: fabric partially cut
• Chicken Table Runner for family White Elephant party at Christmas: fabrics washed
• Floral Table Runner for family White Elephant party at Christmas: fabrics washed
• Sudoku Quilt: Blocks cut; working on this monthly for a quilt class I'm teaching
• Red, White & Blue Sampler: See Above
• Woman's Work: half of the blocks finished
• Metro Blues quilt: fabrics cut and super awesome variegated thread purchased for quilting.
The Pinwheel Sampler, Project Polka-Dot, and Woman's Work carry over from the last list. Besides what I've listed here, I'd really like to get back to my Twilight quilts and the Twilight BOM. If only there were more time in the day to quilt. I've got my work cut out for me and will love every minute of it!
Monday Music Spot: America the Beautiful
Parades and barbecues. Fireworks and time spent with family. But the Fourth of July celebration goes deeper than that. It is wrought of a love and loyalty for the land in which we live. I would say that I'm proud to be an American, except that's not really the right word. Blessed? Certainly. Humbled? Indeed. Grateful? Definitely.
Red, White & Blue Sampler
Once upon a time, about seven or eight years ago, I started a quilt. My mom had done a block-of-the month sampler at her LQS and I borrowed the four patterns from her. I only did a little bit of work on it; I gathered fabrics {which is one of my favorite parts of making a quilt} but was dissatisfied because I couldn't find the same fabrics that the quilt shop had provided with the patterns. I only finished two blocks. Then the project sat in the closet for a few years, until I had a renewed interest in quilting. Two or three years ago, I pulled the quilt out and decided to add some more blocks to the original four. I searched the internet for patriotic patterns and found The Quilter's Cache to be a really great resource. As I auditioned blocks for my quilt, I refined the ideas in my head to come up with a layout for it. I narrowed the patterns down and got to work.
As it stands, I have 10 blocks finished and need to do three more 12" blocks {all paper pieced}, one 5" block and one 5" x 9" block, plus twenty-seven 1" paper-pieced five-point stars for the setting squares in the sashing. I left the outer border on my diagram empty because I want to do flying geese on the border, but the quilt finishes at 53" x 40" so the geese don't divide evenly into the 53" sides. I've figured out how I'm going to do it though, and I think that the border will be awesome.
Although I really love this quilt, I think it stalled for a couple of reasons. First, paper piecing is so tedious. I love the results, but am not overly fond of the process. And second, it needed a little rest period. I needed to hash over the details of it in my head and figure out the best way to finish it. However, I've got a renewed interest in it and hope to make some progress on it soon.
The List
I am distracted by anything shiny and new, as evidenced by the eight year-old Ph.D I just showed you. At the beginning of the year, I set a pretty lofty goal of finishing seven quilts during the next six months. While I did finish seven quilts between January 1 and June 30, they weren't precisely the seven quilts I set out to do. Goals and priorities changed and some of the quilts got bumped down the list and new quilts took their place.
• Grandpa's Candy Dish: Done

• Gracie's Pinwheels: Done

• Cozy Posies: Done

• Magic quilt: Done

• Tweet Tweet: Done

• Service Rendered: Done

• Rainbow Sherbet: Double Dipping: Done

It is really nice feeling to have those quilts finished and checked off my list. There are a few projects that will carry over to my new list for the next six months. I'm not exactly sure how to prioritize this list. There are several quilts I'm itching to get done. And then there are the projects that need to get done. I'm going to focus as much as I can on Ph.D's, but I do have a couple of things I want to do for Christmas. Starting early will be the only way to arrive at Christmas without going completely crazy. I've ordered the list roughly in the priority that I want to work on things, but I'm going to have to see how things go.
• Pinwheel Sampler: current project
• Boo to You!: blocks are nearly all completed; I work on it when I need a project-to-go and want to finish it in time to hang for Halloween this year. I haven't decided if I'm going to quilt this one myself or take it to the shop where I got the pattern and have the pattern designer herself quilt it. This will dictate somewhat how soon I need to get the top finished.
• Project Polka-Dot: fabric partially cut
• Chicken Table Runner for family White Elephant party at Christmas: fabrics washed
• Floral Table Runner for family White Elephant party at Christmas: fabrics washed
• Sudoku Quilt: Blocks cut; working on this monthly for a quilt class I'm teaching
• Red, White & Blue Sampler: See Above
• Woman's Work: half of the blocks finished
• Metro Blues quilt: fabrics cut and super awesome variegated thread purchased for quilting.
The Pinwheel Sampler, Project Polka-Dot, and Woman's Work carry over from the last list. Besides what I've listed here, I'd really like to get back to my Twilight quilts and the Twilight BOM. If only there were more time in the day to quilt. I've got my work cut out for me and will love every minute of it!
Sunday, July 3, 2011
Saturday, July 2, 2011
Scrappy Snowball Quilt Tutorial
Teaching is reminding others that they know just as well as you. You are all learners, doers and teachers. –Richard Bach
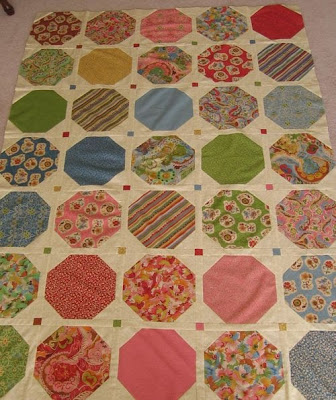
Once upon a time, I guest posted over at Sew We Quilt {formerly Stash Manicure}. My post was a tutorial for the Snowball quilts I've done. At the time, I only had one quilt done, but having just finished the second quilt, I had a renewed interest in the tutorial and realized that it should be posted here as well. And so I proudly present the Scrappy Snowball Quilt Tutorial.
Downloadable, printable PDF
These quilts were inspired by Snowball Night, a quilt-along by Karen of Sew Many Ways, and one of the samples she showed in her post. I pulled the print fabrics from my stash and once I got working with them, I decided that I was going to make two quilts. I was really surprised that I had enough of each of the print fabrics for two quilts, because I don’t have a very big stash. This is what I came up with.
Now that I've shown you what is possible, even from a really small stash, let's get down to the nuts and bolts. The finished size is 53ish" x 67ish" {you know how quilts have a mind of their own and they don't always strictly obey the rules of math}, the perfect size for snuggling under while reading or watching TV. I was working with mostly fat quarters. I had a few half-yard pieces and some larger, odd-sized scraps. This quilt has 20 different fabrics in it. If you are working exclusively with fat quarters, you'll need about 25 fat quarters to make two quilt tops or 13 for one quilt top. For each quilt, you'll also need 4½ yards of neutral fabric {white, off-white, grey, tan, etc.} for your background, binding and back.
From your fat quarters for each quilt cut:
• 48 - 6½" squares {for snowballs}
• 63 - 1½" squares {for setting squares}
• 4 - 2½" squares {for quilt corners}
• 102 - 2½" x 5½" rectangles {for stacked coin border}
From your neutral fabric for each quilt, cut:
• 192 - 2½" squares {for snowballs}
• 110 - 1½" x 6½" rectangles {for sashing}
• 8 - 2¼" x 2½" rectangles {for quilt corners}
• 8 - 2" x 5½" rectangles {for quilt corners}
• 1 - 58" x WOF {minus selvage edges} rectangle {for back}
• 1 - 58" x 26" rectangle {for back}
• 1 - 28" square {for binding, see tutorial for continuous bias binding}
Snowball blocks:
• Mark each of the 2½” background squares diagonally from corner to corner {black line on diagram}.
• Using your clear ruler, measure ½” away from the center diagonal line and make a second line {grey line on diagram}. These are your sewing lines. The pink line between them is the cutting line.
• Place a 2½” square {right sides together} in each corner of your 6½” snowball blocks. Sew along each seam line on all four corners. Make sure to sew just outside of the seam line {ie, on the cutting line side of the seam line}. This will help keep your blocks nice and square.
Note: Sewing along the outer seam line will allow you to use the corners for baby snowball blocks to put across the seam on the quilt back. Even though they are pretty small and time consuming, it is worth it in the end.
• Cut the corners away from the snowball blocks and press the corners out.
• You will be left with four half-square triangles from each snowball blocks. Press the seams open {it helps to minimize bulk}. Sew the half-square triangles together into four-patches with the snowball fabrics in the centers. Square them up to 2½". Set aside.
Assembly:
• The layout for this quilt is 6 x 8. Finished size is 53" x 67".
• Vertical columns {moving left to right} are one through six.
• Horizontal rows {moving top to bottom} are A through H.
Quilt Top:
• Sew a sashing strip to the left side of each of the 48 snowball blocks. Press the seams towards the snowball block.
• Sew a 1½" setting square on one end of the remaining 62 sashing strips. On the last {62nd} sashing strip, sew a second setting square on the opposite end. Press the seams towards the setting squares.
• Sew a sashing strip with setting square to the top of each of the 48 snowball blocks {you may want to lay your quilt out at this point for even distribution of the colors}. The pressing here gets a little tricky. If you haven’t already, lay out your blocks before you press so that you can press them in opposite directions so the seams will nest together and match up nicely. Once you have your layout established, move left to right and press the seams on all the blocks in column one towards the sashing, column two towards the snowball, alternating through column six.
• You should have sashing across the top and left side of the quilt, with left-over sashing and setting square strips for the bottom and right sides.
• Add a sashing and setting square strip to all of the blocks along the right side of the quilt {column six} so that they are sashed on the top and both sides. Alternate the direction you press each column, moving from top to bottom. On row A, press towards the sashing, then towards the snowball on row B. Continue all the way down to the bottom row H.
• Add a sashing-and-setting-square-strip to all of the blocks along the bottom {row H}. Use the sashing piece with setting squares on both ends for the bottom right corner. Alternate pressing towards the sashing and towards the snowball for each block; starting with pressing towards the sashing.
• Moving left to right, sew all the blocks together in the top row {row A}. Press the seams towards the sashing.
• Sew the second row {row B} together, pressing the seams towards the snowball blocks. Continue to sew the remaining rows together {rows C through H}, alternating the direction you press the seams.
• You should now have eight rows; each row is six blocks wide.
• Sew row A to row B, sew row C to the bottom of row B, continuing until all the rows are sewn together. Press the seams towards the sashing strips.
Border:
• Sew the 2½" x 5½" rectangles into four strips; two strips with 29 rectangles each and two strips with 22 rectangles each. Press the seams to the left.
• Measure your quilt top along the left and right side and vertically down the center. Add the three numbers together and then divide by three. This is your {average} quilt length. Your border strips will be longer than your quilt. To solve this problem, sew some of the seam allowances again {spread evenly across the border}, a smidge more than ¼". It is much less noticeable than cutting off a bit on the ends of each border; your eye often won't even notice the minimal differences in the width of the strips. Start small and adjust as necessary. On the two longer border pieces, take in three seams on each strip and then measure. Continue to adjust the length of the two long border pieces by taking in two seams at a time until it is the desired length of the quilt.
• Match centers of the border and the quilt top. Match the ends of the quilt and border strips and match the border and quilt top at the half-way points between the ends and the center. This is one area of the quilt where I use lots of pins. Make sure the seam allowances are pointed down towards the bottom of the quilt on the left side border and up towards the top of the quilt on the right side border and sew them together with the sashing/quilt top side up. All of the seam allowances on the border strip are moving into your machine and will lay flat. The seam allowances on the quilt top, which go in different directions, will be facing up as you sew, so you can manage them and keep them all flat. Press the seam allowance towards the sashing/quilt top
• Measure the quilt top again, this time across the top and bottom and horizontally across the center. Do not measure the borders; only measure the quilt top. Add the three numbers together and divide by three to find the {average} quilt width. Add ½" to that number and then adjust the top and bottom border strips to size by taking in a few seams at a time.
• Assemble your quilt corners. Sew a 2¼" x 2½" neutral rectangle to each side of the four 2½" squares you cut from your fat quarters. Press seams out. Sew a neutral 2" x 5½" rectangle to the top and bottom of each of those four pieces. You should have four 5½" squares.
• Sew a corner square to either end of the two remaining border pieces. Press the seam allowances towards the corner square.
• The quilt corner squares should match up with the border seams on the sides that are already attached. Match the quilt top center with the border center, and the half-way mark between the center and side seams. The seam allowances on the border should point to the left across the top and to the right across the bottom. Sew with the borders down. Press the seam allowances towards the sashing/quilt top.
Back:
• The seam on the back of the quilt runs horizontally, left to right. I used my corner scraps to make baby snowballs. It is tedious and doesn't look like it is going to work out until the very last second, when they are all stitched in place, but it is so worth it. I off-set mine by leaving two blocks in half pieces and sewing them to the ends of one line of snowballs. I also added a 4½" x 8½" {unfinished} label in the middle of the row. You won't have enough baby snowballs if you leave the label out.
• The back should be roughly, 58" x 71", about 4" larger than the quilt top, giving a little wiggle room for machine quilting.
Quilting:
Quilt as desired. My first Snowball quilt was the first quilt I ever machine quilted, so I did an all-over meander or stipple. I had a bit more machine quilting experience by the time I finished my second Snowball quilt, so I did some custom quilting {swirls, curlicues and feathers} on the second quilt.
Binding:
Try this continuous bias binding tutorial.
Once upon a time, I guest posted over at Sew We Quilt {formerly Stash Manicure}. My post was a tutorial for the Snowball quilts I've done. At the time, I only had one quilt done, but having just finished the second quilt, I had a renewed interest in the tutorial and realized that it should be posted here as well. And so I proudly present the Scrappy Snowball Quilt Tutorial.
Downloadable, printable PDF
These quilts were inspired by Snowball Night, a quilt-along by Karen of Sew Many Ways, and one of the samples she showed in her post. I pulled the print fabrics from my stash and once I got working with them, I decided that I was going to make two quilts. I was really surprised that I had enough of each of the print fabrics for two quilts, because I don’t have a very big stash. This is what I came up with.
Now that I've shown you what is possible, even from a really small stash, let's get down to the nuts and bolts. The finished size is 53ish" x 67ish" {you know how quilts have a mind of their own and they don't always strictly obey the rules of math}, the perfect size for snuggling under while reading or watching TV. I was working with mostly fat quarters. I had a few half-yard pieces and some larger, odd-sized scraps. This quilt has 20 different fabrics in it. If you are working exclusively with fat quarters, you'll need about 25 fat quarters to make two quilt tops or 13 for one quilt top. For each quilt, you'll also need 4½ yards of neutral fabric {white, off-white, grey, tan, etc.} for your background, binding and back.
From your fat quarters for each quilt cut:
• 48 - 6½" squares {for snowballs}
• 63 - 1½" squares {for setting squares}
• 4 - 2½" squares {for quilt corners}
• 102 - 2½" x 5½" rectangles {for stacked coin border}
From your neutral fabric for each quilt, cut:
• 192 - 2½" squares {for snowballs}
• 110 - 1½" x 6½" rectangles {for sashing}
• 8 - 2¼" x 2½" rectangles {for quilt corners}
• 8 - 2" x 5½" rectangles {for quilt corners}
• 1 - 58" x WOF {minus selvage edges} rectangle {for back}
• 1 - 58" x 26" rectangle {for back}
• 1 - 28" square {for binding, see tutorial for continuous bias binding}
Snowball blocks:
• Mark each of the 2½” background squares diagonally from corner to corner {black line on diagram}.
• Using your clear ruler, measure ½” away from the center diagonal line and make a second line {grey line on diagram}. These are your sewing lines. The pink line between them is the cutting line.
• Place a 2½” square {right sides together} in each corner of your 6½” snowball blocks. Sew along each seam line on all four corners. Make sure to sew just outside of the seam line {ie, on the cutting line side of the seam line}. This will help keep your blocks nice and square.
Note: Sewing along the outer seam line will allow you to use the corners for baby snowball blocks to put across the seam on the quilt back. Even though they are pretty small and time consuming, it is worth it in the end.
• Cut the corners away from the snowball blocks and press the corners out.
• You will be left with four half-square triangles from each snowball blocks. Press the seams open {it helps to minimize bulk}. Sew the half-square triangles together into four-patches with the snowball fabrics in the centers. Square them up to 2½". Set aside.
Assembly:
• The layout for this quilt is 6 x 8. Finished size is 53" x 67".
• Vertical columns {moving left to right} are one through six.
• Horizontal rows {moving top to bottom} are A through H.
Quilt Top:
• Sew a sashing strip to the left side of each of the 48 snowball blocks. Press the seams towards the snowball block.
• Sew a 1½" setting square on one end of the remaining 62 sashing strips. On the last {62nd} sashing strip, sew a second setting square on the opposite end. Press the seams towards the setting squares.
• Sew a sashing strip with setting square to the top of each of the 48 snowball blocks {you may want to lay your quilt out at this point for even distribution of the colors}. The pressing here gets a little tricky. If you haven’t already, lay out your blocks before you press so that you can press them in opposite directions so the seams will nest together and match up nicely. Once you have your layout established, move left to right and press the seams on all the blocks in column one towards the sashing, column two towards the snowball, alternating through column six.
• You should have sashing across the top and left side of the quilt, with left-over sashing and setting square strips for the bottom and right sides.
• Add a sashing and setting square strip to all of the blocks along the right side of the quilt {column six} so that they are sashed on the top and both sides. Alternate the direction you press each column, moving from top to bottom. On row A, press towards the sashing, then towards the snowball on row B. Continue all the way down to the bottom row H.
• Add a sashing-and-setting-square-strip to all of the blocks along the bottom {row H}. Use the sashing piece with setting squares on both ends for the bottom right corner. Alternate pressing towards the sashing and towards the snowball for each block; starting with pressing towards the sashing.
• Moving left to right, sew all the blocks together in the top row {row A}. Press the seams towards the sashing.
• Sew the second row {row B} together, pressing the seams towards the snowball blocks. Continue to sew the remaining rows together {rows C through H}, alternating the direction you press the seams.
• You should now have eight rows; each row is six blocks wide.
• Sew row A to row B, sew row C to the bottom of row B, continuing until all the rows are sewn together. Press the seams towards the sashing strips.
Border:
• Sew the 2½" x 5½" rectangles into four strips; two strips with 29 rectangles each and two strips with 22 rectangles each. Press the seams to the left.
• Measure your quilt top along the left and right side and vertically down the center. Add the three numbers together and then divide by three. This is your {average} quilt length. Your border strips will be longer than your quilt. To solve this problem, sew some of the seam allowances again {spread evenly across the border}, a smidge more than ¼". It is much less noticeable than cutting off a bit on the ends of each border; your eye often won't even notice the minimal differences in the width of the strips. Start small and adjust as necessary. On the two longer border pieces, take in three seams on each strip and then measure. Continue to adjust the length of the two long border pieces by taking in two seams at a time until it is the desired length of the quilt.
• Match centers of the border and the quilt top. Match the ends of the quilt and border strips and match the border and quilt top at the half-way points between the ends and the center. This is one area of the quilt where I use lots of pins. Make sure the seam allowances are pointed down towards the bottom of the quilt on the left side border and up towards the top of the quilt on the right side border and sew them together with the sashing/quilt top side up. All of the seam allowances on the border strip are moving into your machine and will lay flat. The seam allowances on the quilt top, which go in different directions, will be facing up as you sew, so you can manage them and keep them all flat. Press the seam allowance towards the sashing/quilt top
• Measure the quilt top again, this time across the top and bottom and horizontally across the center. Do not measure the borders; only measure the quilt top. Add the three numbers together and divide by three to find the {average} quilt width. Add ½" to that number and then adjust the top and bottom border strips to size by taking in a few seams at a time.
• Assemble your quilt corners. Sew a 2¼" x 2½" neutral rectangle to each side of the four 2½" squares you cut from your fat quarters. Press seams out. Sew a neutral 2" x 5½" rectangle to the top and bottom of each of those four pieces. You should have four 5½" squares.
• Sew a corner square to either end of the two remaining border pieces. Press the seam allowances towards the corner square.
• The quilt corner squares should match up with the border seams on the sides that are already attached. Match the quilt top center with the border center, and the half-way mark between the center and side seams. The seam allowances on the border should point to the left across the top and to the right across the bottom. Sew with the borders down. Press the seam allowances towards the sashing/quilt top.
Back:
• The seam on the back of the quilt runs horizontally, left to right. I used my corner scraps to make baby snowballs. It is tedious and doesn't look like it is going to work out until the very last second, when they are all stitched in place, but it is so worth it. I off-set mine by leaving two blocks in half pieces and sewing them to the ends of one line of snowballs. I also added a 4½" x 8½" {unfinished} label in the middle of the row. You won't have enough baby snowballs if you leave the label out.
• The back should be roughly, 58" x 71", about 4" larger than the quilt top, giving a little wiggle room for machine quilting.
Quilting:
Quilt as desired. My first Snowball quilt was the first quilt I ever machine quilted, so I did an all-over meander or stipple. I had a bit more machine quilting experience by the time I finished my second Snowball quilt, so I did some custom quilting {swirls, curlicues and feathers} on the second quilt.
Binding:
Try this continuous bias binding tutorial.
Friday, July 1, 2011
Favourite Things Friday: Barbie®
Love her or hate her, Barbie has become an undeniable part of our culture. –Lists Galore
I know there is a lot of controversy surrounding Barbie. Hopefully I won't get booed right off of Favourite Things Friday, because I choose to look past all the hype and see her for what she is; a plaything. Did I ever want to look like her? Well, not exactly. I wanted to be her size {as in 10" tall} so I could live in the Dream House and swim in the pool and drive the pink convertible and wear her shoes. But do I have body image issues because of her? No.
What I love about Barbie is that she can be anyone and do anything. And she looks spectacular doing it {and I'm talking clothes here, not body size}. The same doll, dressed a thousand different ways. Theme and variation. What's not to love?
I get the Barbie catalog every so often. I love to flip through and drool over all the outfits-in-miniature Barbie and company get to wear {as a side note, I tried sewing clothes for Barbie once. Super not fun}. Though I love to look, I am not an avid collector. My collection is hardly a collection at all. I have 12 dolls — the entire Wizard of Oz set released in 2007. This particular set {and I think there have been two others} includes Dorothy, The Scarecrow, The Tin Man, The Cowardly Lion, Glinda the Good Witch, Lullaby Munchkin, Munchkins Gift Set, The Wicked Witch of the West {my favorite}, and the Winkie Guard and Winged Monkey set. When I decided that I wanted the set, some of the dolls were no longer available. But when I do a thing, I do it properly. I had to have them all. I bought what was available and then stalked the auctions on eBay until I had every last doll. The most difficult to get was the Lullaby Munchkin. She was never sold individually. She only came in a gift set {which was no longer available} so the only way to get one was from someone who split up a set and put her up for auction. You know she was over-priced, but I had to have her to complete the set. My collection is sitting mint-in-their boxes patiently waiting for the library wing of Bug Cottage to be built, complete with glass display cases for things like dolls and chess sets. If you want to know the truth, though, I'm dying to take them out of their boxes and play with them. Dorothy's Ruby Slippers are to die for and I wonder if her dress is as soft as it looks.
The fun thing about Barbie is there is something for everyone. I love the recreation dolls, like the Wizard of Oz set and the Barbie loves Lucy collection. I think my favorite dolls are in the Barbie love Pop Culture collection. Wonder Woman. Bat Girl. Super Girl. Star Trek. Awesome! But certain of their collections are not for me. The vintage reproduction Barbies are a little bit creepy. How did they ever sell a single doll {much less become the sensation they are today} with that scowl she wears? I'm not overly fond of some of the Bob Mackie dolls either. Possibly the worst Barbie {and I use the term loosely to describe the molded plastic figures of either sex} ever put into production is the Edward Ken Doll from the Twilight series.
I think my favorite Barbie of all time, the one I wish I would have bought but didn't, is The Pirate Barbie® Doll. She debuted in 2007, riding on the coattails of the popular series of Pirate movies, with a gold label {production classification for collectors; each label color denotes how rare or common a doll is} and a retail price of $174.99. I'm fairly certain I had her in my on-line shopping cart more than once, but I could never press the checkout button. Eventually her price dropped, going down in increments. Her final selling price from Mattel was $55, but at the time groceries were higher on my priority list than doll collecting. I took a quick peek and she's going for as low as $75 and as high as $250 on eBay right now. To collect, or not to collect? Just look at her bad pirate self. Is she not the coolest Barbie you have ever seen?
Today's post brought to you by:

I know there is a lot of controversy surrounding Barbie. Hopefully I won't get booed right off of Favourite Things Friday, because I choose to look past all the hype and see her for what she is; a plaything. Did I ever want to look like her? Well, not exactly. I wanted to be her size {as in 10" tall} so I could live in the Dream House and swim in the pool and drive the pink convertible and wear her shoes. But do I have body image issues because of her? No.
What I love about Barbie is that she can be anyone and do anything. And she looks spectacular doing it {and I'm talking clothes here, not body size}. The same doll, dressed a thousand different ways. Theme and variation. What's not to love?
I get the Barbie catalog every so often. I love to flip through and drool over all the outfits-in-miniature Barbie and company get to wear {as a side note, I tried sewing clothes for Barbie once. Super not fun}. Though I love to look, I am not an avid collector. My collection is hardly a collection at all. I have 12 dolls — the entire Wizard of Oz set released in 2007. This particular set {and I think there have been two others} includes Dorothy, The Scarecrow, The Tin Man, The Cowardly Lion, Glinda the Good Witch, Lullaby Munchkin, Munchkins Gift Set, The Wicked Witch of the West {my favorite}, and the Winkie Guard and Winged Monkey set. When I decided that I wanted the set, some of the dolls were no longer available. But when I do a thing, I do it properly. I had to have them all. I bought what was available and then stalked the auctions on eBay until I had every last doll. The most difficult to get was the Lullaby Munchkin. She was never sold individually. She only came in a gift set {which was no longer available} so the only way to get one was from someone who split up a set and put her up for auction. You know she was over-priced, but I had to have her to complete the set. My collection is sitting mint-in-their boxes patiently waiting for the library wing of Bug Cottage to be built, complete with glass display cases for things like dolls and chess sets. If you want to know the truth, though, I'm dying to take them out of their boxes and play with them. Dorothy's Ruby Slippers are to die for and I wonder if her dress is as soft as it looks.
The fun thing about Barbie is there is something for everyone. I love the recreation dolls, like the Wizard of Oz set and the Barbie loves Lucy collection. I think my favorite dolls are in the Barbie love Pop Culture collection. Wonder Woman. Bat Girl. Super Girl. Star Trek. Awesome! But certain of their collections are not for me. The vintage reproduction Barbies are a little bit creepy. How did they ever sell a single doll {much less become the sensation they are today} with that scowl she wears? I'm not overly fond of some of the Bob Mackie dolls either. Possibly the worst Barbie {and I use the term loosely to describe the molded plastic figures of either sex} ever put into production is the Edward Ken Doll from the Twilight series.
I think my favorite Barbie of all time, the one I wish I would have bought but didn't, is The Pirate Barbie® Doll. She debuted in 2007, riding on the coattails of the popular series of Pirate movies, with a gold label {production classification for collectors; each label color denotes how rare or common a doll is} and a retail price of $174.99. I'm fairly certain I had her in my on-line shopping cart more than once, but I could never press the checkout button. Eventually her price dropped, going down in increments. Her final selling price from Mattel was $55, but at the time groceries were higher on my priority list than doll collecting. I took a quick peek and she's going for as low as $75 and as high as $250 on eBay right now. To collect, or not to collect? Just look at her bad pirate self. Is she not the coolest Barbie you have ever seen?

Subscribe to:
Posts (Atom)