Showing posts with label Snowball Quilt. Show all posts

Saturday, May 19, 2012

HMQS: Judge's Marks

You're not obligated to win. You're obligated to keep trying to do the best you can every day. –Marian Wright Edelman

I got the judge's marks back on the quilt I entered in the HMQS today. My marks were mostly positive, but there were a few items in the “needs improvement” category. After I got past the initial reaction to protect myself from criticism {which only took about 30 seconds}, I found the judge's marks to be very helpful. In the quality of quilting, I need to work on better control of the curves, as well as backtracking. In the last year since I finished the quilt I think my curves have improved, but I'll definitely be more mindful when I next do curves. I'll agree with the judge on the backtracking. It's a tricky business to learn and I still need to improve that.

My other “needs improvement” notes were on finishing—the entire category: straight edges, binding filled & securely stitched, miters stitched closed and square corners. This was kind of a surprise to me because binding a quilt is one of the things I love best. But I'll definitely take the notes and use them for improvement. Learning is the name of the game and I already I know how to improve the binding. I've been cutting it at 2½”, which leaves it a little bit loose. I'll start cutting at 2¼”, which should help with the fill. And I'll start stitching the miters at the corners closed. I kind of like them open, but if the judges want them closed, I'll give them what they want.

There were lots of positive comments; integration of color and design, overall precision of work {piecing, seams, points, borders, sashing} and the back of my quilt were all marked “well done.” I was particularly pleased with the things that were marked well done in the quality of quilting cateogry; stitch length, tension, distribution of quilting, and quilting pattern enhances. The final comments from the judge were, “Use of fabrics to form unity in design well done.” I'm really glad I entered and can't wait for the next show!

I wanted to share a two more of my favorites from the show. This first one is called Wisteria and it was amazing! I love all the 3-D details, the little embellishments in the flowers and the scroll-work border. Amazing! If you right-click on the photo, you can open it in a new tab and see it close-up.

This next quilt is called His Light Reflected. I love things in rainbow order. When I'm working with fabrics for a scrappy quilt, I always stack them in rainbow order. I always admire rainbow quilts and someday I'll maybe do one of my own. This one is so beautiful. I love how certain elements are repeated throughout the quilt.

Here is the center of the quilt. The quilting is absolutely spectacular.

The quilter matched the gradations of fabric from the center of the quilt out to the edges and matched her thread to the fabrics. It is such a simple quilt, but it is so gorgeous!

It is quilt show season and I am definitely looking forward to seeing more beautiful work!

Monday, May 14, 2012

Various & Sundry Monday: Vol. 27

Little drops of water,
Little grains of sand,
Make the mighty ocean
And the pleasant land:

So the little minutes,
Humble though they be,
Make the mighty ages
Of eternity.

Little deeds of kindness,
Little words of love,
Help to make earth happy
Like the heaven above.
–Julia Carney

More from the Home Machine Quilting Show
I've been picking up the HMQS catalogs every spring for probably the last 4 or 5 years, always admiring the quilts they show off and browsing the class lists. As I flipped through those pages I thought I'd never, ever, in a million years be quilting my own quilts. But last year when I was looking at the catalog, I was particularly interested in the quilt show because I'd started quilting my own quilts. I'd missed the entry deadline, which was OK because I didn't really have anything good enough to go in a show anyway. But I decided then that I would enter this year. I entered my Snowball Quilt. I knew it would be a daisy among the roses and didn't expect to win. I thought it would be fun to enter, though, because at the time I'd finished it {which was about 11 months after I started doing FMQ}, it was the best quilt I'd done. The show was last weekend in Salt Lake and here's my quilt hanging in the show.

Quilt shows are subjective and each person gets a unique experience when they attend, which is why, I think, it is hard to share them properly in a blog post. I mostly took close-up photos of quilting techniques that I liked and want to have as a reference. But there were a couple of quilts that I really liked and want to share them with you. I started yesterday with one of my favorites and I'll share another today. Maybe I'll show a couple of others in the next few days, or maybe not. I haven't decided yet. The lighting wasn't the best for taking photos. I alternated between using the flash and not using it. I used the flash on this quilt and should have gone with my gut and taken some without the flash. I did the best I could in editing.


These little embroidered dresses are so amazing! I love the bead details the quilter added. It is hard to pick a favorite!

Can You Tell Me How to Get {Back} to Sesame Street?
I've had to put my Sesame Street Quilt on the back burner for a little bit, because I had some prior sewing commitments that are a little time consuming, but not very interesting to post. Mostly, I'm participating in a half-square triangle swap that I signed up for in February, but that isn't due until the end of this month. I figured there was plenty of time, right? Right. Anyway, there's no set number of HST's you have to make. You just make however many you want, keep a few of each of your color combinations for yourself and send the rest to the coordinator. You get back the same number of HST's you sent in and then you can make something fabulous with them when they come back. I decided that I didn't want to be on top of the deadline for this one, so I've put the Sesame Street quilt on hold and have been working on getting them together. The HST's are 2" finished and I'll need 888 of them to make a nice lap-sized quilt. Picking and prepping the fabrics was fun, but sewing them together, even using a speed-piecing method, is killing me. Can you say snooze-fest?

My point is, 888 half-square triangles in the prep and sewing stages does not make for interesting blog fodder. I'm still looking for the balance between work, home, kids and me, so when I have a few free minutes and the choice is between sewing or blogging, sewing has been winning, even though it's not interesting enough to post about. When I get my swap triangles back and start sewing them together, then that will be interesting. And as soon as I get them wrapped up and in the mail, I'll be back to the Sesame Street quilt, racing for the deadline. The first quilt show is June 8th and 9th. If I miss that one, I have a few days before the entry period for the next quilt show. If I miss the second show, then I have three more weeks until the show here in town at the Art Museum, which is the show I really want to make it to. Hopefully, I'll be done with these HST's in the next few days and back to Sesame Street before mid-week {yeah, yeah. I know. Wishful thinking.}.

I was really inspired by Michelle's patterns and that's where this quilt started. As I've worked on blocks, I've also been working out all the details of the quilt, including how to quilt it. I wanted to do something other than my favorite swirls in the sashing and feathers in the border. Those didn't seem to really fit this quilt. I was inspired by a couple of things Lane is doing on his red silk quilt. I loved the pumpkin seed border and figured it would fit really nicely in the sashing of the Sesame Street quilt. Not so much.

The outer corners don't match up, and the intersections are kind of weird. So I asked Lane what he thought. He made some really great suggestions for making a motif work in your space. I revised. Lane {and everybody else}, what do you think? Do the little spacers work, or do I need to go back to the drawing board?

Monday Music Spot: A Thousand Years
The Piano Guys' latest release is an amazing! I don't think there is one thing they've done that I haven't like. But this one is extra cool because it also has a really great Twilight connection. They've put together an arrangement of Christina Perri's A Thousand Years from the Breaking Dawn soundtrack and it is beautiful.


Available for purchase from The Piano Guys or on iTunes

Story behind the song:
Our kids give us great inspiration for our music. When Jon's 17 year-old daughter said how much she loved this song, Jon decided to try it. He experienced a flood of inspiration. "Never has a piano part come together this fast" Jon says. Steve experienced similar inspiration while composing the cello parts. Since the lyrics suggest a bride walking towards the groom in a ceremony we thought we would include a quote from the Bridal Chorus by Wagner in the climax of the song (it is carefully disguised).

As it seems to always go, Paul and Tel didn't find the spot until they spent 9 hours driving around southern Utah the day before the shoot looking. After getting a little discouraged by not finding anything that great, they just happened to check out a little hidden spot right near Baker Dam and thought it was perfect for the song. The next morning we all loaded up the piano and headed out there to film, but after getting the Truck and Trailer stuck and waiting for the sun to move, we didn't get started filming until that evening having about 3 hours of light. It was so fun to film and play in the middle of the trees!

Credits
A Thousand Years written by CHRISTINA PERRI, DAVID HODGES
Published by SUMMIT BASE CAMP FILM MUSIC, EMI BLACKWOOD MUSIC INC, CHRISTINA PERRI D/B/A MISS PERRI LANE PUBLISHING
Arrangement produced by Jon Schmidt
Arrangement written by Al van der Beek, Jon Schmidt, & Steven Sharp Nelson
Performed by
Jon Schmidt: piano
Steven Sharp Nelson: acoustic cello, & cello-percussion
Music recorded, mixed & mastered by Al van der Beek at TPG Studio
Video produced by Paul Anderson & Tel Stewart

Monday, January 2, 2012

A Stitch In Time: 2011 Wrap-Up

Seventy percent of success in life is showing up. –Woody Allen

For the past two years, I've been keeping an index of all the projects I finish during each year. It has been fun to look back to see how much I've accomplished in one year. I humbly submit my 2011 finishes.

One Hired Machine Quilting & Binding Job

One Halloween Costume, Two Pieces {skirt & cloak}

Two Fleece Baby Blankets

Three Abbey Bags

Four Church Bags

Four Table Runners

Five Adult Bibs

Six Aprons {one reversible}

Eight Quilts

Twelve Quilted Notebook Covers

Fifteen Fabric Postcards

Eighteen Fancy Pillowcases

In case you lost count, that is 80 finishes, and I enjoyed every one of them. I hope that 2012 is as productive!

My 2011 Finishes

Friday, December 2, 2011

Favourite Things Friday: Free-Motion Quilting

Always trust a quilter. She knows her way around the block.
–Unknown


When I did free-motion quilting for the first time at the end of July 2010 I absolutely hated every second of it. I did a fairly tight meander across the whole thing. It took me about 10 hours to do a 52" x 68" quilt. It was tedious. I missed dropping off my quilt top at the long-arm quilter and getting it back transformed into something amazing. I saw every single imperfection. I worried the whole time that I had ruined it. I didn't think I would ever want to quilt my own again.

After a trip through the washer, I was fairly content with my first attempt at FMQ. Necessity {i.e. lack of income} dictated that if I wanted to finish any more quilts, I'd just have to do it myself. So I tried again with loopy flowers on the next quilt. It was an interesting adventure that turned out pretty well. I went back to meandering and straight-line on a couple more quilts and then did some more loopy flowers. I decided to give feathers a try and they didn't come out too badly. I branched out from there, adding in a bit of something new to each quilt, along with the old stand-by favorites. My skills improved, my stitches got more consistent and my quilting got more elaborate.

At the end of June 2011, I finished a second snowball quilt, identical to the one I'd started with. This one took about 35 hours to quilt, there wasn't one straight line or meander anywhere on it and I didn't find it tedious to spend all that time at the machine. As a matter of fact, I loved it. I loved free-motion quilting.

I know I'm tooting my own horn here. I'm not exactly sure how to go about this in a humble sort of way. I'm far from perfect at it and I can improve in so many ways. But I really like the rhythm of machine quilting. And there is something very satisfactory in making a quilt start to finish and having part of that process be producing something that is a reasonable facsimile of free-motion machine quilting.

In the interest of improving this skill, I've decided to do two things. The first is to {start and} finish the Free-Motion Quilt Along by Christina at A Few Scraps. I have my quilt top cut and ready to put together, the back cut and the batting waiting. I'm hoping to squeeze it in after I finish my Christmas crafting but before the New Year.

The second thing I've decided to do is to join Sew Cal Gal's Free-Motion Quilting Challenge.

There will be a new challenge each month from some really great FMQ experts. I've come a long way on my own, but I'm really looking forward to using these challenges to improve the way I quilt. There will be lots of mutual encouragement to keep me motivated and of course, prizes don't hurt either. Free-motion quilting is something that I really love to do and I'm hoping that I will love it even more as I improve.

Today's post brought to you by:

Saturday, July 2, 2011

Scrappy Snowball Quilt Tutorial

Teaching is reminding others that they know just as well as you. You are all learners, doers and teachers. –Richard Bach

Once upon a time, I guest posted over at Sew We Quilt {formerly Stash Manicure}. My post was a tutorial for the Snowball quilts I've done. At the time, I only had one quilt done, but having just finished the second quilt, I had a renewed interest in the tutorial and realized that it should be posted here as well. And so I proudly present the Scrappy Snowball Quilt Tutorial.

Downloadable, printable PDF

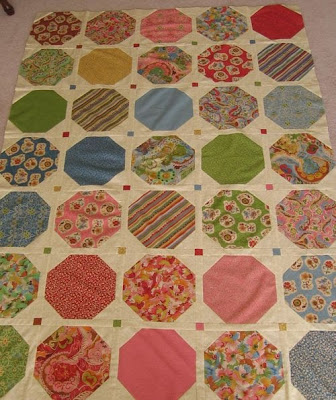
These quilts were inspired by Snowball Night, a quilt-along by Karen of Sew Many Ways, and one of the samples she showed in her post. I pulled the print fabrics from my stash and once I got working with them, I decided that I was going to make two quilts. I was really surprised that I had enough of each of the print fabrics for two quilts, because I don’t have a very big stash. This is what I came up with.

Now that I've shown you what is possible, even from a really small stash, let's get down to the nuts and bolts. The finished size is 53ish" x 67ish" {you know how quilts have a mind of their own and they don't always strictly obey the rules of math}, the perfect size for snuggling under while reading or watching TV. I was working with mostly fat quarters. I had a few half-yard pieces and some larger, odd-sized scraps. This quilt has 20 different fabrics in it. If you are working exclusively with fat quarters, you'll need about 25 fat quarters to make two quilt tops or 13 for one quilt top. For each quilt, you'll also need 4½ yards of neutral fabric {white, off-white, grey, tan, etc.} for your background, binding and back.

From your fat quarters for each quilt cut:
• 48 - 6½" squares {for snowballs}
• 63 - 1½" squares {for setting squares}
• 4 - 2½" squares {for quilt corners}
• 102 - 2½" x 5½" rectangles {for stacked coin border}

From your neutral fabric for each quilt, cut:
• 192 - 2½" squares {for snowballs}
• 110 - 1½" x 6½" rectangles {for sashing}
• 8 - 2¼" x 2½" rectangles {for quilt corners}
• 8 - 2" x 5½" rectangles {for quilt corners}
• 1 - 58" x WOF {minus selvage edges} rectangle {for back}
• 1 - 58" x 26" rectangle {for back}
• 1 - 28" square {for binding, see tutorial for continuous bias binding}

Snowball blocks:
• Mark each of the 2½” background squares diagonally from corner to corner {black line on diagram}.
• Using your clear ruler, measure ½” away from the center diagonal line and make a second line {grey line on diagram}. These are your sewing lines. The pink line between them is the cutting line.
• Place a 2½” square {right sides together} in each corner of your 6½” snowball blocks. Sew along each seam line on all four corners. Make sure to sew just outside of the seam line {ie, on the cutting line side of the seam line}. This will help keep your blocks nice and square.
Note: Sewing along the outer seam line will allow you to use the corners for baby snowball blocks to put across the seam on the quilt back. Even though they are pretty small and time consuming, it is worth it in the end.
• Cut the corners away from the snowball blocks and press the corners out.
• You will be left with four half-square triangles from each snowball blocks. Press the seams open {it helps to minimize bulk}. Sew the half-square triangles together into four-patches with the snowball fabrics in the centers. Square them up to 2½". Set aside.

Assembly:
• The layout for this quilt is 6 x 8. Finished size is 53" x 67".
• Vertical columns {moving left to right} are one through six.
• Horizontal rows {moving top to bottom} are A through H.

Quilt Top:
• Sew a sashing strip to the left side of each of the 48 snowball blocks. Press the seams towards the snowball block.
• Sew a 1½" setting square on one end of the remaining 62 sashing strips. On the last {62nd} sashing strip, sew a second setting square on the opposite end. Press the seams towards the setting squares.
• Sew a sashing strip with setting square to the top of each of the 48 snowball blocks {you may want to lay your quilt out at this point for even distribution of the colors}. The pressing here gets a little tricky. If you haven’t already, lay out your blocks before you press so that you can press them in opposite directions so the seams will nest together and match up nicely. Once you have your layout established, move left to right and press the seams on all the blocks in column one towards the sashing, column two towards the snowball, alternating through column six.
• You should have sashing across the top and left side of the quilt, with left-over sashing and setting square strips for the bottom and right sides.
• Add a sashing and setting square strip to all of the blocks along the right side of the quilt {column six} so that they are sashed on the top and both sides. Alternate the direction you press each column, moving from top to bottom. On row A, press towards the sashing, then towards the snowball on row B. Continue all the way down to the bottom row H.
• Add a sashing-and-setting-square-strip to all of the blocks along the bottom {row H}. Use the sashing piece with setting squares on both ends for the bottom right corner. Alternate pressing towards the sashing and towards the snowball for each block; starting with pressing towards the sashing.
• Moving left to right, sew all the blocks together in the top row {row A}. Press the seams towards the sashing.
• Sew the second row {row B} together, pressing the seams towards the snowball blocks. Continue to sew the remaining rows together {rows C through H}, alternating the direction you press the seams.
• You should now have eight rows; each row is six blocks wide.
• Sew row A to row B, sew row C to the bottom of row B, continuing until all the rows are sewn together. Press the seams towards the sashing strips.

Border:
• Sew the 2½" x 5½" rectangles into four strips; two strips with 29 rectangles each and two strips with 22 rectangles each. Press the seams to the left.
• Measure your quilt top along the left and right side and vertically down the center. Add the three numbers together and then divide by three. This is your {average} quilt length. Your border strips will be longer than your quilt. To solve this problem, sew some of the seam allowances again {spread evenly across the border}, a smidge more than ¼". It is much less noticeable than cutting off a bit on the ends of each border; your eye often won't even notice the minimal differences in the width of the strips. Start small and adjust as necessary. On the two longer border pieces, take in three seams on each strip and then measure. Continue to adjust the length of the two long border pieces by taking in two seams at a time until it is the desired length of the quilt.
• Match centers of the border and the quilt top. Match the ends of the quilt and border strips and match the border and quilt top at the half-way points between the ends and the center. This is one area of the quilt where I use lots of pins. Make sure the seam allowances are pointed down towards the bottom of the quilt on the left side border and up towards the top of the quilt on the right side border and sew them together with the sashing/quilt top side up. All of the seam allowances on the border strip are moving into your machine and will lay flat. The seam allowances on the quilt top, which go in different directions, will be facing up as you sew, so you can manage them and keep them all flat. Press the seam allowance towards the sashing/quilt top
• Measure the quilt top again, this time across the top and bottom and horizontally across the center. Do not measure the borders; only measure the quilt top. Add the three numbers together and divide by three to find the {average} quilt width. Add ½" to that number and then adjust the top and bottom border strips to size by taking in a few seams at a time.
• Assemble your quilt corners. Sew a 2¼" x 2½" neutral rectangle to each side of the four 2½" squares you cut from your fat quarters. Press seams out. Sew a neutral 2" x 5½" rectangle to the top and bottom of each of those four pieces. You should have four 5½" squares.
• Sew a corner square to either end of the two remaining border pieces. Press the seam allowances towards the corner square.
• The quilt corner squares should match up with the border seams on the sides that are already attached. Match the quilt top center with the border center, and the half-way mark between the center and side seams. The seam allowances on the border should point to the left across the top and to the right across the bottom. Sew with the borders down. Press the seam allowances towards the sashing/quilt top.

Back:
• The seam on the back of the quilt runs horizontally, left to right. I used my corner scraps to make baby snowballs. It is tedious and doesn't look like it is going to work out until the very last second, when they are all stitched in place, but it is so worth it. I off-set mine by leaving two blocks in half pieces and sewing them to the ends of one line of snowballs. I also added a 4½" x 8½" {unfinished} label in the middle of the row. You won't have enough baby snowballs if you leave the label out.
• The back should be roughly, 58" x 71", about 4" larger than the quilt top, giving a little wiggle room for machine quilting.

Quilting:
Quilt as desired. My first Snowball quilt was the first quilt I ever machine quilted, so I did an all-over meander or stipple. I had a bit more machine quilting experience by the time I finished my second Snowball quilt, so I did some custom quilting {swirls, curlicues and feathers} on the second quilt.


Binding:
Try this continuous bias binding tutorial.

Wednesday, June 29, 2011

Snowball Quilt № 2: Finished At Last!

Use what talents you possess; the woods would be very silent if no birds sang except those that sang best. –Henry van Dyke

93 Snowball blocks made from fabric pulled from stash: free
{45 baby, 48 regular}

903 Seams: 25± man hours

723 Sashing Swirls: 7 man hours

192 Corner Curlicues: 6 man hours

1700 yards of quilting thread: $11.43
Batting and backing: $16.30
Total Machine Quilting time: 35± man hours

7 yards of double-fold bias binding: 3 man hours

Making a quilt start to finish: Priceless

Posts about the creation of this quilt:
A Quilt-Along
How One Quilt Became Two
The First Snowball Quilt Finished
Work Begins on the Second Quilt
Update 1
Update 2
Update 3
Back at it After A Long Break
Construction Nearly Completed
Preparing For Machine Quilting
Machine Quilting in Progress
Machine Quilting Almost Finished
Snowball Quilt Tutorial

Today's post brought to you by:
My 2011 Finishes Myra's Ph.D Challenge

Monday, June 20, 2011

Snowball Night: Week 55½

Consider the postage stamp: its usefulness consists in the ability to stick to one thing until it gets there. –Josh Billings

I'm glad I didn't wait for the water soluble thread. Because I would still be waiting instead of really close to finished with the quilting.

OK, so 'really close' is a relative term. I estimate that it will take me about 6 hours to do those flourishes in the corners of the snowballs and then two or three hours on the borders, depending on what I do {I'm thinking feathers, but does anyone have any suggestions?}. When you consider that I've already spent between 23 and 25 hours on it, nine more hours is 'really close.' And with that, I'd better get back to it.

Today's post brought to you by: