Tuesday, April 30, 2013

I Demand A Re-Count

If passion drives you, let reason hold the reins.
–Benjamin Franklin

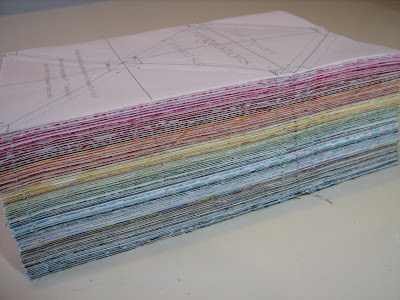
Grace, my ever faithful sewing sidekick, is away on holiday. It will be three weeks tomorrow since I dropped her off for a nice spa retreat. I'm hoping she'll be ready for pick-up tomorrow. In her absence, I've been doing a lot of prep work on quilts I hope to someday finish. One of those prep projects is the result of a half-square triangle swap I did almost a year ago. I got my triangles-in-the-rough back about 5 months ago, and I've been pressing. A lot. Approximately 600 freshly pressed HSTs showing here:

When I put together my triangles for the swap, I formed a plan for what to do with them based on the instructions of putting together a light and a dark fabric for each set of HSTs. I actually heard “neutral and print” and was pretty meticulous with how I put them together. I did roughly the same number of HSTs of every color and split my white and off-white neutrals evenly between the two. As is always the case with swaps, there is room for interpretation and some of what I got back didn't fit in my plans. No matter. The fabrics were still really great, so I unpicked about 300 HSTs {yes, I know :crazy:}, which left me with 600 orphan triangles who needed neutral buddies to become HSTs again. Enter the Go! Fabric cutter, and in a few hours, I was all set to go {yeah, I know. Bad pun, but I couldn't resist. I puns}.

I also put together a few fabrics to fill in on some of the colors I didn't get much back on and will sew those up using the triangle papers we used originally to put our HSTs together. But I'm not showing those because that passes up “particular,” “picky” and “persnickety” and crosses over into “obsessive,” “complusive” and “just plain nutty.”

As I've pressed and cut and sorted, I've been turning over ideas for how to use up 1400± 2½” HSTs. While I was getting my swap triangles done last year I saw a quilt called Triangle Confusion and decided that I wanted to do that. Now that I have the raw materials to work with I've tried a couple of Triangle Confusion layouts. I liked the explosion of triangles with all its patterns and sub-patterns. Then, just for fun, I arranged the HSTs into a more obvious pattern and put it up for an unofficial vote.

I was kind of surprised at the results. Everyone who expressed an opinion chose Diamond Illusion. Although I didn't really know which layout I favored until people started offering opinions {which is why I ask for opinions; it helps me to know what I really want}, I realized that I was leaning more towards Triangle Confusion. It was so bright and cheerful, if not somewhat frenetic. Diamond Illusion was very drab to me even though you could see a definite pattern. Perhaps here was too much brown and orange and green and not enough yellow and pink and turquoise. So I laid it out another way. What do you think?

Green was the color I'd gotten the most back from the swap, so in my first layout I used that for all the small diamonds. It just wasn't working for me. In this new version, I used a different color for each diamond and I think I like it a lot better with more color.

Triangle Confusion is still on my mind, though. I mean, there has to be some way to make it work. So I tried organizing the colors a bit more. I am totally in love with those partial diamonds. The shape is incomplete but the eye finishes it. There's still a lot going on there, though, even with an attempt to make it play nicely by using color to force the sub-patterns. Do you see the large pinwheel in the center?

Still, there is something I really like about Triangle Confusion.

As you can see, I'm still undecided on what to do with all these half-square triangles. Unless I make a king size quilt {which would require another 1700 HSTs and I've almost entirely ruled that out}, I have enough HSTs to make two nice lap-sized quilts; one Diamond Illusion and one Triangle Confusion. The only problem is that I don't have enough of some of the colors to use an even amount in both quilts. Only one of the quilts could be rainbow bright. The other one would have to be mostly green and brown and blue. I could break up the left over browns, blues and greens a bit with solid {meaning unpieced} blocks between pinwheel blocks made of the HSTs and come out with two baby quilts to donate, plus one lap-sized rainbow-y HST quilt for me {design yet to be determined}.

Or, if I decide that I absolutely have to make both a Diamond Illusion and a Triangle Confusion quilt and they both have to have a balanced amount of color, I could make more HSTs, in which case, Jeanette, a swap would definitely be in order :wink:.

And there would probably be enough left-over HSTs for a donation quilt.

Thursday, April 18, 2013

Diamond Illusion or Triangle Confusion?

He puzzled and puzzed till his puzzler was sore. Then the Grinch thought of something he hadn't before. -Dr. Seuss, How the Grinch Stole Christmas

Once upon a time, I made 936 - 2½” half-square triangles for a swap. Our group used a semi-paper pieceing speed method to put together groups of twelve HSTs at a time. For each set of twelve, I used a different main print fabric and I only repeated my neutral white or off-white fabrics in two sets of twelve at most. In the end, I had 78 different sets of 12 HSTs. I kept four HSTs from each set and sent the rest off to the swap hostess. Six months later, I got a box back full of half-square triangle treasure. They sat in that same box for about 3 months, and then in a drawer in my little sewing area, just waiting to be discovered. Last Wednesday, I dropped Grace off for a three-week spa vacation, and when I got home I started pulling the papers off and pressing them open on my spiffy new ironing board cover.


As I've worked, I've been puzzling about exactly what to do with these 936 HSTs when they're all pressed. Actually, I'll have more like 1250 HST's when I'm done. I think there was some room for interpretation in the instructions, which were to pair a light and a dark for each set of HSTs. I heard “print and neutral,” and kind of formed a plan around that. Some of the HSTs I got back don't work for what I had in mind as they are, so I'm unpicking a few more than 300 of them {yes, I know :crazy:} and am going cut a bunch of neutral {white or off-white} HSTs with my Go! fabric cutter {the die that came with it has the perfect triangles} and put them with the prints that I've unpicked from each other. I only have about a hundred more to unpick.

When we were in the planning stages of the swap, Candace at The Double Nickel Quilt Challenge linked a really cool quilt called Triangle Confusion to my monthly finishes linky party, and I decided that's what I wanted to do with my half-square triangles. But as I have been pressing, I've been turning over options for what to really do with these HSTs now that I'm in the process of pressing and sorting. So I laid them out in a diamond pattern to see what it would look like. I really liked it, except it lacks a bit of variety. I chose green for the small diamonds because far and away, green is the color I got back the most of. I'll probably mix it up a little if I go with this layout, but isn't this a cool design?

It is fun to look at each block close up.

As I opened each HST, I tried to guess who made it. Some were easy to guess. Others, not so much.

I love how from far away it gives the illusion that it is a series of interlocking diamonds, but close up you can see each triangle and each print.

I orange. It is a highly underrated color.

I'd really almost made up my mind to go with the Diamond Illusion layout. But just for fun, I laid out a little Triangle Confusion. You can still see the diamond pattern, which I love, but it is an explosion of color.

But you can also see, among other patterns, pinwheels intermingled with the diamonds. Pinwheels are awesome.

Time for some more close-ups. I haven't posted much lately, so it is picture overload today.

It is an interesting block design.

I'm not sure why, but I only took close-ups of three of the four blocks, so this is the last one.

In the first layout, I kept the diamonds each a single color, but I mixed the other colors in everywhere else. I wanted to know how it would effect the overall design if I paired colors in the non-diamond areas {corners} of each individual block.

It is still an interesting pattern, but not quite so much of an explosion, which I think I maybe like. I didn't notice until I was editing photos, that with the colors paired as they are it makes a secondary diamond pattern; or rather, a large pinwheel on point between the diamonds.

That has me wondering what it would look like if I paired it so that the large pinwheels were all one color. I think I might like that best of all {control freak here}, but I'll have to lay it out to see because that might suck all the joy out of Triangle Confusion. I'll probably wait until I get all those other HST's unpicked and the neutral triangles cut, though. I only have about a hundred left.

Even though my puzzler is a little sore, I'm also puzzling over what size to make this quilt. My original plan was a 6 x 8 block layout with a 1" stop border and a sawtooth border beyond that, which finishes at 54” x 70”. That's a really cozy lap-size quilt. But that will leave me with 375± extra HSTs, which I will have to use up in something else. I've pondered other sizes, right on up to a 9 x 11 layout {with no borders} which finishes at a nice 72” x 88” twin size quilt. That will require an additional 300 HSTs beyond what I'm already working with. I kind of like the idea. This quilt is scrappy and patchy and full of calicos, which makes me think of quilting at its roots — quilting out of necessity and using whatever was on hand. Of course, I'm not trying to kid anyone here. I have bins and bins of fabrics and I don't need to quilt, except for the sake of my sanity. I really want this to be a useful quilt, though, because I'm excited about it. A lap size would be used for snuggling under to watch TV or read. I don't know whose twin-size bed this quilt would go on. Maybe I should open an Etsy shop :wink:. Do you think anyone would pay $2300 for a twin-size quilt?

My next thought was to make it square. I really like square quilts. 8 x 8 finishes at 64” square. I even have enough HSTs for a 9 x 9. But then, we're almost back into the bed size quilts, at 72”. So why not go super-size and make it a king? I happen to sleep in a king size bed that needs a pretty quilt on it. But for that, I'd need another 1900 HSTs :faint:.

Anyone want to swap?

Wednesday, April 17, 2013

Random Bits: Vol. 9

If you don't get lost, there's a chance you may never be found.
–Unknown

Thoughts On Boston
My heart is heavy for those who were effected by the bombs at the finish line of the Boston Marathon. It is difficult to make sense of such a tragedy. My thoughts and prayers are with the families whose lives are forever changed.

In the wake of such an event, and with things like this becoming more and more common, it is hard not to let fear become the overriding influence. It is hard to think there might be hope for a world so full of bad. But there is hope. It comes from faith. For me, faith is knowing that God has a plan for me and that even though life is full of hard things and bad things, with His help, I can carve out my own little haven within my own home and I can overcome the hard and the bad. I will do my best to be prepared to help my family and myself when something bad happens us and do my best help others when something bad happens to them and leave the rest up to God. However you define it, faith is the opposite of fear. I choose to act in faith.


New Ironing Board Cover
Almost three years ago, I made a reversible ironing board cover for my small ironing board. Since then, I've done a lot of ironing. I've washed it several times, and worn a hole clean through the fabric. There were still a few good patches here and there, but the main ironing space was pretty much done for.

The other side was even worse.

It was time for a new cover.

I finished this up last week, but haven't had much time for posting. Isn't it pretty? This cover is reversible as well, but I used the same fabric on both sides so I don't have to feel bad when one side gets worn out. I can just flip it over and have the same pretty fabric all over again. I used three layers of pre-shrunk Warm 'n Natural in the middle. I did three layers on the last cover and there was pretty much nothing left in the end. In order to hopefully give the fabric a little bit more wear, I used the last bit of the 10-yard package of Mistyfuse I won three years ago to fuse a layer of white muslin to the back of the fabric. It gave the fabric a nice body, which I'm happy with. Only time will tell if it makes a difference in the wear.

I put a pretty yellow binding on to house the cord that pulls it tight around the ironing board. And I left the original cover and foam padding on the ironing board under my cover to prevent any rust that might occur, due to condensation of steam, being transferred to the side that is down. Every time I wash my cover, I decide I'm going to take that old foam and cover off because they are ugly from the underside, but then I get in there and remember that the metal rusts a bit and decide to leave it.

I've already put this cute little ironing board to use. I dropped Grace off for a three-week holiday last week. She's one of those “fancy” machines that don't require oiling, except by professionals, who take their sweet time and charge you an arm and a leg for it. While she's getting the royal spa treatment, I've got plenty to keep me busy and I'll show you what I've been up to tomorrow. Or as soon as I get the pictures edited.

Today's post brought to you by:
My 2013 Finishes

I Am Way Too Old {and LadyBug is way too young} for General Admission
or Lindsey Stirling Live

It's been almost three weeks now since we had a little adventure with general admission concerts, but I wanted to share it with you anyway.

Lindsey Stirling is one of our favorite YouTube musicians. So when I saw that she was going on tour, I thought it would be fun to go and see her. I bought tickets in mid-January, 2½ months before the concert, and smiled to myself every now and then at the secret I was keeping. Mr. Bug was in on it and we waited until two weeks before the concert for the big reveal. We gave two tickets to my dad for his birthday {hoping he'd use the spare to bring my mom} and at the same time told the Not-So-Little Bugs that we were all going to see Lindsey.

I was certain it was going to be beyond awesome.

People started asking where the concert was, and when we told them the venue, we were informed that there was no seating. At all. I was certain this couldn't be the case. A Lindsey Stirling violin concert certainly would not be without seating. I mean, how could you enjoy the music? I searched the FAQ's on the venue's website, and even tried calling & e-mailing to find out about seating. I hoped they might set up folding chairs or something. But I never heard back. I'm sure they just laughed at my inquiries. Besides the question of seating, there were other objections to the location, namely that it was a bar and we were taking children. But as the concert was billed as “all ages” we decided to take our chances and hope for the best.

As promised, there was no seating. And it was a bar. Fortunately, there was a separated 21-and-older area, to which the alcohol was confined. But there was nothing to be done about the lack of seating.

The opening act was 30 minutes of pure torture. I'm certain that there had been no sound check for this group, because all you could hear was the bass, which vibrated in a very odd place at the base of your throat in the center of your collar bone.

Happy Birthday, Dad. I love you. Oh, and by the way, I'm subjecting you to cruel and unusual punishment as a gift.

We'd managed to find a spot behind the “sound booth” that wasn't overly crowded, relatively speaking, and the shorter persons in our group could climb up onto a raised platform sort of thing and see over the very tall people who crowded in front of us as Lindsey took the stage. As people pressed in, trying to get a better look, it got warmer and warmer. I tied my hair in an actual knot to keep it off my neck. I stood on my tip-toes and peered between the abnormally tall people in front of me to see.

And Lindsey was awesome.

After about an hour, LadyBug had pretty much had her fill of standing and being too hot. She literally melted into a puddle of tears. She doesn't do well with excessive heat and all those bodies were producing a lot of it. She and I went to the back of the venue where the crowd was thinner and sat down by the open doors to cool off. My parents followed shortly and after another 20 minutes or so, we coaxed Mr. Bug and Grasshopper, who was having a marvelous time, out of the mosh pit, via text, and headed home right in the middle of Phantom of the Opera.

I learned several things from this experience. Number 1: check out the venue before you buy the tickets. Number 2: general admission with no seating should be designated as appropriate for ages 13 to 27. Period. Number 3: Lindsey Stirling is really that awesome, and I am determined to attend a concert of hers that has seating.

For now, I'm going to sit back and enjoy her from the comfort of my office chair.

Thursday, April 11, 2013

Miss Butterfly's Flower Garden: A Zig-Zag Quilt Finish

My therapist told me the way to achieve true inner peace is to finish what I start. So far today, I have finished 2 bags of M&M's and a chocolate cake. I feel better already. –Dave Barry

The average time for a quilt from start to finish for me is 2½ years. I hardly ever work on a quilt from start to finish in one go. I almost always work on it a little bit here and there with a few other projects in between and then come back to it and then work on something else, until I finally decide that it is time to finish something, at which time I pick the project that is the closest to being done. This cute little zig-zag quilt is an exception {for the most part} to that rule. For the last seven weeks, it has been {almost} my sole project. I finished it last weekend and it is already in place on Miss Butterfly's bed.

Almost as soon as I got home from the February 16th wedding reception my last project went as a gift to, I stared work on this zig-zag quilt for my niece. My sister and I planned it a year ago for her daughter, Miss Butterfly, and I've had the fabrics cut out since early last summer. And then it sat because I had other, more urgent things to work on. Miss Butterfly's birthday was just past mid-way through March, and I wanted to finish it in time for that. I missed the mark by a couple of weeks, getting it to her last Saturday. Even though I worked on in nearly every day since mid-February, and revised my “finish by” date, I still cut it down to the wire. We had a family get-together at my parent's on Saturday and I wanted to finish it by then so that I could deliver it in person, rather than mailing it to her {it is pretty heavy and the recent hike in postage rates has sucked all the joy out of sending and receiving packages}. The party started at 4:00 pm, but 4:00 was when I was putting the last stitches in the quilt. It's about an hour and twenty minute's drive to my mom's, plus all that hurry-up-and-wait while everyone gets their stuff ready to get out the door, so we didn't get there until 6:00. But it all worked out. Miss Butterfly's quilt was finished when we left and I made the matching pillow case {tutorial here} when we got there.

I designed this quilt to go together quickly. The HST's are 6" finished, making it relatively fast to pull a twin-size quilt together. I'd originally planned to quilt arcs from corner to corner of each triangle, in essence putting a “net” of flowers on the quilt. I even named the quilt Miss Butterfly's Flower Garden because of the effect the quilting would have. But once I got into it, I decided against that, worrying that my arcs wouldn't be even or pretty without marking them first. As the quilt came together I realized that the chevron or zig-zag design and the white Kona cotton are both very modern, but the calicos in the colored rows are more traditional and I wanted the quilting to be a good mix of both. Plus, I like to quilt to enhance the design of a quilt, rather than covering it. I settled on echo quilting just a hair wider than ¼" apart in the white, and then I did some loopy half-flowers in the colored zig-zags. I think it is a good fusion of modern and traditional. And the quilt name still works, which is a good thing because I embroidered the label six months before I even started piecing the quilt. The yellow row is my favorite because the quilting really shows up. I'm not sure why the quilting doesn't show up in the other rows as well as it does in the yellow, but it really pops in the yellow.

This is the biggest quilt I've quilted myself. The finished size is 72" x 96". I estimate it took me between 70 and 80 hours to put together. On the low end, 30 hours for cutting and piecing, 40 hours for quilting about about 5 hours for binding, I think I wound at least 20 bobbins. And yes, those are 1" pieced HST's {:crazy:} around the label on the back {close-up here}. It is a great feeling to have this one finished and delivered to my niece!

Read more about this quilt:
A Start on Piecing
Finished Quilt Top & Label
Quilting in Progress
Quilting in Progress, part 2

Today's post brought to you by:
My 2013 Finishes

Thursday, April 4, 2013

A Stitch In Time: March Finishes Giveaway Winner

Sewing fills my days, not to mention the living room, bedroom, and closets. –Unknown

Surprisingly, we only had 15 entries for the March linky party. I started to wonder if I'd goofed up on the settings and the linky wasn't open all month. I even double-checked, because I did that once {but was fortunate enough to have someone tell me the linky had closed early}, but the settings were all good. So, I hope you were all out doing lots of fun non-sewing kinds of things like dusting off the winter blues with the extra daylight and the first warm days of spring, or squeezing every last bit of enjoyment you could out of summer. For those of you who did enter, fewer entries mean a better chance of winning, right? Plus, I made it around to visit all of you AND I left a comment. And now for the reason we're really here; LadyBug drew our winner this month and she picked #4.

$20 Fat Quarter Shop Gift Certificate


Congratulations to
:partytime: Karla :partytime:


Karla will receive a $20 Gift Certificate from The Fat Quarter Shop! Make sure you click on over and see the beautiful quilt Karla made for her daughter's bed. I love the colors she used! And if you haven't already, check out a few of the other finishes this month. You won't be disappointed!

The April Finishes Linky Party is open, so you can link up as you go throughout the month. Remember to include the April Finishes button {code found in the April post} somewhere in any post you link up. Code for a button for your sidebar can also be found at the bottom of the April post. The giveaway, sponsored by The Fat Quarter Shop, is a charm pack of Avalon by Fig Tree Quilts!

Avalon by Fig Tree Quilts

Today's post brought to you by:

Monday, April 1, 2013

A Stitch In Time: April Finishes Linky Party

People often say that motivation doesn't last. Well, neither does bathing — that's why we recommend it daily. –Zig Ziglar

It's April already! I kind of don't believe it! Did you all like my little April Fool's joke? You know, the one where I didn't get the linky party posted on time? Yeah, that's it. It was an April Fool's joke. We'll go with that and not mention that I didn't think of it at the right time, when I could get it ready before and schedule it to post on time. But here we are. I know there have been a couple of finishes already in April {Shay, I'm talking to you}, so let the linking begin!

To participate in this month's linky party:
• Finish a project {finished as in done, finito, nothing more to add, ready to use/display/give away} with some sort of stitching in it and blog about it or post a photo of it on Flickr.
• Scroll down to see what other bloggers are up to and to link your own finishes.
• Please include the April button in your blog post. Copy the code in the text box below and paste it somewhere in the post you link for this month's finishes. The button is a link to this specific post, so that other bloggers can find their way over and link up too. If you'd like a button for your sidebar, the code is at the bottom of this post.


• Each time you link up a finished project, you're entered to win the April giveaway, a charm pack of Avalon by Fig Tree Quilts from The Fat Quarter Shop! Isn't this fabric line darling?

Avalon by Fig Tree Quilts

• Thank you to The Fat Quarter Shop for sponsoring our giveaway!


The Fine Print {which might be boring but you really should read}:
• Projects must include stitching of some sort. For example: appliqué, crochet, cross-stitch, embroidery, knitting, practical sewing {garment construction, bags, curtains, etc.}, quilting.
• Projects must be completely finished. As in done, finito, nothing more to add, ready to use/display/give away.
• You can pick something new to do, but projects do not have to be started during the month. If you pick up a UFO, Ph.D, WIP and finish it during the month, it counts.
• Finishes must be completed during this month, but you have until noon MST on the 1st of the next month to link your post.
• Post about your finish and then link your specific post {instructions here} above. Links to your blog and not the individual post about your finished project will be deleted.
• Have more than one finish this month? Great! Post about each finish individually and then link the specific posts up separately. Each finish, and therefore each link you add, counts as one entry for this month's giveaway.
• If you've already posted about a finish for this month, there's no need to do a separate post. Just add the button to that post and link up.
• Please copy and paste the code below to include this month's button somewhere in the post {not your sidebar} you link up for this month .

March Finishes

• Don't have a blog? You can link from your flickr account. Just post a picture, include a little note about your finish and a link back here {code included below} in the description. Then join the linky party.


• Want a button for your sidebar? Copy and paste the code below into an HTML gadget for your sidebar. This button is a link to the main A Stitch In Time Linky Party page, which always has the current month's finishes and links to all previous linky parties.

A Stitch In Time Linky Party

• Make sure to visit a few of the other links and leave them some love {ie, a comment}. A good rule of thumb is to visit two links for every one you include.
• Winner of the sponsored giveaway will be drawn randomly from among the links and announced by 8:00 pm MST on the 3rd of the following month.
• Instructions for making an index page to your finishes can be found here.
• Kindly consider changing your comment settings to the pop-up window option for faster and easier commenting for visitors to your blog. Instructions can be found here.