Yesterday I showed you this cute little table topper that I made for my bowling league Christmas party. It was so fun and easy to put together, so I've written up some super simple instructions and included my holly design.
Here’s what you’ll need:
80 – 1½” squares of red and green fabric; 40 of each color
8½” square of neutral fabric for background
Scraps for holly leaves and berries
15” square of fabric for back
9½” x 17” piece of fabric for binding {makes 2¼”- wide binding}
15” square of batting.
• Appliqué the holly to the background fabric using your favorite method. I used fusible webbing and did raw edge machine appliqué on mine.
• Sew the 1½” squares together into pairs of red and green; alternate colors and make two strips that are 2 squares wide by 8 squares long, and two strips that are 2 squares wide by 12 squares long.
• Sew the 8 x 2 strips of squares onto the left and right sides. Finish the topper by sewing the 12 x 2 strips across the top and bottom.
• Quilt as desired.
One of the things I enjoyed most about making this mini is that I used fabrics from four different people on both sides of the country {shout out to Angie, Iris, P. and Wanda!}. It was fun to think about them as I used the fabric they had sent me. I love how the scrappy border turned out.
The holly design is a composite of things I liked from different images. I liked the shape of the leaves from one image, the cut-outs in the center of the leaves from another, the berries from a third image and the placement from yet a fourth image. There was a little bit of tracing, some free-hand drawing, a circle template and a lot of erasing involved as I pulled the different elements all together to make the perfect holly sprig. To size the holly for the 12" table topper, you can either copy the image and paste it into a Word document or save it to your computer and insert it into a Word document. Then set the size of the image to 8" by 8" and you're done. Or you can download the Holly Jolly Christmas 12" Table Topper PDF, and the image is ready to go. Just remember to print it at original size {make sure the "fit to page" option isn't checked}. If you use my holly, even if it's not for a mini like mine, I'd love to see it! Leave me a link so I can come check out your work!
And what could be more fun than a little music to sew by?
Binding a quilt is so much fun. It means that hours and hours of work are about to come together into a finished quilt. I like to do bias binding and a while ago I wrote a tutorial on how to make bias binding in two seams and then you cut—one long continuous strip of bias binding. I've updated the tutorial to include how to sew the double-fold bias binding on, turn corners, join the ends and hand stitch it to the back. There is also a downloadable, printable PDF version available.
I like to make my bias binding 2½” wide, but 2¼” also works nicely for a quilt. The chart at right is a guide for how much fabric you'll need using a square, but you can use a rectangle as well. To get a rough estimate of how much binding any given piece of fabric will produce, divide the length of the fabric by either 2.5 {for 2½” binding} or 2.25 {for 2¼” binding}, multiply that number by the width of your fabric and then divide by 36 to see how many yards. For example, if your fabric is 22” in length and 35” wide and you are making 2½” binding your equation would be:
22 ÷ 2.5 = 8.8
8.8 x 35 = 308
308 ÷ 36 = 8.5 yards
Note: Whether using a square or a rectangle, make sure that the width of your fabric {which would also be the length in the case of a square} is evenly divisible by 3.5 and then add ½” to that measurement in order to avoid waste.
• Begin with a piece of washed, pressed and starched fabric.
• Lay the fabric, right side up, on your cutting mat. Use the grid markings on your ruler to find the 45˚ angle.
• If you are right handed, cut diagonally from the top left corner to the bottom right. If you are left handed, make your diagonal cut from the top right corner to the bottom left.
• Flip one triangle piece over, placing it right sides together with the other triangle, lining up the straight {non-bias cut} edges.
• If you started with a rectangle, make sure the bottom corner lines up. If you started with a square, you need to adjust the fabric for proper sewing. The easiest way to do this is use a ruler and pencil and mark the ¼" seam allowance along the straight {non-bias cut} edge on the wrong side of the fabric. With the fabrics right sides together, slide the fabric so the end of the pencil line matches up with the edge of the fabric opposite it and you have dog ears at both the top and bottom of the seam.
• Sew a ¼” seam and press it open.
• Mark the cutting lines using a ruler and pencil. Begin at the bias cut edge {the edge cut at a 45˚ angle} working left to right for right handers and right to left for left handers and mark the first line 2½” in from the bias edge and continue marking every 2½” inches until you reach the opposite side of your prepared fabric. {Note: if you are making 2¼” binding, adjust your measurements and markings accordingly.}
• When you reach the opposite side of the fabric, cut off any excess fabric that is less than 2½” from the last line you marked. If the width of your fabric was divisible by 3.5 plus ½”, you should not have any left over fabric.
• Mark the ¼” seam intersections on both the upper and lower edges of the fabric.
• Fold the fabric in half right sides together along the width, bringing together the edges where the pencil markings begin and end.
• Slide the bias cut edge to the first marked line.
• Using the pencil markings, line up the bias edge on the fabric closest to you with the pencil line on the opposite edge of the fabric and pin in place.
• Continue lining up the pencil markings at the ¼” seam intersections along the width of the fabric. The fabric should lay flat along the seam you are preparing, but will not lay flat along the fold.
• After each pencil mark has been lined up at the ¼” seam intersection, sew the seam and then press flat.
• This is the fun part. Using a nice pair of scissors cut the binding along the pencil lines. Just keep on cutting — you'll know when to stop. Trust me.
• What you end up with is a lovely piece of bias binding — in two seams!
• Press the binding flat. This is the only pressing I do.
• Trim the triangle off one end of your binding so that it is straight {I forgot this step, but you'll see it later}.
• Fold the binding in half lengthwise, wrong sides together.
• Place the raw edges even with the outer edge of the quilt. Place the start of the binding about the half-way down a long side of the quilt. Leave about 6” from the beginning of the binding and stitch the binding to the quilt using a ¼” seam.
• To make a crisp corner, stop stitching ¼” from the corner.
• Turn the quilt 90˚, so that you are ready to start sewing down the next side. Lift the presser foot and pull the quilt towards you, but leave the thread attached.
• Pull the binding back and away from you, forming a 45˚ angle fold coming in towards the middle of the quilt from the corner.
• Fold the binding towards yourself, covering up the 45˚ fold and lay the binding down, raw edges even with the quilt.
• Start at the corner and continue sewing the binding down.
• When you get back around to where you started the binding, stop stitching about 6” from where the two ends will meet, leaving about 12” between where you started stitching and where you stopped.
• Mark the exact point where the end of the binding meets the start. I just use a pin, but you can mark it however it is most convenient for you.
• If your binding is 2½” wide, mark the binding 2⅜” beyond the point where the binding meets. If your binding is 2¼” mark the binding 2⅛” beyond the point where the binding meets.
• Cut away the excess binding.
• Pull the loose ends of the binding away from the quilt and open them up so right sides are up and wrong sides are down.
• Flip the binding on the right over onto the binding on the left, putting right sides together and rotating the right side binding 90˚ so that it is vertical on the left side binding. The left binding should remain right side up and horizontal, but the corners should match.
• Fold the top right corner of the right side binding down and finger press a 45˚ angle across the binding.
• Mark the 45˚ angle with a pencil.
• Pin the binding back in place and sew along the line.
• Open out the binding to make sure it lays flat and there are no twists in it.
• When you're sure the ends of the binding have been joined correctly, cut away the triangle of fabric on the seam.
• Finger press the seam open.
• Place the binding, right sides together, even with the edge of the quilt and sew the gap closed.
• Fold the binding over the seam allowance and raw edges and wrap it around to the back of the quilt.
• Smooth the binding over and pin the folded edge of the binding so that it covers the seam allowance. To avoid being poked by a pin tuck the ends back into the quilt, keeping the tip of the pin between the layers of binding and quilt.
• When you come to a corner, turn the binding over, extending out past the corner.
• Fold the next side down, creating a mitered corner and pin in place.
• To hand stitch the binding to the back of the quilt, bury your thread in the seam allowance and come up just on the outside of the seam. Push the needle through the binding at the fold and come out ½” away. Put the needle down into the quilt, again, just outside of the seam and push it through ½”. Pull the thread through and continue moving up and down through the binding and the quilt at ½” intervals. When you run out of thread, tie off in the seam allowance and begin again.
• When you come to a corner, make sure to come up through the quilt and out into the corner of the binding that meets the opposite edge.
• Go back down through the binding nearly back from where you came out and push the needle through the quilt ½”.
• Push the needle through the binding back towards the corner, catching the opposite binding in the stitch.
• Go back down through the binding nearly back from where you came out and push the needle through the quilt towards the unstitched edge. Come out of the quilt just beyond where you came out before and continue tacking the quilt down at ¼”—½” intervals until you've gone all the way around.
A teacher's purpose is not to create students in his own image, but to develop students who can create their own image.
–Unknown
Last month {has it been that long already?} I guest posted over at Sew Inspired for her Focus On Free-Motion. One of the things I really love to quilt are swirls, especially in 1" sashing. They just seem to go together really well. There were a couple of questions in the comments on how I quilt my favorite swirls. I finally got my act together and have written up some basic instructions. Click here for a downloadable, printable PDF of this tutorial.
First, I've broken down the design into steps. I alternate the direction that the swirls go, which I think makes for a very pretty effect. The illustration below moves from left to right, but when I quilt, I don't rotate the quilt. North always faces north, east faces east, etc., so I've learned to do swirls up and down and left and right. As you follow the illustration, you'll see that you have to backtrack a little bit, but the swirls are made in one continuous line of quilting, with no stops or starts on a row.
I love to quilt this design in 1” sashing. I think it makes a lovely border. So, I mark my quilt at 1” intervals so that I have a framework that will keep the swirls even.
I always sketch out this design beforehand to make sure I know which way to go to make corners and intersections look seamless. I usually start in the bottom left corner and quilt all the way around the outer edge of the quilt first. I start at the very center of the swirl {step 2 in the diagram above} because this is not only the starting place, but the stopping place and it makes it easier to join the last swirl with the first if you start in the center.
Then I start quilting up the left side, alternating directions as I go.
When I reach the top left corner, I move left to right across the top. This is where sketching the design out really helps, because you know which way to go at the corner. Depending on the size of your blocks, the direction of the swirl may be different. If you are working with odd sized blocks {3”, 5”, 7”, etc.} then you will start and end the same at each corner {swirls will both be up or both be down}. If you are working with even sized blocks {4”, 6”, 8”, etc.} then the corners will be opposite {one swirl will be up and one will be down}.
Once you reach the top right corner, move down the right side of the quilt.
From the bottom left corner move back to the bottom right corner and join the last swirl with the first. I have to work this out on paper every time I do a quilt to make sure that I get it right when I quilt it.
After I have finished the “frame” around the quilt, I go back and fill in any rows or columns. Again, sketching it out beforehand is helpful to know which way to join a new row onto an existing column {or new column onto an existing row}.
Here is the completed sketch.
Here is an example on a quilt. You can see where I marked the sashing to help keep the swirls even.
On this quilt the swirls intersect at every block and run throughout the entire quilt.
And here's another example of the swirls used only as an outside border for this block.
Teaching is reminding others that they know just as well as you. You are all learners, doers and teachers. –Richard Bach
Once upon a time, I guest posted over at Sew We Quilt{formerly Stash Manicure}. My post was a tutorial for the Snowball quilts I've done. At the time, I only had one quilt done, but having just finished the second quilt, I had a renewed interest in the tutorial and realized that it should be posted here as well. And so I proudly present the Scrappy Snowball Quilt Tutorial.
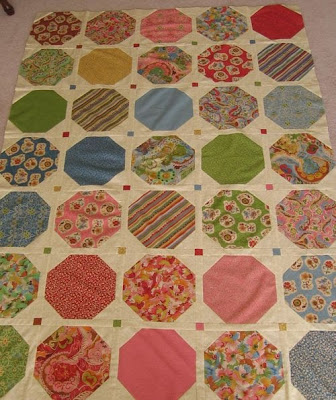
These quilts were inspired by Snowball Night, a quilt-along by Karen of Sew Many Ways, and one of the samples she showed in her post. I pulled the print fabrics from my stash and once I got working with them, I decided that I was going to make two quilts. I was really surprised that I had enough of each of the print fabrics for two quilts, because I don’t have a very big stash. This is what I came up with.
Now that I've shown you what is possible, even from a really small stash, let's get down to the nuts and bolts. The finished size is 53ish" x 67ish" {you know how quilts have a mind of their own and they don't always strictly obey the rules of math}, the perfect size for snuggling under while reading or watching TV. I was working with mostly fat quarters. I had a few half-yard pieces and some larger, odd-sized scraps. This quilt has 20 different fabrics in it. If you are working exclusively with fat quarters, you'll need about 25 fat quarters to make two quilt tops or 13 for one quilt top. For each quilt, you'll also need 4½ yards of neutral fabric {white, off-white, grey, tan, etc.} for your background, binding and back.
From your neutral fabric for each quilt, cut:
• 192 - 2½" squares {for snowballs}
• 110 - 1½" x 6½" rectangles {for sashing}
• 8 - 2¼" x 2½" rectangles {for quilt corners}
• 8 - 2" x 5½" rectangles {for quilt corners}
• 1 - 58" x WOF {minus selvage edges} rectangle {for back}
• 1 - 58" x 26" rectangle {for back}
• 1 - 28" square {for binding, see tutorial for continuous bias binding}
Snowball blocks:
• Mark each of the 2½” background squares diagonally from corner to corner {black line on diagram}.
• Using your clear ruler, measure ½” away from the center diagonal line and make a second line {grey line on diagram}. These are your sewing lines. The pink line between them is the cutting line.
• Place a 2½” square {right sides together} in each corner of your 6½” snowball blocks. Sew along each seam line on all four corners. Make sure to sew just outside of the seam line {ie, on the cutting line side of the seam line}. This will help keep your blocks nice and square. Note: Sewing along the outer seam line will allow you to use the corners for baby snowball blocks to put across the seam on the quilt back. Even though they are pretty small and time consuming, it is worth it in the end.
• Cut the corners away from the snowball blocks and press the corners out.
• You will be left with four half-square triangles from each snowball blocks. Press the seams open {it helps to minimize bulk}. Sew the half-square triangles together into four-patches with the snowball fabrics in the centers. Square them up to 2½". Set aside.
Assembly:
• The layout for this quilt is 6 x 8. Finished size is 53" x 67".
• Vertical columns {moving left to right} are one through six.
• Horizontal rows {moving top to bottom} are A through H.
Quilt Top:
• Sew a sashing strip to the left side of each of the 48 snowball blocks. Press the seams towards the snowball block.
• Sew a 1½" setting square on one end of the remaining 62 sashing strips. On the last {62nd} sashing strip, sew a second setting square on the opposite end. Press the seams towards the setting squares.
• Sew a sashing strip with setting square to the top of each of the 48 snowball blocks {you may want to lay your quilt out at this point for even distribution of the colors}. The pressing here gets a little tricky. If you haven’t already, lay out your blocks before you press so that you can press them in opposite directions so the seams will nest together and match up nicely. Once you have your layout established, move left to right and press the seams on all the blocks in column one towards the sashing, column two towards the snowball, alternating through column six.
• You should have sashing across the top and left side of the quilt, with left-over sashing and setting square strips for the bottom and right sides.
• Add a sashing and setting square strip to all of the blocks along the right side of the quilt {column six} so that they are sashed on the top and both sides. Alternate the direction you press each column, moving from top to bottom. On row A, press towards the sashing, then towards the snowball on row B. Continue all the way down to the bottom row H.
• Add a sashing-and-setting-square-strip to all of the blocks along the bottom {row H}. Use the sashing piece with setting squares on both ends for the bottom right corner. Alternate pressing towards the sashing and towards the snowball for each block; starting with pressing towards the sashing.
• Moving left to right, sew all the blocks together in the top row {row A}. Press the seams towards the sashing.
• Sew the second row {row B} together, pressing the seams towards the snowball blocks. Continue to sew the remaining rows together {rows C through H}, alternating the direction you press the seams.
• You should now have eight rows; each row is six blocks wide.
• Sew row A to row B, sew row C to the bottom of row B, continuing until all the rows are sewn together. Press the seams towards the sashing strips.
Border:
• Sew the 2½" x 5½" rectangles into four strips; two strips with 29 rectangles each and two strips with 22 rectangles each. Press the seams to the left.
• Measure your quilt top along the left and right side and vertically down the center. Add the three numbers together and then divide by three. This is your {average} quilt length. Your border strips will be longer than your quilt. To solve this problem, sew some of the seam allowances again {spread evenly across the border}, a smidge more than ¼". It is much less noticeable than cutting off a bit on the ends of each border; your eye often won't even notice the minimal differences in the width of the strips. Start small and adjust as necessary. On the two longer border pieces, take in three seams on each strip and then measure. Continue to adjust the length of the two long border pieces by taking in two seams at a time until it is the desired length of the quilt.
• Match centers of the border and the quilt top. Match the ends of the quilt and border strips and match the border and quilt top at the half-way points between the ends and the center. This is one area of the quilt where I use lots of pins. Make sure the seam allowances are pointed down towards the bottom of the quilt on the left side border and up towards the top of the quilt on the right side border and sew them together with the sashing/quilt top side up. All of the seam allowances on the border strip are moving into your machine and will lay flat. The seam allowances on the quilt top, which go in different directions, will be facing up as you sew, so you can manage them and keep them all flat. Press the seam allowance towards the sashing/quilt top
• Measure the quilt top again, this time across the top and bottom and horizontally across the center. Do not measure the borders; only measure the quilt top. Add the three numbers together and divide by three to find the {average} quilt width. Add ½" to that number and then adjust the top and bottom border strips to size by taking in a few seams at a time.
• Assemble your quilt corners. Sew a 2¼" x 2½" neutral rectangle to each side of the four 2½" squares you cut from your fat quarters. Press seams out. Sew a neutral 2" x 5½" rectangle to the top and bottom of each of those four pieces. You should have four 5½" squares.
• Sew a corner square to either end of the two remaining border pieces. Press the seam allowances towards the corner square.
• The quilt corner squares should match up with the border seams on the sides that are already attached. Match the quilt top center with the border center, and the half-way mark between the center and side seams. The seam allowances on the border should point to the left across the top and to the right across the bottom. Sew with the borders down. Press the seam allowances towards the sashing/quilt top.
Back:
• The seam on the back of the quilt runs horizontally, left to right. I used my corner scraps to make baby snowballs. It is tedious and doesn't look like it is going to work out until the very last second, when they are all stitched in place, but it is so worth it. I off-set mine by leaving two blocks in half pieces and sewing them to the ends of one line of snowballs. I also added a 4½" x 8½" {unfinished} label in the middle of the row. You won't have enough baby snowballs if you leave the label out.
• The back should be roughly, 58" x 71", about 4" larger than the quilt top, giving a little wiggle room for machine quilting.
Quilting:
Quilt as desired. My first Snowball quilt was the first quilt I ever machine quilted, so I did an all-over meander or stipple. I had a bit more machine quilting experience by the time I finished my second Snowball quilt, so I did some custom quilting {swirls, curlicues and feathers} on the second quilt.
You will do foolish things, but do them with enthusiasm. –Colette
It's like I've been walking around with a big piece of broccoli stuck between my front teeth. And nobody told me. For like eight months.
Have you ever clicked on the Operation Pop-Up Window Pirate button so prominently placed at the top of my sidebar, and promising to show you how to make commenting faster and easier for your readers? And then after you clicked on it wondered why you were still at my homepage ? Well, that happened to me the other day . When I discovered that the button didn't work right, I sifted through my posts to fix the link and found the post it was supposed to link to clear back in June of last year. I was so embarrassed. And it explained a few things .
Yeah. I'm a dork .
My motto is Go Big or Go Home, and now seems like an opportune time to revisit the subjet. A while back, I launched a campaign to convert all of blog-kind to Pop-Up Window Pirates, because I like to browse blogs and leave a little comment for the blog owner. The Pop-Up Window is by far the fastest of the three comment options that Blogger offers. I even made a cool bloggy button for it. Which now works like it is supposed to.
And here are the step-by-step instructions for changing your comment settings. They were specially designed with all types of learners in mind {for those who follow verbal instructions best, read them out loud to yourself} and they will help you to quickly and easily become a Pop-up Window Pirate.
• From your Dashboard, click on the Settings option.
• Under the settings tab, click on the fourth option: Comments.
• In the third heading labeled Comment Form Placement, select Pop Up Window.
• Save your changes {scroll to the bottom of the page} and you're done. You're now officially a Pop-Up Window Pirate. Welcome to the crew, matey.
The imagination exercises a powerful influence over every act of sense, thought, reason — over every idea. –Latin Proverb
A long time ago, I decided to do the Free-Motion Quilt Along{which I'll eventually get started on, but that's another post for another day}. Part of the getting ready process was to get a notebook for jotting down ideas and drawing out designs. Well, I had this brilliant idea to make a notebook cover using the gorgeous Double Pinwheel String Quilt tutorial by P. over at The Way I Sew It. I'm a teesny bit obsessively creative and believe that if making one is good, then making two {or a hundred} is even better, right? Right. I decided that if I was going to go to the trouble of making one quilt journal for myself, while I was at it I probably ought to make one for the genius mastermind behind the beautiful design and then for good measure, I probably ought to make one to give away {which I did already}.
I set to work drawing out a design. I used P.'s template for the narrow pinwheels at full-size and cut it down so that it would come out at 2" finished for the entire block, but still use the angle that she used. I rummaged through my stash and pulled out all the bright, pretty fabrics I could find and started cutting strips. And then some other project had to be finished and this projected sat, completely neglected for a good four months. When I realized that I'd planned out a week-long blog anniversary/birthday giveaway in my head, but didn't actually have anything ready to give away, I decided it was time to dust this project off. About the same time I was getting ready to make the three journals, I found out who my buddy would be for this year's gift exchange for an on-line quilting group I'm in, and decided that a quilt journal would be the perfect gift for her. And so my plans for three quilt journals turned into four. Hooray for more January finishes!
My quilting is wonky {I obviously need to get back to that Free-Motion Quilt Along}, none of my centers match and I pieced the black pinwheels wrong and ended up cutting off all the points on them. I only realized that after I had all 12 pinwheels completely sewn together and there was no way I was going to unpick that many little bitty pinwheels and remake the 48 individual squares it took to make them. So I'm going with, I meant to do that. Other than that, I think they turned out pretty OK.
I used the same fabrics throughout, but each journal is a little different than the others because that's just how scrappy works out. I used some A.H. Arvika that I won during P.'s birthday giveaway for the inside cover and back and put in colored, tabbed pages to divide the book up for putting ideas into different categories. Each divider page has a little quilting quote on it.
There are 50 pages total in each notebook, 10 of which are double-sided graph paper, because I like to draw quilt designs out on graph paper.
I put bright red polka-dots on the back cover because that just seemed like the perfect finishing touch.
I really loved P's response to my journal giveaway, because what she didn't know was that one was already in the mail on the way to her house. When she received it, a little e-mail conversation ensued between us and she said she wanted to know the details of how I made it and wondered if I'd guest blog for her. I told her I was already planning a post on it. And here it is, simul-cast on her blog and mine.
Let's get to the nitty gritty. For a downloadable, printable version of this tutorial, click here. Here's what you'll need to make your own Double Pinwheel String Quilt Journal:
• 20 – 1" strings, at least 5" in length
• 45 – ¾" strings, at least 3½" in length
• 3 – 6¼" x 8½" rectangles of fabric for the inside covers and back of the journal
• A fat eighth each of solid black and solid white fabrics {or your choice of a light and a dark solid fabric}
• ¼ yard Pellon Peltex 72F II double-sided fusible stabilizer {I got mine at JoAnn's, but couldn't find it on their web-site}
• Heat n' Bond Lite
• Chipboard Art Journal {Stampin' Up!® item #107065}
• Spiral Border Punch {Stampin' Up!® item #119872}
• Extra-Large Rounded Tab Punch {Stampin' Up!® item #119684}
• Crop-A-Dile {Stampin' Up!® item #108632}
• Craft knife with a sharp blade
• Pinking shears
If you're interested in making a journal with my pattern {which is sized for the Art Journal because I had them already on hand}, I just happen to know the cutest Stampin' Up!® demonstrator you can order your supplies from. Her name is Jenna and she would be more than happy to help you out. If you live in the US, you can place an order through her web-site or you can contact her directly via e-mail. If you live outside the US, visit Stampin' Up!®'s website to find a demonstrator in your own country.
Here is my design layout and the templates for the journal. When you print it out, make sure your printer is set to print at 100%. Double Pinwheel String Quilt Journal
Use the templates to cut out the double pinwheels. Start with six white {or your choice of light solid} squares cut at 1⅞". Cut them in half on the diagonal and then use the template on the left to cut away the portion that will be the dark double pinwheel. If you need clarification, check out P.'s illustrated instructions. You'll be following the same steps, only on a smaller scale. The template eliminates the need for measuring the angle at which you cut away the excess fabric. Use a ¼" seam throughout.
To make the pinwheels, use the smaller template on the right to cut out 12 pieces from your black fabric {or your choice of light solid}. Make sure that you cut them all with the template right-side up. Use the line on the pattern as the grain line and cut your pieces on the grain.
Assemble the double pinwheel following P.'s illustrated instructions. Make sure you read the part about how to line up the smaller black piece on the white piece {hers are red and blue}, otherwise you'll end up cutting off all your points.
To get started piecing your strings, you'll need a foundation. P. used phone book pages and then tore them away when she was finished. I used foundation sheets, with the intention of leaving them in for extra stablity because of the small scale we're working with here. It did help with that, but even though the sheets are thin, they do add a bit of bulk and when you're working with small pieces, that makes things a little tough. So, it's your call if you want more stability with the foundation sheet or less bulk with old phone book pages {or newsprint} that you will remove later. Whatever your choice, you'll need one 3¼" x 8½" rectangle and six 2" squares.
Mark each foundation piece with a line on the 45˚ angle and begin piecing your string blocks, using the 1" strings on the 3¼" x 8½" rectangle and the ¾" strings on the 2" squares. If you need instructions on piecing your strings, refer to P.'s illustrated tutorial.
When you've finished piecing the string blocks, trim around the edges of all of the pieces and square up the squares to 1⅞" before cutting them in half on the diagonal. When you're finished, you will have 12 string triangles and 12 black and white triangles. Piece them together and then square them up to 1½".
Assemble the pinwheels, again referring to P.'s awesome illustrated instructions if needed. You will have three pinwheels when you finish, which should be squared up 2½".
From your white solid, cut six 1" x 2½" strips and four 1" x 3½" strips. Sew a 2½" strip to the left and right sides of each pinwheel. Then lay the blocks out in a column and sew a 3½" strip in between the blocks and on the top and bottom of the column.
The pinwheel section will be 3½" wide x 8½" tall. Sew this to the 3¼" x 8½" rectangle string block that you pieced earlier. Your patchwork piece will now be 6¼" x 8½", which gives you some wiggle room. Cut a piece of Pellon Peltex 72F II double-sided fusible stabilizer to match your patchwork piece. Use a rotary cutter and ruler so that it is nice and square. Make sure that the protective cellophane is on the back, facing the ironing board {otherwise you'll fuse the whole thing to your ironing board} and iron the patchwork onto the exposed fusible side of the stabilizer. Allow the journal-cover-in-progress to cool completely and then peel away the cellophane. Do all the decorative quilting you'd like on the journal cover, except for the outer edges and along the binder rings.
Turn the journal cover over and fuse the inside cover fabric to the back of the journal cover. Use pinking shears on the top, right and bottom edges and a rotary cutter on the left edge, to trim the cover to the finished size of 5¾" x 8¼".
Remove the chipboard covers from the Art Journal by opening the back cover and pulling the rings apart. Place the chipboard cover over the Double Pinwheel String Quilt Journal and mark the center of each hole along the left side of the journal cover. Use the ¼" punch on the outside handle of the Crop-A-Dile {you know, the one that punches through metal} to punch holes that the binder will go through. Then stitch all the way around the edges of the journal cover.
To make the back cover, fuse a piece of Heat 'n Bond lite to the back of the remaining two 6¼" x 8½" rectangles of fabric. Trim the pieces down to 5¾" x 8¼". Peel the backing off the fabric you chose for the inside and fuse it to the chipboard, making sure to put it on the inside of the back cover. Before you fuse the fabric to the other side, use the craft knife to cut away the fabric covering the holes where the journal binder goes through. Cut two parallel sides from the back and then flip the journal over and cut the remaining two parallel sides to open up the holes. Then fuse the outside fabric to the back cover and cut away the fabric that {again} covers the holes.
Using colored card stock, cut five divider pages at 5½" x 7¾". If you want, add a cute saying or quote to each divider page. I used the following:
• In the crazy quilt of life, I'm glad you're on my block of friends. –Unknown
• Our lives are like quilts – bits and pieces, joy and sorrow, stitched together with love.–Unknown
• When life gives you scraps, make a quilt.–Unknown
• I cannot count my day complete 'til needle, thread and fabric meet. –Unknown
• The only place where housework comes before needlework is in the dictionary. –Mary Kurtz
Use the rounded tab punch to make tabs for the pages. To help with even spacing, do the top and bottom tabs first, then center the middle tab directly between the two. Center the second tab between the top and the middle tabs and the fourth tab between the middle and bottom tabs. Use the Spiral Punch to make holes for the binder to go through. Insert the divider pages at intervals through the journal {I did 10 pages to a section}.
If you would like to add graph paper pages, right click on the image to the right and then choose Save Image As from the menu that pops up. Name and save the image to your hard drive. Open a new Word document and set the paper size to 5½" x 7¾", with top, bottom and right margins at .25" and right margin at .55". While you are in the Margins settings, go to the drop-down menu under the Pages heading and choose Mirror Margins. This will allow you to print the graph paper on both sides of the page and avoid printing in the area were the binder goes through the holes. Insert the graph paper image file into the document, setting the size at 7.26" x 4.77". Use the Position selector on the Picture Tools tab, to center the image on the printable area of the paper. I suggest printing a test page before you print on the Art Journal pages to make sure everything lines up right, based on how your printer feeds the paper through.
To reassemble the journal, place the pages onto the binder, right side up. Thread the journal cover through the binder, right side up. Put the back cover on top of the, with the inside back cover facing up. Push the binder back together and then turn the back cover around to the back. Voila. Your Double Pinwheel String Quilt Journal is finished. Now have lots of fun filling it up with beautiful quilt ideas!


 ? Well, that happened to me the other day
  . When I discovered that the button didn't work right, I sifted through my posts to fix the link and found
  .
. .
.