

Downloadable, printable PDF
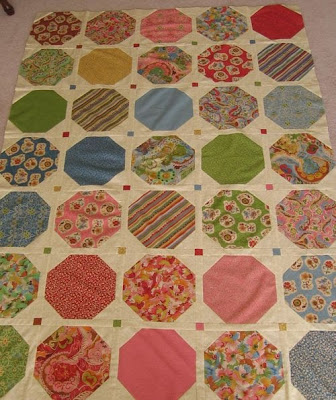
These quilts were inspired by Snowball Night, a quilt-along by Karen of Sew Many Ways, and one of the samples she showed in her post. I pulled the print fabrics from my stash and once I got working with them, I decided that I was going to make two quilts. I was really surprised that I had enough of each of the print fabrics for two quilts, because I don’t have a very big stash. This is what I came up with.

Now that I've shown you what is possible, even from a really small stash, let's get down to the nuts and bolts. The finished size is 53ish" x 67ish" {you know how quilts have a mind of their own and they don't always strictly obey the rules of math}, the perfect size for snuggling under while reading or watching TV. I was working with mostly fat quarters. I had a few half-yard pieces and some larger, odd-sized scraps. This quilt has 20 different fabrics in it. If you are working exclusively with fat quarters, you'll need about 25 fat quarters to make two quilt tops or 13 for one quilt top. For each quilt, you'll also need 4½ yards of neutral fabric {white, off-white, grey, tan, etc.} for your background, binding and back.
From your fat quarters for each quilt cut:

• 63 - 1½" squares {for setting squares}
• 4 - 2½" squares {for quilt corners}
• 102 - 2½" x 5½" rectangles {for stacked coin border}
From your neutral fabric for each quilt, cut:
• 192 - 2½" squares {for snowballs}
• 110 - 1½" x 6½" rectangles {for sashing}
• 8 - 2¼" x 2½" rectangles {for quilt corners}
• 8 - 2" x 5½" rectangles {for quilt corners}
• 1 - 58" x WOF {minus selvage edges} rectangle {for back}
• 1 - 58" x 26" rectangle {for back}
• 1 - 28" square {for binding, see tutorial for continuous bias binding}
Snowball blocks:
• Mark each of the 2½” background squares diagonally from corner to corner {black line on diagram}.

• Place a 2½” square {right sides together} in each corner of your 6½” snowball blocks. Sew along each seam line on all four corners. Make sure to sew just outside of the seam line {ie, on the cutting line side of the seam line}. This will help keep your blocks nice and square.
Note: Sewing along the outer seam line will allow you to use the corners for baby snowball blocks to put across the seam on the quilt back. Even though they are pretty small and time consuming, it is worth it in the end.
• Cut the corners away from the snowball blocks and press the corners out.


Assembly:
• The layout for this quilt is 6 x 8. Finished size is 53" x 67".
• Vertical columns {moving left to right} are one through six.
• Horizontal rows {moving top to bottom} are A through H.

Quilt Top:
• Sew a sashing strip to the left side of each of the 48 snowball blocks. Press the seams towards the snowball block.
• Sew a 1½" setting square on one end of the remaining 62 sashing strips. On the last {62nd} sashing strip, sew a second setting square on the opposite end. Press the seams towards the setting squares.
• Sew a sashing strip with setting square to the top of each of the 48 snowball blocks {you may want to lay your quilt out at this point for even distribution of the colors}. The pressing here gets a little tricky. If you haven’t already, lay out your blocks before you press so that you can press them in opposite directions so the seams will nest together and match up nicely. Once you have your layout established, move left to right and press the seams on all the blocks in column one towards the sashing, column two towards the snowball, alternating through column six.
• You should have sashing across the top and left side of the quilt, with left-over sashing and setting square strips for the bottom and right sides.
• Add a sashing and setting square strip to all of the blocks along the right side of the quilt {column six} so that they are sashed on the top and both sides. Alternate the direction you press each column, moving from top to bottom. On row A, press towards the sashing, then towards the snowball on row B. Continue all the way down to the bottom row H.
• Add a sashing-and-setting-square-strip to all of the blocks along the bottom {row H}. Use the sashing piece with setting squares on both ends for the bottom right corner. Alternate pressing towards the sashing and towards the snowball for each block; starting with pressing towards the sashing.
• Moving left to right, sew all the blocks together in the top row {row A}. Press the seams towards the sashing.
• Sew the second row {row B} together, pressing the seams towards the snowball blocks. Continue to sew the remaining rows together {rows C through H}, alternating the direction you press the seams.
• You should now have eight rows; each row is six blocks wide.
• Sew row A to row B, sew row C to the bottom of row B, continuing until all the rows are sewn together. Press the seams towards the sashing strips.
Border:
• Sew the 2½" x 5½" rectangles into four strips; two strips with 29 rectangles each and two strips with 22 rectangles each. Press the seams to the left.
• Measure your quilt top along the left and right side and vertically down the center. Add the three numbers together and then divide by three. This is your {average} quilt length. Your border strips will be longer than your quilt. To solve this problem, sew some of the seam allowances again {spread evenly across the border}, a smidge more than ¼". It is much less noticeable than cutting off a bit on the ends of each border; your eye often won't even notice the minimal differences in the width of the strips. Start small and adjust as necessary. On the two longer border pieces, take in three seams on each strip and then measure. Continue to adjust the length of the two long border pieces by taking in two seams at a time until it is the desired length of the quilt.
• Match centers of the border and the quilt top. Match the ends of the quilt and border strips and match the border and quilt top at the half-way points between the ends and the center. This is one area of the quilt where I use lots of pins. Make sure the seam allowances are pointed down towards the bottom of the quilt on the left side border and up towards the top of the quilt on the right side border and sew them together with the sashing/quilt top side up. All of the seam allowances on the border strip are moving into your machine and will lay flat. The seam allowances on the quilt top, which go in different directions, will be facing up as you sew, so you can manage them and keep them all flat. Press the seam allowance towards the sashing/quilt top
• Measure the quilt top again, this time across the top and bottom and horizontally across the center. Do not measure the borders; only measure the quilt top. Add the three numbers together and divide by three to find the {average} quilt width. Add ½" to that number and then adjust the top and bottom border strips to size by taking in a few seams at a time.
• Assemble your quilt corners. Sew a 2¼" x 2½" neutral rectangle to each side of the four 2½" squares you cut from your fat quarters. Press seams out. Sew a neutral 2" x 5½" rectangle to the top and bottom of each of those four pieces. You should have four 5½" squares.
• Sew a corner square to either end of the two remaining border pieces. Press the seam allowances towards the corner square.
• The quilt corner squares should match up with the border seams on the sides that are already attached. Match the quilt top center with the border center, and the half-way mark between the center and side seams. The seam allowances on the border should point to the left across the top and to the right across the bottom. Sew with the borders down. Press the seam allowances towards the sashing/quilt top.
Back:

• The back should be roughly, 58" x 71", about 4" larger than the quilt top, giving a little wiggle room for machine quilting.
Quilting:
Quilt as desired. My first Snowball quilt was the first quilt I ever machine quilted, so I did an all-over meander or stipple. I had a bit more machine quilting experience by the time I finished my second Snowball quilt, so I did some custom quilting {swirls, curlicues and feathers} on the second quilt.


Binding:

9 comments:
Wow! Thank you for the amazing tutorial! Your quilt is absolutely beautiful!
So pretty!! Another bookmarked page for me to attempt someday - I love the little squares in the middle of the snowballs - nice!!
Your snowball quilt is very beautiful, thanks for the great tutorial ☺
Bente
I like to quiltblog
I love your snowball quilt. Thank you for sharing your quilt and tutorial.
It really is a gorgeous quilt-well worthy of a tutorial!
Thanks Elizabeth! I'm bookmarking this blog for "maybe, someday". You know how much I've been admiring your snowball quilts. :-)
I love this quilt. I have been thinking about doing a snowball quilt for a while, you have just given me the inspitation to try it.
The quilt is beautiful.
Thanks for sharing.
I was inspired to make a quilt for my daughter adapting this pattern and using fabrics from the different places she has lived and worked. It took a couple of weeks, but the result was , in her own words 'amazing'. So thank you so much for creating the design.
Post a Comment