Monday, May 13, 2013

Quilter's Favorites

The fact that I can plant a seed and it becomes a flower, share a bit of knowledge and it becomes another's, smile at someone and receive a smile in return, are to me continual spiritual exercises. –Leo F. Buscaglia

Geta, over at Geta's Quilting Studio has put together a really fun linky party where you share what you know about quilting. She's put together a list of questions, which you can answer in a post of your own and then link the post on her Quilter's Favorites page. After you've linked, you can click around the blogosphere and see what other quilters have to share. You can answer as many or as few questions as you like, illustrate with photos and links, and have a good time getting to know other quilters.


Before I answer a few of Geta's questions, I would like to welcome new visitors and thank you for stopping by! I have been sewing for 30+ years {I started with doll clothes when I was about 8} and love it. I have two great children, a wonderful husband and besides sewing and quilting, I like to listen to beautiful music, cook, read and garden. And now, on to the question and answer session.

List a few of your favorite quilting notions.
Spray Starch: I love Magic Sizing, which is inexpensive and does a great job. I also really love homemade Magic Starch.
Small Cutting Mat: I like to keep a small cutting mat next to my machine for squaring up blocks and paper piecing.
Small Ruler: A small cutting mat requires a small ruler. I love the Omnigrid 4" x 8" ruler. It has ⅛" markings and is great for squaring up and paper piecing.

Some thoughts about thread:
I love Gütterman 50-weight 100% cotton thread for piecing and AURIfil Makò 50-weight 100% cotton thread for quilting. AURIfil is magical. It becomes a part of the quilt, rather than just lying on top. And it has a pretty shine to it. Red Rock Threads has all the colors available, the best prices I've found and great shipping rates. {And, no, I'm not being paid by AURIfil or Red Rock Threads to endorse them, but I wouldn't say no if they wanted to give me free stuff :lol:.}

Some thoughts about batting:
I love Warm 'n Natural. It is 100% cotton and I like the way it quilts up. You can hand wash and machine dry the batting before quilting to shrink it, which I love {instructions on the packaging}.

Share some tips for easy piecing.
My biggest recommendation is to machine wash & dry and press fabrics with starch {see notes above} before beginning any project. Cut carefully, using the ruler to measure rather than the grid on your cutting mat. Use an accurate ¼" seam, press at every step and square up blocks, as needed.

Some machine quilting tips:
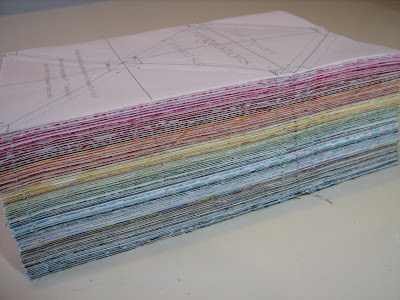
When I took art classes in Jr. High and High School, the teachers always required thumbnail sketches as part of the assignment. I never really got it until I started quilting. My best quilting friend is my pencil and paper. I sketch out designs for almost every quilt I make; both the layout of the blocks and the machine quilting I'm going to put into it. This is a thumbnail sketch for a Pinwheel Sampler quilt I finished last year:

Not only did I sketch out a basic map for the entire quilt, I did individual sketches for each block. The sketches for the individual blocks were larger and allowed me room to include all exact details, while the sketch for the whole quilt helped me to balance out the quilting so I didn't have two blocks next to each other with too similar of quilting. I don't always stick to my sketches. Sometimes a block needs something different when you get to it, but having an idea to start with is always helpful for me.

In addition to doodling on paper, I usually warm up on a practice quilt sandwich made from scraps of batting and muslin, to make sure the quilting comes out how I want it to.

Do you have free tutorials on your blog?
My tutorials include Continuous Bias Binding from start to finish, Pillowcases, FMQ Swirls, Paper Piecing, and a Scrappy Snowball Quilt, among others. All my tutorials can be found here.

Share one of your favorite quilts made by you.
Picking a favorite quilt is like picking a favorite child. I just can't. But you can visit my quilts here.

Do you have a favorite on-line quilt shop?
I love Mary Jo's Cloth Store. They have a huge collection of quilting fabrics and their prices are really great!

Friday, May 10, 2013

Some Assembly Required

It's not the load that breaks you down, it's the way you carry it.
–Lou Holtz
10 yards of fabric
cut to
252 – 2” Squares
504 – 1½” x 2½” Rectangles
1,260 – 1½” Squares
1,044 Triangles

A little over four weeks ago I dropped Grace off at the Babylock dealer where I bought her for a routine physical. And they happily told me they'd give her a good work-over and have her back to me in three or four weeks. When I got home, I got busy preparing for Grace's return. I pressed open about 600 half-square triangles and unpicked about 300 more, making 600 orphaned triangles. Then I cut buddies for them so they could become half-square triangles again and put them all away in a drawer to wait patiently and dust-free, until I got my machine back.

After that, I started cutting fabrics for another quilt that has been kicking around since late 2007. At least. I pieced triangles {which are actually star points} together here and there until I finally couldn't stand it and chain-pieced the rest together one day a few months ago while I was procrastinating quilting the Zig-Zag quilt. 1,044 triangles showing here:

This quilt started out as four blue fabrics from the Toile Christmas fabric line by Moda. I came upon them at my mom's LQS and stood in the store coming up with a plan to use these fabrics in a quilt for LadyBug's bed so that I could buy them. I was going to make a quilt of maple leaves. Blue maple leaves. I still don't know what I was thinking :confused:, except that I love maple leaves. And this pretty blue fabric.

One day, six or so months later, I came across the instructions for a Checkerblock Star by Marcia over at The Quilter's Cache. And I decided that the blue fabrics would be way more cool in a quilt of Checkerblock Stars.

The only problem was that I didn't have enough of my four Toile Christmas blues to make a whole quilt. 60% of the fabric gets pulled into seam allowances. Enough time had passed that the fabric was all sold out so I visited every quilt shop along a 100-mile stretch of I-15 {which runs North and South through Utah & Nevada. And maybe Idaho.} looking for blues to match those four shades of Toile Chirstmas. Matching the exact tone of these blues was tricky, but in the end I pulled together something passable.

At the time, my eyes had not been opened to the beauty of scrappy quilts and the picture in my head for this quilt was for a smooth, subtle and uniform flow of shades. I was reluctant to break up my original four fabrics and add other fabrics to the mix to give me enough for the quilt I wanted to make. Since then, I've come to love scrappy quilts, but I still waver between thinking this particular scrap quilt is going to be really great and a great big mess. Trying to make this work with four shades of the same color in a single fabric line is a little bit tricky. Trying to make it work with those same four shades but in a of a bunch of different fabrics {34, to be precise} is a little bit crazy.

--

Last Tuesday night, I had all my fabrics cut to finish the rest of this quilt. I was pretty sure that Grace would be ready for me to pick her up on Wednesday, because Wednesdays are pick-up and delivery days for the repair man. Also, three weeks was plenty of time for him to give her a tune-up. By noon on Wednesday, I was too anxious to wait any longer for a call from the shop. I called them, but she was not back yet. I guess she'd heard that I had big plans for her and wanted another week off. Reluctantly, I made a mental list of projects that did not require a machine and worked on a hand sewing project that evening.

On Thursday after work I was sitting at the stop sign on the corner down the street from my house, when the shop called to say my machine was in. I banged my head on the steering wheel several times because if they'd have called just 15 minutes earlier, I could have picked Grace up on my way home. The shop is two blocks from where I work {sidebar: on really frustrating work days, I fantasize about walking down the street and escaping in the bolts of fabric}. On Friday, I actually did leave work in the middle of the day and picked up my machine. And then I pretended I was an adult and went back to work. When I got home on Friday afternoon, Grace and I got right to work.

These are the center sections of each Checkerblock Star; 252 – 2” squares, sewn into 63 – four-patches. I used my Go! cutter and the 2" square die, but there was a little distortion because I tried cutting too many layers at a time. I was about a hundred squares in when I decided that I'd better not try to cut six layers of fabric all at once. They are kind of a mess. Not a single one of them measures the 3½” they should. I'm trying to decide if I should fudge it in the seam allowance when I put the blocks together, or if I should unpick them and sew them back together with a scant scant ¼” seam. If I had any fabric left, I think I would probably start from scratch, but that's not an option.

I strip pieced the rest. These are the outer edges and corners of the blocks, 252 – 1½” squares and 504 – 1½” x 2½” rectangles. Half of the rectangles were pieced to squares and the other half will be added to four-patches made from the remaining 1½” squares. I've only got a few strips left to cut.

These are the rest of the 1½” squares {in the rough}. 1,008 of them. They need cutting into 504 pairs and then sewing into 252 four-patches.

Did your eyes glaze over a little at all of those numbers? Mine did at the thought of all the cutting and piecing left to do. I might go back to piecing here and there again, and wrap this up in another 5 years or so. Eventually, all these pieces will become a twin-size quilt, finishing at 72” x 90”. In all, there are 3060 pieces, which includes a border using the triangle blocks.

The math is a little bit boring, and sometimes mind boggling, but I kind of like knowing what sort of dragon I've got to slay. It is highly satisfying to come out on the other side of a project this big and not just see, but know exactly how much work went into it.

I just wish there were some way to measure how many yards of thread I'm using.

Thursday, May 2, 2013

A Stitch In Time: April Finishes Giveaway Winner

The road to success is always under construction. –Lily Tomlin

Thank you to everyone who linked up in April. I really enjoyed looking at all the fun finishes that were linked up this month. I'm excited to announce our winner, drawn by Grasshopper. He picked #6.
Avalong by Fig Tree Quilts


Congratulations to
:partytime: Lee :partytime:


Lee will receive a charm pack of Avalon by Fig Tree Quilts from The Fat Quarter Shop! Make sure you click on over and see Lee's beautiful postage stamp quilt. It is amazing! And if you haven't already, check out a few of the other finishes this month. There were so many fun projects finished in April!

The May Finishes Linky Party is open, so you can link up as you go throughout the month. Remember to include the May Finishes button {code found in the May post} somewhere in any post you link up. Code for a button for your sidebar can also be found at the bottom of the May post. The giveaway is a $15 gift certificate from our sponsor, The Fat Quarter Shop. Make sure you click on over and see what's coming soon!

Today's post brought to you by:

Wednesday, May 1, 2013

A Stitch In Time: May Finishes Linky Party

No matter how many goals you have achieved, you must set your sights on a higher one. –Jessica Savitch

I'd like to send a huge thank you to everyone who linked up in April! I so enjoyed clicking on over to see what you've been up to and if you haven't gotten a comment from me yet, you will soon :wink:. I had two finishes in April, and since I can't very well enter my own giveaway by linking them up, I'll just give you links to them here, because this is the place we get to show off our accomplishments, right? I made a new ironing board cover and I finished a Zig-Zag quilt for my niece. I am working towards a couple of finishes in May, too. And I can't wait to see all the fun projects that you finish up and link this month. I am inspired by your creativity! I can't believe it is May already. I say that every month, but I honestly don't know where the time goes. In any case, let the linking begin!

To participate in this month's linky party:
• Your project must be completed sometime in May, 2013.
• Once you've got your project finished {as in done, finito, nothing more to add, ready to use/display/give away} with some sort of stitching in it and blog about it or post a photo of it on Flickr.
• Scroll down to see what other bloggers are up to and link to your own finishes.
• Please include the May button in your blog post. Copy the code in the text box below and paste it somewhere in the post you link for this month's finishes. The button is a link to this specific post, so that other bloggers can find their way over and link up too. If you'd like a button for your sidebar, the code is at the bottom of this post.


• Each time you link up a finished project, you're entered to win the May giveaway, a $15 gift certificate from The Fat Quarter Shop! Make sure to click on over and see what is coming soon!

• Thank you to The Fat Quarter Shop for sponsoring our giveaway!


The Fine Print {which might be boring but you really should read}:
• Your project must be completed during the month you are linking to.
• Projects must include stitching of some sort. For example: appliqué, crochet, cross-stitch, embroidery, knitting, practical sewing {garment construction, bags, curtains, etc.}, quilting.
• Projects must be completely finished. As in done, finito, nothing more to add, ready to use/display/give away.
• You can pick something new to do, but projects do not have to be started during the month. If you pick up a UFO, Ph.D, WIP and finish it during the month, it counts.
• Finishes must be completed during this month, but you have until noon MST on the 1st of the next month to link your post.
• Post about your finish and then link your specific post {instructions here} above. Links to your blog and not the individual post about your finished project will be deleted.
• Have more than one finish this month? Great! Post about each finish individually and then link the specific posts up separately. Each finish, and therefore each link you add, counts as one entry for this month's giveaway.
• If you've already posted about a finish for this month, there's no need to do a separate post. Just add the button to that post and link up.
• Please copy and paste the code below to include this month's button somewhere in the post {not your sidebar} you link up for this month .

May Finishes

• Don't have a blog? You can link from your flickr account. Just post a picture, include a little note about your finish and a link back here {code included below} in the description. Then join the linky party.


• Want a button for your sidebar? Copy and paste the code below into an HTML gadget for your sidebar. This button is a link to the main A Stitch In Time Linky Party page, which always has the current month's finishes and links to all previous linky parties.

A Stitch In Time Linky Party

• Make sure to visit a few of the other links and leave them some love {ie, a comment}. A good rule of thumb is to visit two links for every one you include.
• Winner of the sponsored giveaway will be drawn randomly from among the links and announced by 8:00 pm MST on the 3rd of the following month.
• Instructions for making an index page to your finishes can be found here.
• Kindly consider changing your comment settings to the pop-up window option for faster and easier commenting for visitors to your blog. Instructions can be found here.

Tuesday, April 30, 2013

I Demand A Re-Count

If passion drives you, let reason hold the reins.
–Benjamin Franklin

Grace, my ever faithful sewing sidekick, is away on holiday. It will be three weeks tomorrow since I dropped her off for a nice spa retreat. I'm hoping she'll be ready for pick-up tomorrow. In her absence, I've been doing a lot of prep work on quilts I hope to someday finish. One of those prep projects is the result of a half-square triangle swap I did almost a year ago. I got my triangles-in-the-rough back about 5 months ago, and I've been pressing. A lot. Approximately 600 freshly pressed HSTs showing here:

When I put together my triangles for the swap, I formed a plan for what to do with them based on the instructions of putting together a light and a dark fabric for each set of HSTs. I actually heard “neutral and print” and was pretty meticulous with how I put them together. I did roughly the same number of HSTs of every color and split my white and off-white neutrals evenly between the two. As is always the case with swaps, there is room for interpretation and some of what I got back didn't fit in my plans. No matter. The fabrics were still really great, so I unpicked about 300 HSTs {yes, I know :crazy:}, which left me with 600 orphan triangles who needed neutral buddies to become HSTs again. Enter the Go! Fabric cutter, and in a few hours, I was all set to go {yeah, I know. Bad pun, but I couldn't resist. I puns}.

I also put together a few fabrics to fill in on some of the colors I didn't get much back on and will sew those up using the triangle papers we used originally to put our HSTs together. But I'm not showing those because that passes up “particular,” “picky” and “persnickety” and crosses over into “obsessive,” “complusive” and “just plain nutty.”

As I've pressed and cut and sorted, I've been turning over ideas for how to use up 1400± 2½” HSTs. While I was getting my swap triangles done last year I saw a quilt called Triangle Confusion and decided that I wanted to do that. Now that I have the raw materials to work with I've tried a couple of Triangle Confusion layouts. I liked the explosion of triangles with all its patterns and sub-patterns. Then, just for fun, I arranged the HSTs into a more obvious pattern and put it up for an unofficial vote.

I was kind of surprised at the results. Everyone who expressed an opinion chose Diamond Illusion. Although I didn't really know which layout I favored until people started offering opinions {which is why I ask for opinions; it helps me to know what I really want}, I realized that I was leaning more towards Triangle Confusion. It was so bright and cheerful, if not somewhat frenetic. Diamond Illusion was very drab to me even though you could see a definite pattern. Perhaps here was too much brown and orange and green and not enough yellow and pink and turquoise. So I laid it out another way. What do you think?

Green was the color I'd gotten the most back from the swap, so in my first layout I used that for all the small diamonds. It just wasn't working for me. In this new version, I used a different color for each diamond and I think I like it a lot better with more color.

Triangle Confusion is still on my mind, though. I mean, there has to be some way to make it work. So I tried organizing the colors a bit more. I am totally in love with those partial diamonds. The shape is incomplete but the eye finishes it. There's still a lot going on there, though, even with an attempt to make it play nicely by using color to force the sub-patterns. Do you see the large pinwheel in the center?

Still, there is something I really like about Triangle Confusion.

As you can see, I'm still undecided on what to do with all these half-square triangles. Unless I make a king size quilt {which would require another 1700 HSTs and I've almost entirely ruled that out}, I have enough HSTs to make two nice lap-sized quilts; one Diamond Illusion and one Triangle Confusion. The only problem is that I don't have enough of some of the colors to use an even amount in both quilts. Only one of the quilts could be rainbow bright. The other one would have to be mostly green and brown and blue. I could break up the left over browns, blues and greens a bit with solid {meaning unpieced} blocks between pinwheel blocks made of the HSTs and come out with two baby quilts to donate, plus one lap-sized rainbow-y HST quilt for me {design yet to be determined}.

Or, if I decide that I absolutely have to make both a Diamond Illusion and a Triangle Confusion quilt and they both have to have a balanced amount of color, I could make more HSTs, in which case, Jeanette, a swap would definitely be in order :wink:.

And there would probably be enough left-over HSTs for a donation quilt.