Wednesday, August 14, 2013

Easy Zucchini Quiche Supreme

When I pass a flowering zucchini plant in a garden, my heart skips a beat. –Gwyneth Paltrow

It is that time of year again. Zucchini season! And I love zucchini. Did you know that August 8th is National Zucchini Day, otherwise known as Sneak Some Zucchini Onto Your Neighbor's Porch day? I don't usually grow zucchini because I have a very kind neighbor who always brings me some of hers. She doesn't even have to sneak it over because I always appreciate it. Zucchini is awesome.

I know it's been a few days, but if someone snuck you some zucchini and you're still wondering what to do with it, try out this bit of deliciousness.

Easy Zucchini Quiche Supreme
2 medium-large zucchini {about 4 cups} sliced about ½" thick and quartered
4 oz. {about 1 cup} coarsely chopped mushrooms
¼-½ cup finely chopped onion {to taste}
3 large tomatoes {about 1½ cups}, seeded and chopped
½ cup butter or butter substitute
2 eggs, well beaten
1 clove garlic, minced or pressed
2 tablespoons dried parsley or ¼ cup + 2 tablespoons fresh minced parsley
¼ teaspoon dried basil or ¾ teaspoon fresh minced basil
¼ teaspoon dried oregano or ¾ teaspoon fresh oregano basil
½ teaspoon salt
½ teaspoon pepper
1 {8 oz.} can crescent rolls
2 teaspoons mustard
2 cups grated Monterey cheese

• In a large skillet, melt butter over medium heat; sauté zucchini, mushrooms and onion until tender. Add tomatoes and heat through.
• Heat oven to 375˚. In a large mixing bowl combine eggs, garlic, parsley, basil, oregano, salt and pepper.
• Separate crescent rolls and press into the bottom of a 9" x 13" pan. Spread the crescent rolls with mustard and place the zucchini, mushrooms, onions and tomatoes into the pan. Pour the egg mixture over the zucchini and then top with cheese.
• Bake for 18-20 minutes, making sure the eggs have set. Let cool 10 minutes before serving.

Notes:
• I made my quiche dairy-free by using butter substitute and vegan mozzarella. I used a lot less than 2 cups {probably about ½ cup} because it just doesn't act or taste like real cheese, but does add a bit of nice flavor. The fresh veggies give enough great flavor that I really didn't miss the cheese at all. As a matter of fact, it was so yummy that Mr. Bug and I ate nearly half the quiche between us.
• If you don't have all of the veggies called for, substitute in what you've got. It would be delicious with yellow squash and/or bell peppers of any color.

For lots of other yummy zucchini recipes, here's a fun recipe book. To print the booklet, print the file out on both sides of the paper {if your printer won't do it automatically, print odd pages first, flip the pages and arrange so that the first page is on top, printed side down, and so forth. Then print the even pages}. Fold down the middle and you've got lots of new recipes to try.

Green Monster Soup

Tuesday, August 13, 2013

South for the Winter

Give thanks for what you are now, and keep fighting for what you want to be tomorrow. –Fernanda Miramontes-Landeros

Since July 4th I've been puttering around with my Patriotic Sampler. This is a project I started before LadyBug was born {which was 11½ years ago. Can she be that old already?} and is my second oldest Ph.D {Project Half-Done}. I keep thinking I need to put it away and work on something else, but there is always another something fun to tinker with on this quilt. I put together 120 flying geese for the outer border. I ♥ geese. And I ♥ this no waste method for flying geese.

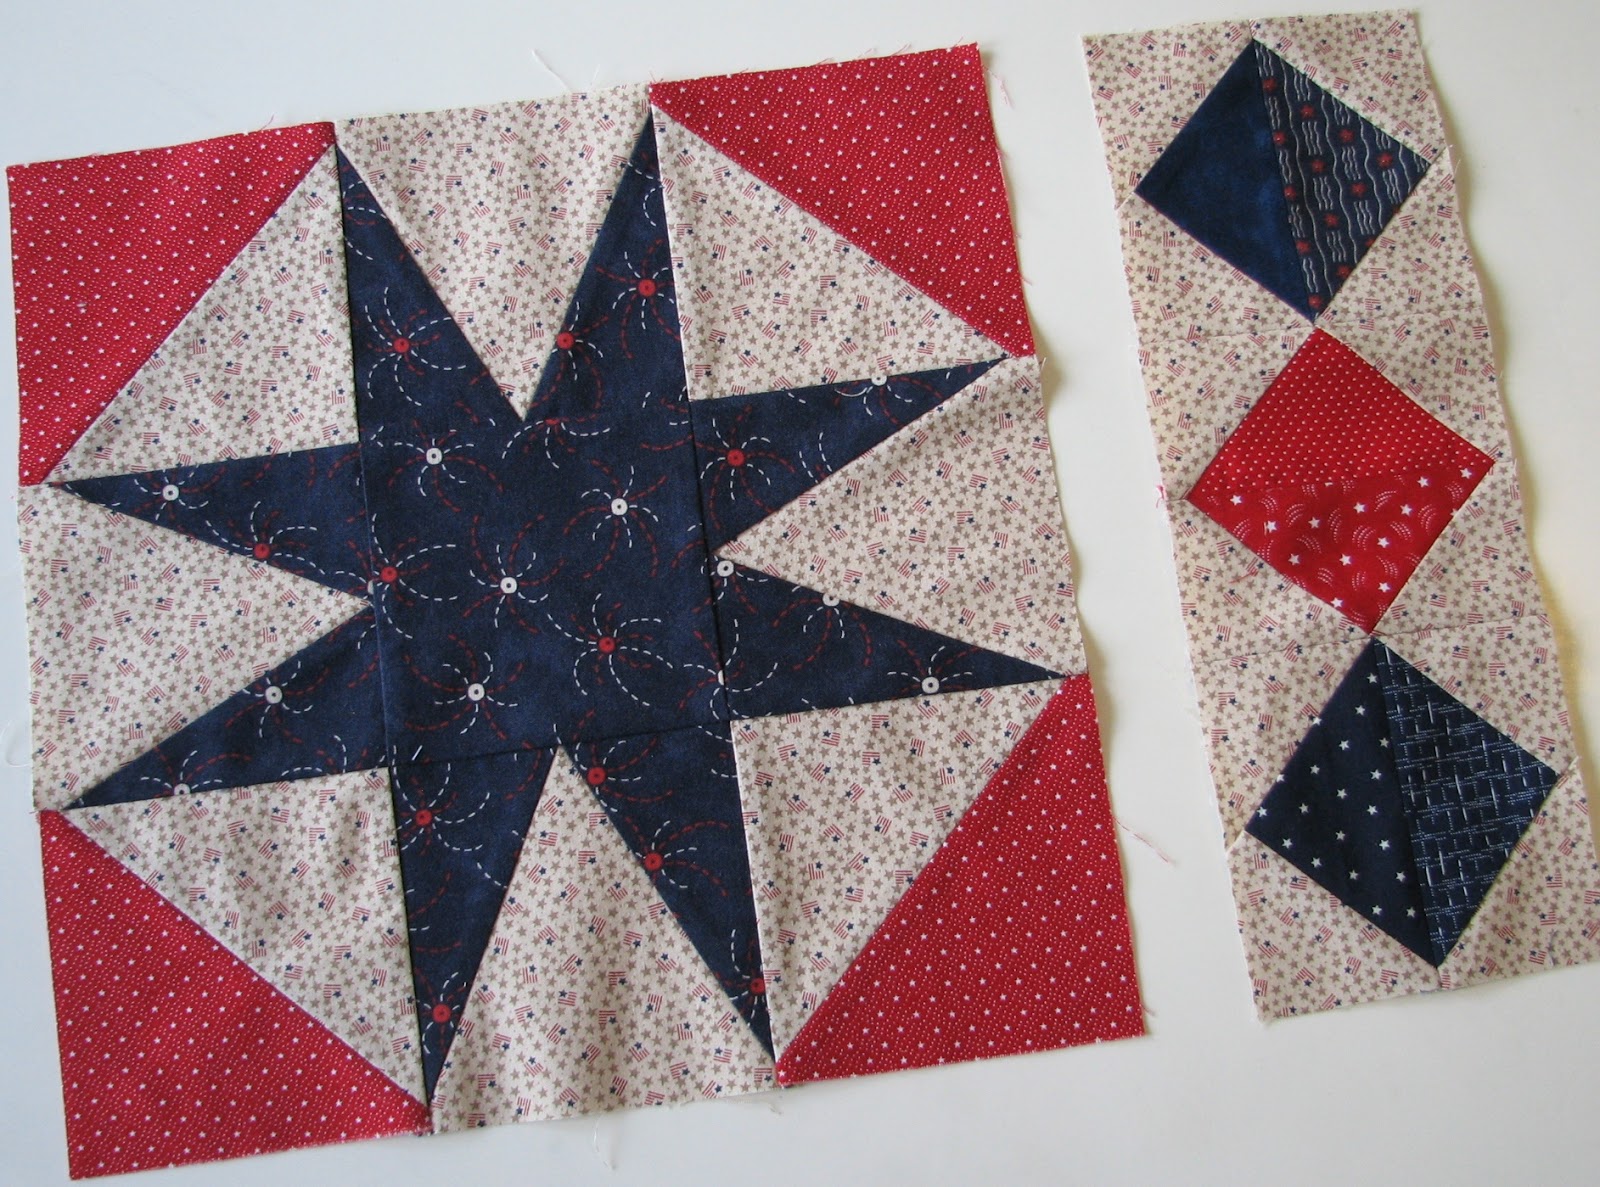
I also made the transition pieces for the centers of the flying geese border. When I originally planned it, I'm pretty sure I envisioned diamonds {square in a square} at the center of each side between the geese. But because I didn't write my plans down anywhere, I had to come up with it twice. When I finally added the border to my layout graphic, I put in alternating strips of red and blue to bridge the gap between the different colors of geese. But once I had my strip sets sewn, I knew they needed to be diamonds rather than squares/rectangles.

I scanned the blocks and added them in to my layout. I really like how the diamonds look {compare to the previous incarnation}.

I forgot math while I was working on my border centers and accidentally made the ones for the sides too long. It took me for. ev. er. to get the background triangles in the corners right. I only discovered the blocks were too long when I went to square them up. But aren't they pretty?

Anything that I went to that much trouble to make does not end up in the discard bin. I decided to use them as a part of one of the place mats. {Backstory: I have this huge blank wall in my kitchen. I want to make a quilt for every month to display there, and have coordinating place mats on the table, which is next to the wall.} Place mats are fun, but I think for any future quilts, I'll probably do a table runner instead of place mats. Because no one will eat off these place mats. Ever.

A row of geese on each place mat was the original plan. I really like how it looks. There will be a sashing strip between and a border of the same width all the way around.

Since I used those discarded stripey diamonds on that first place mat, I decided to mix it up a little on some of the other place mats as well.

Another one with a row of geese.

Three diamonds made out of the geese units seemed to fit really well with this block.

And another one with just geese. It was purely coincidental that I ended up with three with rows of geese and three with something different. It was also purely coincidental that I posted them in alternating order.

I love the pretty red, white and blue scrappiness of this project. And I love the tan that ties everything together.

I started to put sashings on the quilt blocks for the top. Here it is on my living room floor up on my design wall. I debated about whether to just go ahead and put the top together, but I still need to finish eight of those tiny paper pieced five-point stars {I made three more since my last report} that go at the corner of each block. And didn't want the quilt top to sit folded somewhere for the next nine months until I can get to quilting it, so I only put things together insofar as they won't have to be folded when I put them away.

My last bit of puttering was to figure out how to label this puppy. Two of the blocks {The Old Red & Blue and Land of Liberty} are original designs by Marcia Hohn at The Quilter's Cache and her terms and conditions of use stipulate that any original block be credited to her and her site referenced in a permanent manner on the back of the quilt. I picked up ideas and/or patterns for a number of the other blocks from other folks around the internet {credits here}, so in fairness to everyone who creatively contributed, I decided to make a little embroidered label for each block. They are between 1½" and 2" tall and 4" wide. There's also a label with the name of the quilt {This Land Is My Land} and credits to me for piecing, layout and quilting. I'm going to put them together in a strip that will go up the back of the quilt along length of the seam where I join the two pieces of fabric to make it wide enough. I'll add varying lengths of strips of red and blue fabric or left over geese between each embroidered piece. I'll keep the labels in my go bag for hand projects for when I know I'll be sitting and waiting. Hopefully, I'll have them all finished when I'm ready to get this quilt out again and finish it. {Sidebar: LadyBug had her pre-6th grade well-child check the other day. I didn't bring anything to work on because I thought we'd be in and out in a jiffy. The last few times we've been in for other things, I've barely got my project out when they're ushering us out the door. But after 10 minutes in the waiting room, we sat for a full 30 minutes in the exam room before the doctor came in. I think they forgot we were in there because they weren't busy. We entertained ourselves with a rousing game of "I Spy." Lesson learned. Always bring a project. Always.}

I put everything back in the storage tote today. I made myself little notes and put things in separate baggies so that when I get this back out again, I won't have to reinvent. There's not much left to do before I have a flimsy. Eight 5-point paper pieced stars; adding the sashings and corner stones to the blocks, sewing the blocks together, sewing the flying geese border together and adding it to the quilt.

Yes. Next year is definitely the year to get this quilt finished. But for now, the 120 geese {and company} are flying south for the winter.

Wednesday, August 7, 2013

Dairy-Free Basics: Taco Seasoning and Ranch Dressing

Food allergy side effects may include healthier eating habits, improved baking skills and an increased number of meals together at the dinner table. –Tiffany Glass Ferreira at Food Allergy Fun

Going dairy-free was not a lot of fun. Besides all the yummy things like pizza and ice cream that you have to give up, dairy is hidden in a lot of places you'd never expect to find it. Shortly after giving it up I made chicken tacos, which is a favorite at Bug Cottage. At the time, I was kind of at a loss about what to eat and when I planned my menu for that week I figured I'd be safe as long as I didn't put any cheese on mine. As I was putting the tacos together, I decided to check the ingredients and discovered that there is dairy in the seasoning packets you buy from the grocery store. I didn't know what to do. It was getting late and everyone was hungry. So I made the tacos for my family and had a bowl of cereal {with rice milk} for myself.

Later, after talking with a neighbor who has kids with lots of food sensitivities and allergies, she gave me good recipe. If you've been dairy-free for a while, this is probably old news but I thought I'd share anyway.

Taco Seasoning
½ tablespoon chili powder
⅛ teaspoon garlic powder
⅛ teaspoon onion powder
⅛ teaspoon crushed red pepper flakes {or ⅛ teaspoon cayenne pepper}
⅛ teaspoon dried oregano
¼ teaspoon paprika
½ teaspoon Cumin
½ teaspoon salt
¼ teaspoon pepper
½ teaspoon dried onion flakes
¾ teaspoon Pampered Chef Southwest Seasoning {optional}

• Combine all dry ingredients. Add seasoning and ⅓ cup water to one pound of meat. Stir to combine; simmer until the liquid is gone.

--

Ranch dressing was never my favorite, but as soon as I couldn't have it anymore, I suddenly wanted it. My friend, the same one who gave me the taco seasoning recipe, gave me this yummy dairy-free version. I like it a lot better than the lactose-laden original. Probably because it doesn't give me heartburn.

Ranch Dressing
1 cup mayonnaise
2 teaspoons apple cider vinegar
1 tablespoon dried parsley or 3 tablespoons fresh parsley, finely minced
1 teaspoon onion powder
⅓ teaspoon garlic powder
¼ teaspoon salt
¼ teaspoon pepper

• Mix mayonnaise and vinegar together until smooth. Add parsley and spices; stir to combine. Keep refrigerated.

Lately, I've been on a fresh-herb kick. Dried herbs are good. And it takes a little more time to chop fresh ones, but it seems like the fresh ones are just a little bit better. Plus, they make nice garnishes.

Sunday, August 4, 2013

Mormon Messages: Dare to Stand Alone

May we ever be courageous and prepared to stand for what we believe, and if we must stand alone in the process, may we do so courageously, strengthened by the knowledge that in reality we are never alone when we stand with our Father in Heaven.
–Thomas S. Monson, Dare to Stand Alone, October 2011


Saturday, August 3, 2013

Tiny Stars All In A Row

[Miss Tick] said, “Are you listening?”
“Yes,” said Tiffany.
“Good. Now . . . if you trust in yourself . . .”
“Yes?”
“. . . and believe in your dreams . . .”
“Yes?”
“. . . and follow your star . . .” Miss Tick went on.
“Yes?”
“. . . you’ll still be beaten by people who spent their time working hard and learning things and weren't so lazy. Goodbye.”

–Terry Pratchett, The Wee Free Men

Since July 4th, I've been puttering around with my patriotic themed quilt. I finished the last two blocks for the top and then started putting together some tiny 1" paper pieced stars. My little pile has grown from seven to 20 of 31 {27 for the front and four to go on the label on the back of the quilt}.

I also decided to measure my blocks for accuracy. This is one of the first quilts I ever started {it's my second oldest Ph.D} and I knew that some of the blocks were a little off. The blocks I did last year and this were OK, but most of the older blocks needed fixing. Some of them just needed to be taken apart, the pieces squared up and put back together with an accurate ¼" seam allowance. Others, I unpicked, changed out a few fabrics and put back together, and I even completely remade a couple.

I'll probably be moving on to another project soon, but my goal is to have the pieces close to being ready to put together into a quilt top when I get it back out again next year. I'm think I'm done with the stars for now. But I put together the blocks that go in the corners. I love how they came together!

I think I'm going to work on the flying geese a little bit, and then it will be time to put this quilt away for a while. Next year, I will remember to get this out in time to have it finished and displayed for the holiday!