Showing posts with label Once Upon A Time. Show all posts

Saturday, January 11, 2014

Birthday Giveaway

If you always give, you will always have. –Chinese Proverb

Tomorrow is my birthday. I will be 21 with 20 years' experience. And I'm celebrating with a giveaway! 'Cause that's how I like to roll. The story goes like this:

Once upon a time, I won a a half-yard bundle of Carnaby Street in the Cool Peace colorway, from Pat Bravo herself. It was pretty groovy.

The cool thing about half-yard cuts is that there is plenty to share. It is a mathematical law that if you divide something by half, you always have half left. So today I'm giving away a fat quarter bundle of Carnaby Street in the Cool Peace colorway, from Pat Bravo to me to you. The fabrics have been washed, pressed and squared up so "fat quarter" is used loosely here.

The Fine Print:
• To enter this giveaway, leave a comment telling me your favorite color combination. Or just leave a comment. Whichever.
• You can enter today's giveaway only once.
• Non-blogging/non-Google users and international entrants are welcome.
• If you do not have a Google account, use the name/url {url optional} commenting option and make sure you leave your e-mail in your comment in the following format: address (at) domain name (dot) com.
• Comments with no contact information will be deleted.
• Google account users: not sure if your contact information will be attached to your comment? Click here:


• Duplicate comments will be deleted.
• Comment moderation is on, so don't panic when your comment doesn't show up. I'm notified of new comments and will approve them periodically each day, after which they'll show up on the post.
• The giveaway will close at 10:00 pm {MST} on Wednesday, January 15th. Winner will be chosen by random drawing and notified by e-mail and announced here by 8:00 pm on January 16th.

Good luck!

Thursday, July 18, 2013

Feelin' Groovy

Slow down, you move too fast.
You got to make the morning last.
Just kicking down the cobble stones.
Looking for fun and feelin' groovy.

–Paul Simon, 59th Street Bridge Song


Once upon a time, I fell in love with Pat Bravo's Indie fabric line. I was so in love that I bought a half-yard of every print. And I decided to share the love. I gave away a fat quarter bundle. I made some Stitchy Kits, one to keep and one to give away. And then I made a Folded Fabric Star tote bag to tote my Stitchy Kit and stitching projects around in. Lori Holt, designer of the Stitchy Kit left me a comment on the post about that. I love it when famous people comment on my little blog. Ryan Tilby, bass player from Ryan Shupe and the Rubberband left me a comment once. It was awesome. Then he came back and commented again. But that's not the point of this story.

Just over a week ago, lightning struck again. Pat Bravo left me a sweet comment and invited me to enter her Groovy Instagram Contest. I was so flattered. I signed right up for Instagram and spent the next day fiddling around with it and entering my tote bag and Sitchy Kit ensemble in Pat's contest. There were 85 entries. She announced two winners on July 8th and on Monday she announced two more winners.

A half-yard bundle of Pat's newest line, Carnaby St in the Cool Peace colorway is on its way to me. The happy thing about a half-yard cut of fabric is that there is enough to share. And fabric this good is meant to be shared. Just sayin' :wink:.

Thank you, Pat, for a really fun contest. And thank you for making the world a little more beautiful.

Tuesday, July 9, 2013

Seven Days Without Sewing Makes One Weak

Doldrums: \ˈdōl-drəmz\
Noun
1. a spell of listlessness or despondency
2. a part of the ocean near the equator abounding in calms, squalls, and light shifting winds
3. a state or period of inactivity, stagnation, or slump


Once upon a time, about 2½ weeks ago, I kind of fell into a funk. About six weeks ago, I made a major adjustment to my schedule so that I could be around more for the Not-So-Little Bugs during summer. Overall, it has been a really positive change. I like being the first one in at work. I get a lot more done while it's quiet. And I also get to go home before everybody else; before lunch even. I think, too, that going to bed earlier {it's usually still a little bit light out} and getting more sleep has had a positive effect on how many migraines I get and how long they last {i.e., I'm having fewer and they don't hang on for days}.

I'm trying to keep this as non-whiney as possible, but what this little back-story is leading up to is that somewhere in there, I kind of lost my "me" time. And maybe a little bit of me, too. I know that making sacrifices for your kids is part of being a parent. But I kind of felt like there was a whole lot of resistance in the ranks to where I wanted to go {which, in the literal sense, was anywhere but sitting around at home staring at the screens all day}, getting up early to go to work, going to bed early so I could get up early to go to work, and trying to out-stubborn {in a happy, positive, encouraging kind of way} the reticent {or alternately defiant} Not-So-Little Bugs all combined to make me feel like I was kind of failing a little bit at life. Subsequently, not even sewing sounded fun. So for a few days, I didn't.

Going without sewing for a few days is no big deal. Sometimes you just need a little break. Going a whole week without sewing was kind of a red flag for me. I decided that I'd better get back to the machine and I started to write this post. Well, sort of. I had a clever post title {I ♥ puns}. A few more days went by and still no sewing. At around the 11th no-sew day, it became a bit of a game and I decided to see if I could go a full two weeks without sewing. I think that was the turning point and by day 13, I was itching to do something creative. It was the 4th of July and it is kind of my tradition to work on my Patriotic Sampler for a few days every year around this time. {I know. It would make more sense to start working on it in April so it would be finished and ready to display on the 4th.}

I've been working on this sampler for about twelve years now. I started it when I was pregnant with LadyBug. She's eleven. It is my second oldest Ph.D, and I don't know why I don't just finish it already :lol:. I'm so close. Anyway, I decided I'd work on some of the itty, bitty paper pieced stars that go at the corners of the blocks in the sashing. It was then that I found out that my post title was more true than I knew. After the first star {which took an hour because I fussed and fiddled and unpicked a lot to try and get the stripes to line up} I was ready to quit. My sewing muscles {the mental ones that help you push through a boring/difficult/unpleasant part of a project} were seriously out of shape. I persisted, even though I didn't really want to. The non-stripey ones only took thirty minutes each. Seven down. Only twenty more to go.

Cute, no? They finish at 1". Who designed this quilt anyway?
Oh. Right. It was me.

After I'd had my fill of that, I put together one of two remaining blocks for the quilt top. It has been cut out and ready to go for, oh, I don't know. Four years now? This one is called Land of Liberty as was designed by Marcia Hohn at The Quilter's Cache. I kind of love it. Pinwheels and flying geese in the same block? It doesn't get better than that.

For the final block, I had three contenders, only two of which I can remember at the moment, so I won't even bother to tell you about the losers. I showed them to Mr. Bug and he said, hands down, this should be the final block. It is called Spiderweb Star, and it is pretty awesome. {Note: if you make this block, reverse the cutting directions for template piece C/CR.}

I also fiddled around at the old doodle pad {Microsoft Picture Manager & Microsoft Paint} and changed my sashing from tan {the same tan used for most of the block backgrounds. Yeah, not sure what I was thinking there.} to white, moved the blocks around a bit and added the flying geese border. It's kinda wild and crazy. I think it will be a little more mellow with a scrappy collection of reds and blues in the flying geese section. I'm debating about whether or not to add a border between the sashing and the geese and another on the outside of the geese. What do you think?

Block Credits:
Row 1 - left to right
The Old Red and Blue by Marcia Hohn at The Quilter's Cache
Zig-Zag Flag inspired by Karen at The Recipe Bunny
Our Eagle pattern from a BOM my mom did at her LQS

Row 2 - left & right
Glory Flag pattern from a BOM my mom did at her LQS
Crossroads traditional block

Center Section - left to right, top to bottom
Uncle Sam pattern from a BOM my mom did at her LQS
Patriot's Star {modified} at eQuiltPatterns.com
Banner Flag by Elizabeth
US Ribbon at Compuquilt
Pledge of Allegiance Embroidery by Elizabeth

Row 3 - left & right
July Fourth traditional block
54-40 or Fight {modified} or Star Shield traditional block

Row 4 - left to right
Land of Liberty by Marcia Hohn at The Quilter's Cache
Courthouse Steps traditional block
Spiderweb Star at McCall's Quilting

Thursday, May 30, 2013

The String Ring Dresden and the Bogart

Bogart: /ˈboʊ gɑrt/ — Slang, Verb:
1. to take an unfair share of something; keep for oneself instead of sharing. Derived, presumably, from actor Humphrey Bogart's tendency to frequently hold a cigarette between his lips or in his hand, but never to actually smoke it.
Noun:
1. a person who hogs or monopolizes something.
2. a magical creature that takes the form of whatever you fear the most.


Once upon a time, P. made a fabulous String Ring Dresden quilt top {String Dresden Tutorial here}. P. does amazing things with fabric. I loved the colors she picked. I even sent her a few fabrics when she put out a call for more strings in those colors, and it was really fun to see them incorporated into her quilt top. So when she said she wasn't going to quilt it herself, but send it off on a fabulous quilting vacation—destination to be determined, I opened my big mouth and told her I had an idea for those fabulous Dresdens.

A few months later, a box arrived at my doorstep, which I resolutely ignored for a good three months. I was absolutely terrified that I would mess up her beautiful quilt top with my poor quilting skills. Eventually, I took a peek at her flimsy {she had it folded right sides together} and was completely amazed by it all over again. Photographs don't quite do quilts justice. From there, I started fleshing out the quilting plan details in the back of my mind, while still ignoring the quilt in its box for a few more months. Sometime around the five month mark, I knew it was time to get going or send the quilt back. I took a deep breath and started quilting. I stitched in the ditch to stabilize the quilt and then did ¼" echo quilting around all the Dresdens, diamonds and border.

Then I started adding some details. I'm not finished yet, but so far, not bad.

What P. doesn't know, is that when I'm finished with this quilt I'm keeping it. I even got her to send me the binding for it. I told her that I like to put the binding on part-way through the quilting process to keep lint from building up on the quilt top from the excess border of batting. It is true, but I told P. that as part of my evil plot to get possession of this super fabulous quilt. And now that it's here, there's pretty much nothing she can do to get it back :mischief:.

Thursday, May 16, 2013

Folded Fabric Star: Tote Bag Edition

Though my soul may set in darkness,
It will rise in perfect light,
I have loved the stars too fondly
To be fearful of the night.
–Sarah Williams

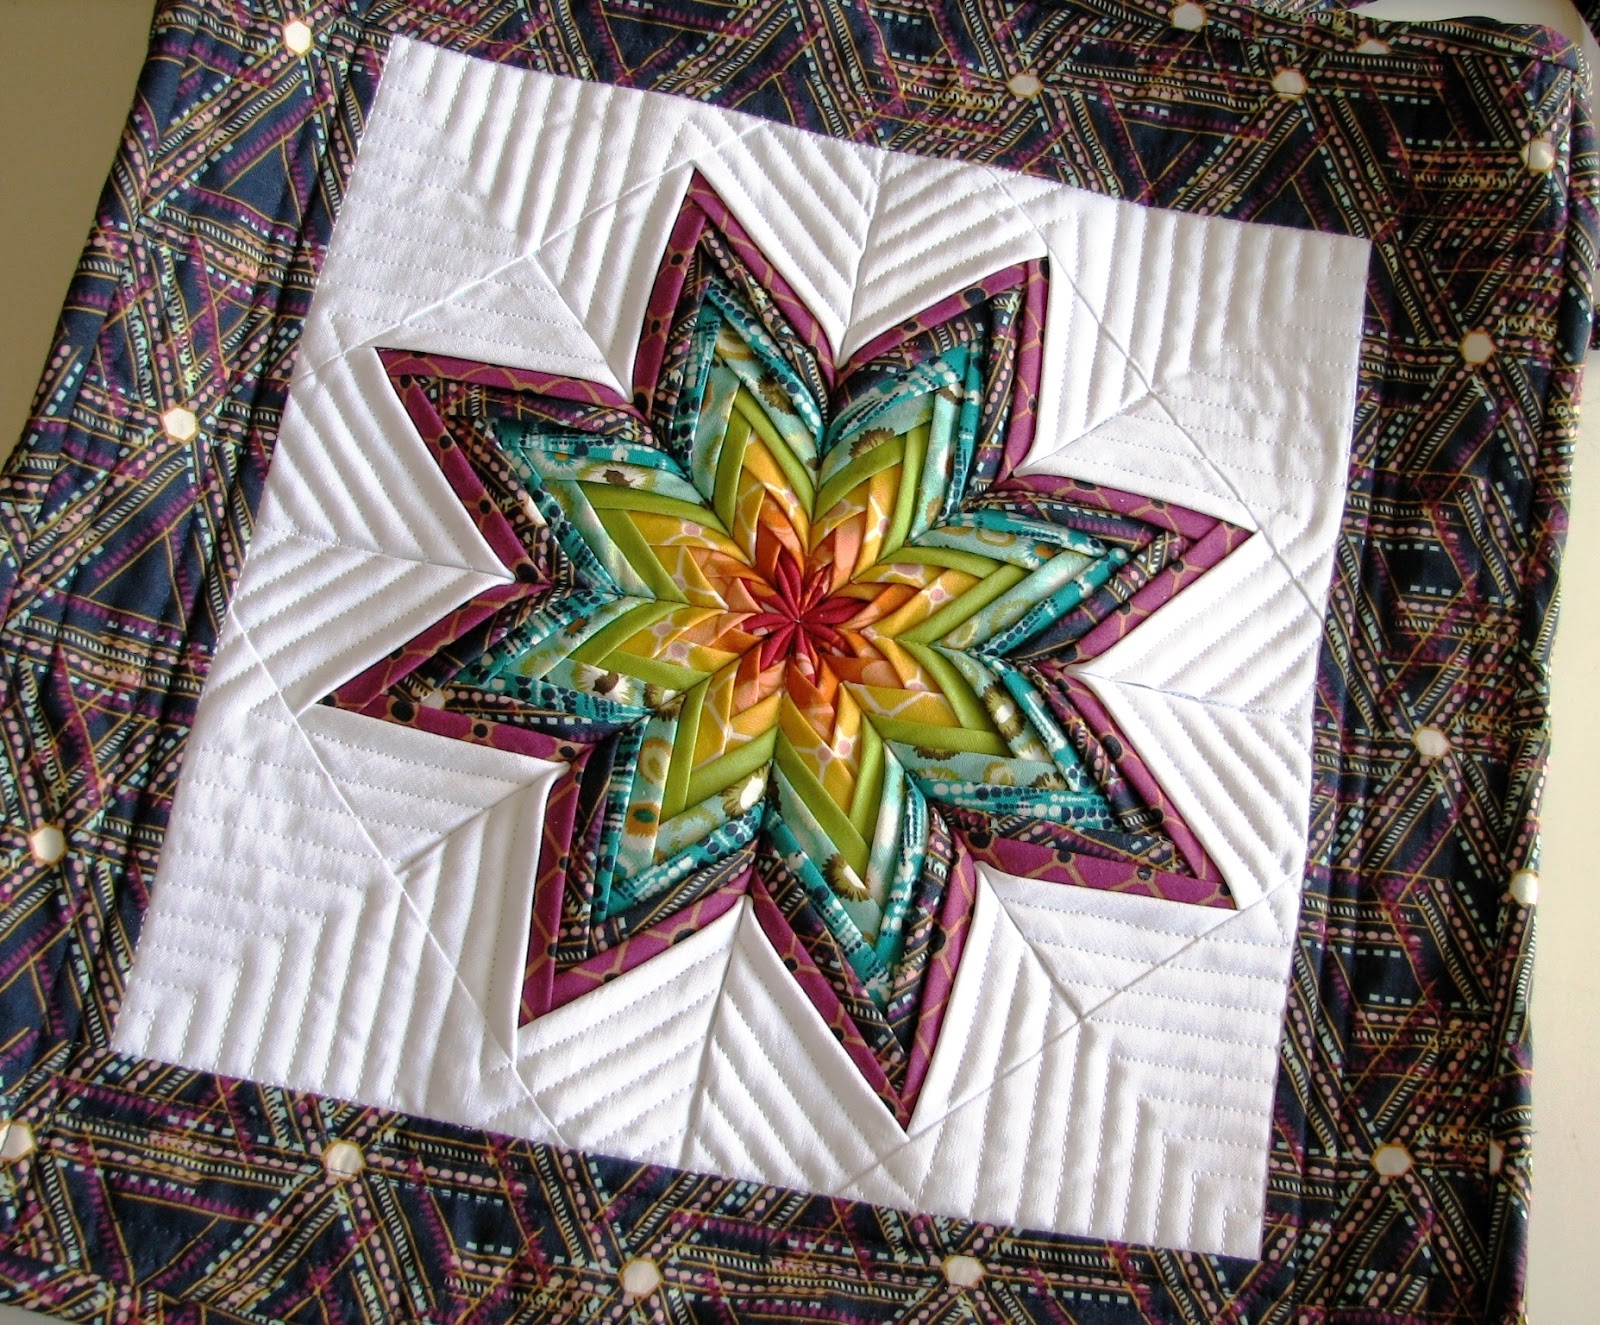
Once upon a time, I saw a really cool folded fabric star. And so, of course, I had to make my own.

I went to the tutorial, decided I was definitely not going to make a pot holder, got my fabrics ready and made a tote bag. Geta deserves the credit for the tote bag idea. I made the straps nice and long so that I could comfortably put it over my shoulder and not have the bag hitting me just under the armpit.

I had most of this bag finished before I dropped Grace off for her three-week spa vacation on April 10th. As a matter of fact, on the day I took her in I only needed to put on the binding around the top of the bag, but didn't dare take the time to do it for fear of missing the repair man's pick-up time {which is not an exact time; just whenever he gets to the shop on that particular Wednesday} and have to wait another week. By the time I got Grace back on May 3rd, I'd moved on to other things and this bag sat for another couple of weeks. Sometime very early this week, or maybe even late last week, I lost my mojo. I got kind of worried there for a bit, when my funk lasted for more than a day or two and my desire to sew completely vanished. I picked this back up with the hope that doing something easy that would lead to a quick finish would put me back in my groove. It didn't really. I finished this several days ago and wasn't super excited about it. Eventually my mojo came back all on its own, though, and I am really happy with how it turned out.

The red center of the star isn't quite large enough. While I actually did read through the directions, when it came time to place the fabrics, I just looked at the pictures and missed the part about moving the second fabric ½” down from the first and leaving ¼” between fabrics after that. But there was no way I was unpicking. Next time I'll remember. And there probably will be a next time because I need a cool tote bag for church. I added an extra color, using nine fabrics instead of just eight. To compensate, I increased the base fabric and the width of the fabric rectangles by ½”. I'm pretty happy with how it turned out. I kept the quilting simple. Actually, I just copied the quilting in the tutorial, not wanting to distract from the star of the show, the folded fabric star. And I didn't think the bag itself needed anything fancy, either. I just did straight lines on the front and diamonds, or intersecting lines at a 45˚ angle on the sides and back.

I'm using this as my “go bag” for hand sewing projects. I almost always take a little something to work on when I know I'm going to be sitting and waiting, like at the doctor's office or the driver license division or a book signing. I've been using ziplock bags, which keep the project clean, but they're a little tricky to juggle when the waiting stops and the business to attend to commences. I'll keep my Stitchy Kit inside it all the time, and I'll probably still use ziplock bags to hold my projects, but I'll slip those inside the tote bag when it is time to go. Functional and fabulous, no?

Today's post brought to you by:
Show Off Friday at Pieceful Life

My 2013 Finishes

Thursday, April 18, 2013

Diamond Illusion or Triangle Confusion?

He puzzled and puzzed till his puzzler was sore. Then the Grinch thought of something he hadn't before. -Dr. Seuss, How the Grinch Stole Christmas

Once upon a time, I made 936 - 2½” half-square triangles for a swap. Our group used a semi-paper pieceing speed method to put together groups of twelve HSTs at a time. For each set of twelve, I used a different main print fabric and I only repeated my neutral white or off-white fabrics in two sets of twelve at most. In the end, I had 78 different sets of 12 HSTs. I kept four HSTs from each set and sent the rest off to the swap hostess. Six months later, I got a box back full of half-square triangle treasure. They sat in that same box for about 3 months, and then in a drawer in my little sewing area, just waiting to be discovered. Last Wednesday, I dropped Grace off for a three-week spa vacation, and when I got home I started pulling the papers off and pressing them open on my spiffy new ironing board cover.


As I've worked, I've been puzzling about exactly what to do with these 936 HSTs when they're all pressed. Actually, I'll have more like 1250 HST's when I'm done. I think there was some room for interpretation in the instructions, which were to pair a light and a dark for each set of HSTs. I heard “print and neutral,” and kind of formed a plan around that. Some of the HSTs I got back don't work for what I had in mind as they are, so I'm unpicking a few more than 300 of them {yes, I know :crazy:} and am going cut a bunch of neutral {white or off-white} HSTs with my Go! fabric cutter {the die that came with it has the perfect triangles} and put them with the prints that I've unpicked from each other. I only have about a hundred more to unpick.

When we were in the planning stages of the swap, Candace at The Double Nickel Quilt Challenge linked a really cool quilt called Triangle Confusion to my monthly finishes linky party, and I decided that's what I wanted to do with my half-square triangles. But as I have been pressing, I've been turning over options for what to really do with these HSTs now that I'm in the process of pressing and sorting. So I laid them out in a diamond pattern to see what it would look like. I really liked it, except it lacks a bit of variety. I chose green for the small diamonds because far and away, green is the color I got back the most of. I'll probably mix it up a little if I go with this layout, but isn't this a cool design?

It is fun to look at each block close up.

As I opened each HST, I tried to guess who made it. Some were easy to guess. Others, not so much.

I love how from far away it gives the illusion that it is a series of interlocking diamonds, but close up you can see each triangle and each print.

I ♥ orange. It is a highly underrated color.

I'd really almost made up my mind to go with the Diamond Illusion layout. But just for fun, I laid out a little Triangle Confusion. You can still see the diamond pattern, which I love, but it is an explosion of color.

But you can also see, among other patterns, pinwheels intermingled with the diamonds. Pinwheels are awesome.

Time for some more close-ups. I haven't posted much lately, so it is picture overload today.

It is an interesting block design.

I'm not sure why, but I only took close-ups of three of the four blocks, so this is the last one.

In the first layout, I kept the diamonds each a single color, but I mixed the other colors in everywhere else. I wanted to know how it would effect the overall design if I paired colors in the non-diamond areas {corners} of each individual block.

It is still an interesting pattern, but not quite so much of an explosion, which I think I maybe like. I didn't notice until I was editing photos, that with the colors paired as they are it makes a secondary diamond pattern; or rather, a large pinwheel on point between the diamonds.

That has me wondering what it would look like if I paired it so that the large pinwheels were all one color. I think I might like that best of all {control freak here}, but I'll have to lay it out to see because that might suck all the joy out of Triangle Confusion. I'll probably wait until I get all those other HST's unpicked and the neutral triangles cut, though. I only have about a hundred left.

Even though my puzzler is a little sore, I'm also puzzling over what size to make this quilt. My original plan was a 6 x 8 block layout with a 1" stop border and a sawtooth border beyond that, which finishes at 54” x 70”. That's a really cozy lap-size quilt. But that will leave me with 375± extra HSTs, which I will have to use up in something else. I've pondered other sizes, right on up to a 9 x 11 layout {with no borders} which finishes at a nice 72” x 88” twin size quilt. That will require an additional 300 HSTs beyond what I'm already working with. I kind of like the idea. This quilt is scrappy and patchy and full of calicos, which makes me think of quilting at its roots — quilting out of necessity and using whatever was on hand. Of course, I'm not trying to kid anyone here. I have bins and bins of fabrics and I don't need to quilt, except for the sake of my sanity. I really want this to be a useful quilt, though, because I'm excited about it. A lap size would be used for snuggling under to watch TV or read. I don't know whose twin-size bed this quilt would go on. Maybe I should open an Etsy shop :wink:. Do you think anyone would pay $2300 for a twin-size quilt?

My next thought was to make it square. I really like square quilts. 8 x 8 finishes at 64” square. I even have enough HSTs for a 9 x 9. But then, we're almost back into the bed size quilts, at 72”. So why not go super-size and make it a king? I happen to sleep in a king size bed that needs a pretty quilt on it. But for that, I'd need another 1900 HSTs :faint:.

Anyone want to swap?

Tuesday, August 14, 2012

Pinwheel Sampler: Quilting Inspired by . . .

To be creative, you need to be able to view things in new ways or from a different perspective. Among other things, you need to be able to generate new possibilities or new alternatives. Tests of creativity measure not only the number of alternatives that people can generate but the uniqueness of those alternatives. The ability to generate alternatives or to see things uniquely does not occur by change; it is linked to other, more fundamental qualities of thinking, such as flexibility, tolerance of ambiguity or unpredictability, and the enjoyment of things heretofore unknown. –Robert E. Franken, Human Motivation, 3rd ed.

A long time ago I read a story about a future where government experts could detect a person's talents shortly after birth. Only those who had extraordinary gifts were allowed to create. They were removed from society where they were encouraged to develop their talents free from the influence of the work other artists. The story follows a man who had prodigious musical talent. From childhood he lived with his caregiver in a secluded cabin in the woods, and his companion ensured that he was never exposed to any music created by anyone but himself.

The man grew curious and somehow procured a piece of Beethoven's work, unbeknownst to his caregiver. He listened to the music, enjoying it immensely. However, as soon as he had finished, he knew that he could not use what he heard in Beethoven's music in his own. His music became inhibited as he avoided those chords and combinations he had heard in the great composer's work, and eventually his transgression was discovered. For his crime, he was forbidden to ever play music again and he was returned to normal society.

Years later, he entered a bar where an forlorn piano sat in the corner. The temptation was too much. The man could not resist. To the shock of the occupants of the bar, he sat down and began to play, producing the most beautiful and harmonious music from the dilapidated and out-of-tune instrument. It was not long before government officials came to deliver justice to this man who had twice broken the law. His punishment was swift and irrevocable; they cut off his fingers. Surely this would prevent him from breaking the law again.

He was assigned to work on a road crew. Without fingers, he couldn't do much, except for hold a sign. He began to hear rhythms in the world around him and again began to make music, this time without an instrument. He used what was around him, beating out beautiful rhythms and melodies. The officials again came quickly to silence the law-breaker, this time taking his life.

I can't remember what this story was called or who wrote it, but I have vivid mental pictures of it. I may have gotten the ending a little confused, but this story has stuck with me for a long time. I've been thinking a lot about creativity in the last little while. Sewfrench posted about it earlier this month, and since then I've been thinking about how I create.

Once upon a time, I thought I was not creative. I thought that a lack of original ideas made me not creative. In the quote above, which I borrowed from Sewfrench's post on this subject, it says that being creative means looking at things from a different perspective and being able to generate new possibilities or new alternatives. To be honest, I don't think there are any new ideas left. It's all been said and done. But that doesn't mean there aren't creative people.

Think about it this way; using a pattern to make an item of clothing is not considered as an uncreative endeavor. You get to choose the fabrics, colors and perhaps make an alteration or two and you make it your own. Even if you choose the very same colors as shown on the pattern, you’ve still created something that was not in existence before. And nobody says, “well, you used a pattern so you’re not creative.” You can apply the same line of thinking to using a recipe when cooking. Why shouldn't that also be the case with quilt making or gardening or writing? Just because you saw it somewhere else doesn’t mean you’re not creative. And why re-invent the wheel every time, anyway? I consider myself to be very creative, but hardly ever come up with a project from nothing. I almost always see something that inspires me and then make it my own.

I'm plugging away at my pinwheel sampler quilt. I'm SO close to finishing it I can taste it. I have 16 {out of 40} sections of sashing left to quilt and I will be there. This quilt has been so much fun to work on. I don't know if I will ever do such a detailed quilting job again, but it is good to know I can. Since I started machine quilting, I have been watching other quilters who do beautiful work and they have inspired me. I've incorporated a lot of that in my quilt. I've used ideas from Wendy at Ivory Spring, Natalia at Piece 'n Quilt, Leah at The Free Motion Quilting Project, Karen McTavish and Lane at That Man Quilts.

More than a year ago, Lane did a quilt he called West of Paris, Texas. I was absolutely in awe of the spiraling or twisting feathers he did. I was in the planning stages for this quilt and was going to do a sort-of braid in the sashings, but when I saw Lane's feathers I knew that's what I wanted to do. This is the last bit of quilting left on my quilt. I left it for last because, while it is completely awesome, it is also scary. This is my second section. The feathers are not uniform and it looks a bit pinched.

It took me probably five or six more sections to get comfortable enough to know how to fill the space evenly and make the feathers more uniform, but I think I'm finally there.

I'm grateful to those, named and unnamed, who inspired me!

Today's post brought to you by:

Tuesday, June 26, 2012

Sew Day: Escaping Critter/Bug Jar Quilt

Though snails are exceedingly slow,
There is one thing I'd like to know.
If I out run 'em round the yard,
How come they beat me to the chard?
–Allen Klein

Once upon a time, about three years ago, my mom and I started making an escaping bug jar quilt. Every week during that summer I went to her house and we had a sew day. We started with the little paper pieced critters. The snail was first because he is too cute, although an actual snail in an actual garden is anything but cute. He is still my favorite of all the escaped critters in the quilt {Coin and Natural Fairy Frost, Chestnut Moda Marbles}.

Then there's the dragon fly who needed a little sparkle {Aqua and Platinum Fairy Frost}.

And the beetle, who must be from some exotic land {Lipstick, Celestial & Violet Fairy Frost}.

The sticky-tongue frog makes me smile. I Photoshopped an eye on there so he wouldn't be sightless for his big internet debut {Lily Pad & Red Fairy Frost}.

If this mouse weren't so cute, I'd be setting a trap. Instead, I'll just leave him some cheese {Silver, Bubble Gum & Natural Fairy Frost}.

I'm pretty sure quilt spiders aren't poisonous. Better play it safe, though, and keep away from Miss Spider {Red & Fog Fairy Frost}.

Mr. Chameleon is playing it pretty casual, trying to blend into the background. If you don't look closely, you'll miss him {Lettuce Fairy Frost}.

When school got back in session, our Bug Jar Sew Days became less frequent. We scaled them back to once an month and we took turns traveling back and forth. The picture below was taking on our last sew day in February of 2010. We got our jars all cut, as well as the corners for the background.

We keep our fabrics in a storage tote. Whoever travels for our sew days gets to take the tote home and the next sew day will be at her house. The tote has been at my mom's house for more than two years. Yesterday, I went to her house for a sew day, but we didn't actually get to the sewing part. We did get all our background corner pieces marked and ready to sew on the corners of the bug fabrics to make them into jars. And we picked out some fabrics for a cute little firefly, which isn't included in the quilt pattern but was made by the same designer. It is too cute not to include, especially since I have some glow-in-the-dark Fairy Frost that will be perfect for it! The storage tote is at my house now. I hope it will be much less than two years before we open it again to work on our quilts.

Thursday, January 12, 2012

A Week of Giveaways Day 4: Project Polka-Dot, Half-Baked

Gold cannot be pure, and people cannot be perfect. –Chinese Proverb

[Note to my non-quilting friends: Up until now, this week of giveaways has been all about raw materials and tools for the quilting/sewing/fabric arts. However, today's giveaway just might be appealing to even the non-quilters, although you might be seriously bored for the next eleven paragraphs.]

Today's post starts with a story. And you have to indulge me because I'm giving away free stuff and if you want the free stuff, you have to at least pretend to humor me. Also, it is my birthday and you have to do what I say.

Once upon a time, I started a project. A fabulous project with lots and lots of polka-dot fabrics. Well, maybe not all of the fabrics were polka-dotted, per se. But they all had dots or spots or circles or roundish splotches of some sort on them. And as my projects tend to do, this one kind of multiplied into more than one project. Because if one is fabulous, four is better, right?

It started out simply. I pulled all the dotty fabrics from my stash. But the project needed even more spots. So, I wrangled swaps for fabrics with dots. I traded quilting services for polka-dotted fabrics. I begged strangers on the internet for their spotty scraps. OK, not total strangers. Just people I've never met in real life. As this project grew and multiplied, I collected fabric with dots from every corner of the earth {special thanks to: Annelise, Iris, Jerri Lynn, Michelle, P., Sara and Wanda for feeding my obsession}. And a terrific plan was set in motion. This plan was for the most fabulous giveaway ever. A giveaway to trump all giveaways. The polka-dotted queen of all giveaways.

I've pooled ideas from several sources {thank you to Sew Sara for her Dots Crazy and Mini Dots quilts, to Amber for her Dot-to-Dot quilt and to American Quilting who published a free pattern called Connect the Dots, which I can no longer find on their site}. I'd originally planned on making two quilts; one for a really special aunt, who did me a solid, and one for me. I knew this polka-dotted monster that I was creating was going to be the best scrappy, dotty, spotty quilt ever. And that right there is reason to share. So I decided that I was going to give away a polka-dot quilt kit. But as I cut and stacked mountains of polka-dots, I discovered that I had enough dots to reach from here to the moon. Or, to make four spotted quilts. And I decided to give away two polka-dotted quilt kits.

My plan was to have those first two quilts finished and ready to go by now so I could show you how fantastic this crazy, dotty project of mine is and get you excited to win a quilt kit to make your own. But work and laundry and dishes kept getting in the way. I adjusted my goal to have just one spotty quilt ready to show you. When I realized that wasn't happening either, I thought for sure that I'd be able to at least get a quilt top done. But my boss gets disgruntled when I don't show up for work and people kept asking me for dinner and clean underwear, so all I have to show you is half of a slightly lumpy, bumpy quilt top.

OK. So it is a really lumpy, bumpy quilt top with seams that don't match. I've been wondering lately if my giveaway is as fantastic as I thought, or if anyone will even want a polka-dotted queen of all monsters?

You see, it is not just the piecing that makes this quilt a little wonky. Admittedly, I thought that piecing curves would be a breeze since I've been sewing since I was eight. But I didn't match my beginning and ending points quite right, which contributes to the wonkiness. Lesson learned.

The major factor in all of this, though, is that the drunkard's path dies I used to cut the pieces are not exactly symmetrical. This poses certain challenges in the assembly because the blocks aren't square. I didn't want to loose a full ¼" on each piece, so I didn't square up the blocks. Lesson learned. Again.

Despite the non-perfectness of it all, I'm still offering my polka-dots as part of my week of giveaways for two three reasons. First, I've been working on this project for over a year and even though it hasn't come off exactly as I'd envisioned, polk-dots make me happy and I'm excited to see this project take shape. Second, I really do think that this is an awesome quilt and I want to share. And third, I've got nothing else for today. So, without further ado, I'm excited to announce today's giveaway.

A Project Polka-Dot Quilt Kit for each of 2 winners

Each kit includes:
• Fabrics to make a 52" x 66" {ish} quilt top as {partially} pictured above, including small and large quarter-circles and background pieces cut with the Go! Fabric Cutter and Drunkard's Path dies and fabrics for 1" and 4" borders
• Fabric for the backing, including sixteen small quarter circles for use in creating a quilt label and row of "floating" dots up the back.
• 2½" wide bias binding to finish your quilt.
• All fabrics have been washed, dried, starched and pressed.
• All fabrics will have dots {defined as spots, circles or roundish splotches of some sort} on them.
• The background fabric for the quilt top and the fabric for the back of the quilt will be the same.
• Quarter circle pieces, borders and binding will each be a different dotted fabric, with the exception of the pieces for the quilt label, which are all white.


Giveaway Addendum
[This is where the non-quilters can tune back in.]
If you're not a quilter, but you like my dots and want to enter my giveaway, I'll pinch-hit for you on the assembly, quilting and binding. In non-quilting terms, I'll make the quilt and send it to you finished and ready for use. Please allow six to eight months weeks for delivery. In the even that two non-quilters enter and win this giveaway, please allow twelve to sixteen months weeks for delivery.

If you're remotely interested, leave me a comment and you'll be entered to win a kit {quilters} or a quilt {non-quilters only} that has 112 different dotted fabrics in it.

The Fine Print:
• You can enter each giveaway during the week only once. However if you spread the word about my week of giveaways by posting on your blog and sending people on over to check it out, you can have one additional entry on one giveaway of your choice. After you post on your blog, leave a comment on my giveaway post for which you'd like a second entry with a link to your post. Please make sure to include my giveaway button somewhere in your post.


Such a Sew and Sew

• Non-blogging/non-Google users and international entrants are welcome.
• If you do not have a Google account, use the name/url {url optional} commenting option and make sure you leave your e-mail in your comment in the following format: address (at) domain name (dot) com.
• Comments with no contact information will be deleted.
• Google account users: not sure if your contact information will be attached to your comment? Click here:


• Duplicate comments will be deleted. Comment moderation is on, so don't panic when your comment doesn't show up. I'm notified of new comments and will approve them periodically each day, after which they'll show up on the post.
• The giveaway will close at 10:00 pm {MST} on Thursday, January 19th. Winner will be chosen by random drawing and notified by e-mail and announced here by noon January 21st.

Good luck!

Week of Giveaways Directory:
• Embroidery Gift Pack
• Backyard Baby Fat Quarter Bundle
• $50 Long-Arm Machine Quilting Gift Certificate
• Machine Quilting Gift Pack